Sending emails from Opter using Microsoft 365
Last updated: 2 March 2026
In this article
If you are using Microsoft 365 as your email service, Opter needs to be authenticated by registering it as an app in Azure.
The app registration in Azure can be done with a PowerShell script; a code example for this is available below. The reason why the script cannot be run in conjunction with an update is that the person running it must have permission to change the Microsoft Entra ID (formerly Azure Active Directory) and be the Microsoft 365 administrator for your organisation, which Opter is not. The script makes the necessary settings in Entra ID and Exchange. Once the script has been run, a few details needs to be entered in the Servers tab of the office settings.
The script below may need to be adjusted to work in your specific environment.
Step 1: Find out sender addresses
Find out the email addresses you use to send emails from Opter. You can specify which email addresses you use when you run the script. Otherwise, you will need to do this manually in Exchange afterwards (see Alternative sender addresses below).
-
Primary address: Available in the Email field on the General tab in the office settings.
-
Address for regions (if applicable): Available in field Email on tab General of the regions.
-
Address for invoices and other financial communications: Available in the Email field on the Invoice details tab in the office settings, or in the regions (if you use it).
The system owner of Opter knows which sender addresses are used by Opter. For more information, see Alternative email addresses.
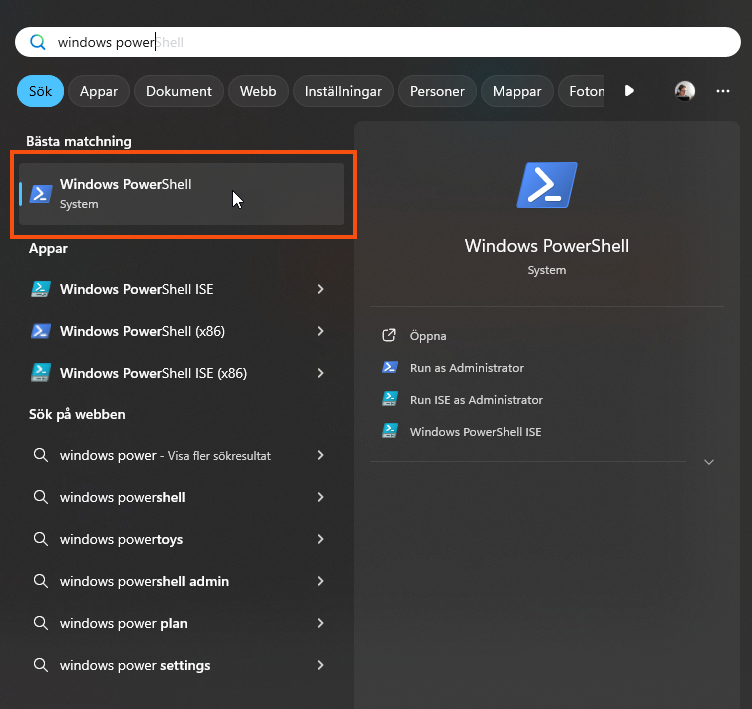
Step 2: Open Powershell
The script must be run in PowerShell 7 or later, not Windows PowerShell ISE. Click on the Start menu in Windows and search for "powershell".
A command prompt opens. Set the RemoteSigned right by pasting the following into the command line and pressing Enter. More information about rights is available on the Microsoft website.
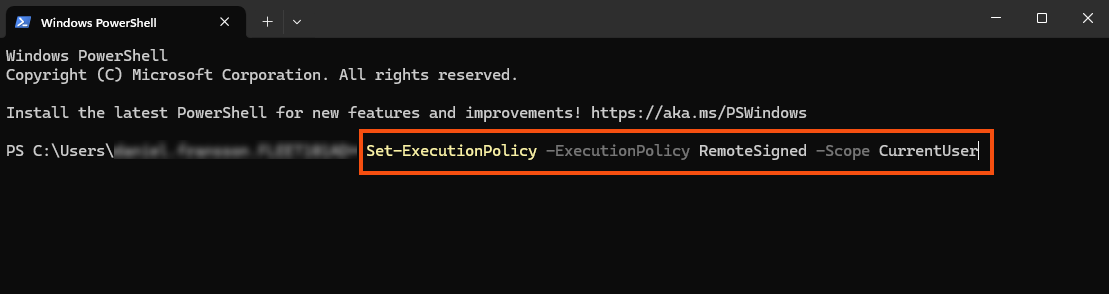
Once you have run the script, you can reset the permissions with the following command
Step 3: Save the script on your computer
Copy and save the following script as regmsgraph.ps1 on your computer. Depending on how your environment is configured, some details in the script may need to be adjusted.
#requires -Version 7.0
<#
End-to-end: Create Entra ID App Registration for app-only Microsoft Graph sendMail
AND scope it with an Exchange Online Application Access Policy using a mail-enabled security group.
Derived naming:
- SecretDisplayName is derived from AppDisplayName (unless overridden)
- GroupName and GroupAlias are derived from AppDisplayName (unless overridden)
Creates:
- App registration (Application)
- Enterprise app (Service Principal)
- Client secret (default 10 years)
- Grants Microsoft Graph application permission: Mail.Send (app role assignment)
- Mail-enabled security group (Distribution Group of Type Security)
- Application Access Policy restricting the app to members of that group
Change log:
2026-02-16 Initial version
#>
param(
# App registration name (source for derived names)
[Parameter(Mandatory = $false)]
[string]$AppDisplayName = "OpterMessageProxy",
# Secret settings
[Parameter(Mandatory = $false)]
[int]$SecretValidYears = 10,
# Optional overrides (if not provided, derived from AppDisplayName)
[Parameter(Mandatory = $false)]
[string]$SecretDisplayName,
[Parameter(Mandatory = $false)]
[string]$GroupName,
[Parameter(Mandatory = $false)]
[string]$GroupAlias,
# Optional: add initial members (UPN/email of mailboxes)
[Parameter(Mandatory = $false)]
[string[]]$InitialGroupMembers = @()
)
$ErrorActionPreference = "Stop"
function Ensure-Module {
param([Parameter(Mandatory = $true)][string]$Name)
if (-not (Get-Module -ListAvailable -Name $Name)) {
Install-Module $Name -Scope CurrentUser -Force
}
Import-Module $Name -ErrorAction Stop
}
function Normalize-Name {
<#
Creates a friendly base string from an app name for use in:
- distribution group display name
- distribution group alias (mailNickname)
Rules:
- keep letters/digits/spaces/hyphens
- collapse whitespace
- trim
#>
param([Parameter(Mandatory=$true)][string]$Name)
$n = $Name -replace '[^\p{L}\p{Nd}\s-]', ' ' # replace other chars with space
$n = $n -replace '\s+', ' ' # collapse spaces
$n = $n.Trim()
return $n
}
function To-Alias {
<#
Creates an Exchange-safe alias from a base name:
- lowercase
- letters/digits/hyphen only
- spaces -> hyphen
- collapse multiple hyphens
- trim hyphens
- max length 64 (Exchange alias limit is typically 64)
#>
param([Parameter(Mandatory=$true)][string]$Name)
$a = $Name.ToLowerInvariant()
$a = $a -replace '\s+', '-' # spaces to hyphen
$a = $a -replace '[^a-z0-9-]', '' # remove non-safe characters
$a = $a -replace '-{2,}', '-' # collapse hyphens
$a = $a.Trim('-')
if ($a.Length -gt 64) { $a = $a.Substring(0,64).Trim('-') }
if ([string]::IsNullOrWhiteSpace($a)) { throw "Could not derive a valid alias from AppDisplayName '$Name'." }
return $a
}
Write-Host "=== Installing/importing modules (may take several minutes, be patient) ==="
Ensure-Module -Name "Microsoft.Graph"
Ensure-Module -Name "ExchangeOnlineManagement"
Import-Module Microsoft.Graph.Authentication
Import-Module Microsoft.Graph.Applications
# ---- Derive names from AppDisplayName (unless overridden) ----
$baseName = Normalize-Name -Name $AppDisplayName
$derivedAliasBase = To-Alias -Name $baseName
if (-not $SecretDisplayName) {
$SecretDisplayName = "$derivedAliasBase-secret"
}
if (-not $GroupName) {
$GroupName = "$baseName - MailSend Allowed"
}
if (-not $GroupAlias) {
$GroupAlias = "$derivedAliasBase-mailsend-allowed"
if ($GroupAlias.Length -gt 64) { $GroupAlias = $GroupAlias.Substring(0,64).Trim('-') }
}
Write-Host ""
Write-Host "=== Derived/selected Names ==="
Write-Host "AppDisplayName : $AppDisplayName"
Write-Host "SecretDisplayName : $SecretDisplayName"
Write-Host "GroupName : $GroupName"
Write-Host "GroupAlias : $GroupAlias"
Write-Host ""
Write-Host "=== Connecting to Microsoft Graph ==="
$scopes = @(
"Application.ReadWrite.All",
"Application.Read.All",
"Directory.Read.All",
"AppRoleAssignment.ReadWrite.All"
)
Connect-MgGraph -Scopes $scopes | Out-Null
$ctx = Get-MgContext
Write-Host "Connected to Graph. TenantId: $($ctx.TenantId)"
Write-Host "`n=== Creating App Registration + Service Principal ==="
$app = New-MgApplication -DisplayName $AppDisplayName -SignInAudience "AzureADMyOrg"
$sp = New-MgServicePrincipal -AppId $app.AppId
Write-Host "App created:"
Write-Host " App (objectId) : $($app.Id)"
Write-Host " ClientId (appId) : $($app.AppId)"
Write-Host " SP (objectId) : $($sp.Id)"
Write-Host "`n=== Creating Client Secret (default $SecretValidYears years) ==="
$end = (Get-Date).ToUniversalTime().AddYears($SecretValidYears).ToString("o")
$pwdParams = @{
PasswordCredential = @{
DisplayName = $SecretDisplayName
EndDateTime = $end
}
}
$secret = Add-MgApplicationPassword -ApplicationId $app.Id -BodyParameter $pwdParams
Write-Host "Secret created (store the value now, it is shown only once)."
Write-Host " Secret expires (UTC): $end"
Write-Host "`n=== Granting Microsoft Graph Application Permission: Mail.Send ==="
$graphAppId = "00000003-0000-0000-c000-000000000000" # Microsoft Graph
$graphSp = Get-MgServicePrincipal -Filter "appId eq '$graphAppId'"
if (-not $graphSp) { throw "Microsoft Graph service principal not found in tenant." }
$mailSendRole = $graphSp.AppRoles | Where-Object {
$_.Value -eq "Mail.Send" -and $_.AllowedMemberTypes -contains "Application"
} | Select-Object -First 1
if (-not $mailSendRole) { throw "Could not find Microsoft Graph app role 'Mail.Send' (Application)." }
$assignBody = @{
principalId = $sp.Id
resourceId = $graphSp.Id
appRoleId = $mailSendRole.Id
}
New-MgServicePrincipalAppRoleAssignment -ServicePrincipalId $sp.Id -BodyParameter $assignBody | Out-Null
Write-Host "Granted: Mail.Send (Application)"
Write-Host "`n=== Connecting to Exchange Online ==="
try {
Connect-ExchangeOnline -ErrorAction Stop | Out-Null
} catch {
Write-Warning "Connect-ExchangeOnline failed. Retrying with device code..."
Connect-ExchangeOnline -Device -ErrorAction Stop | Out-Null
}
Write-Host "`n=== Creating Mail-Enabled Security Group ==="
# Mail-enabled security group is created as a Distribution Group with -Type Security
$dg = New-DistributionGroup -Name $GroupName -Alias $GroupAlias -Type Security
Write-Host "Group created:"
Write-Host " Name : $($dg.DisplayName)"
Write-Host " Alias : $($dg.Alias)"
Write-Host " SMTP : $($dg.PrimarySmtpAddress)"
if ($InitialGroupMembers.Count -gt 0) {
Write-Host "`nAdding initial group members..."
foreach ($m in $InitialGroupMembers) {
Write-Host " + $m"
Add-DistributionGroupMember -Identity $dg.Identity -Member $m
}
} else {
Write-Host "`nNo initial members provided. Add allowed mailboxes to: $($dg.PrimarySmtpAddress)"
}
Write-Host "`n=== Creating Application Access Policy (RestrictAccess) ==="
New-ApplicationAccessPolicy `
-AppId $app.AppId `
-PolicyScopeGroupId $dg.PrimarySmtpAddress `
-AccessRight RestrictAccess `
-Description "Restrict app-only Graph mail access to members of $($dg.PrimarySmtpAddress)" | Out-Null
Write-Host "Application Access Policy created."
Write-Host "`n=== OUTPUT (save securely) ==="
Write-Host "Ms Graph Tenant Id : $($ctx.TenantId)"
Write-Host "Ms Graph Client Id : $($app.AppId)"
Write-Host "Ms Graph Client Secret : $($secret.SecretText)"
Write-Host "Secret Expires (UTC) : $end"
Write-Host "Scoped Group SMTP : $($dg.PrimarySmtpAddress)"
Write-Host ""
Write-Host "Test examples (EXO):"
Write-Host " Test-ApplicationAccessPolicy -AppId $($app.AppId) -Identity allowed.user@yourdomain.com"
Write-Host " Test-ApplicationAccessPolicy -AppId $($app.AppId) -Identity notallowed.user@yourdomain.com"
Write-Host ""
Write-Host "Reminder: app-only sending uses POST /users/{id|UPN}/sendMail (not /me/sendMail)."
Disconnect-ExchangeOnline -Confirm:$false | Out-Null
Disconnect-MgGraph | Out-NullWhat does the script do?
Let’s break it down into blocks.
-
Lines 24–96 set variables that are used later in the script and ensure that the values for the variables work.
-
Lines 98–126 install the Azure modules needed for the rest of the script to work. The modules are placed in C:\Program Files\WindowsPowerShell\Modules\.
-
Lines 128–137 log in to Microsoft Entra ID (formerly Azure Active Directory) with the permissions required to complete the app registration.
-
Lines 139–178 register Opter as an app in Azure with the name "OpterMessageProxy" and grant that app permission to send emails. You can change the name "OpterMessageProxy" to something else on line 27, but it is easier to keep the default name if you need to contact support for any reason.
-
Lines 180–214 create a permission group in Exchange with limited rights and add OpterMessageProxy to it.
-
Lines 216–230 show the information that must be entered in the office settings in Opter (tab Servers).
Step 4: Run the script
Run the script from PowerShell 7.0 or later by pasting the path to the file regmsgraph.ps1 into the command line.
-
If you want to add the sender addresses manually in Exchange later, run the script according to line 1 below. Replace "C:\Temp" with the path where you saved the script.
-
If you want to add the sender addresses now, use line 2 when running the script and replace the path to the script ("C:\Temp") and the email addresses with the correct ones.
PS C:\Temp\regmsgraph.ps1
PS C:\Temp\regmsgraph.ps1 -InitialGroupMembers @("info@exempel.se","faktura@exempel.se")When the script runs, it uses the authentication credentials you are logged in with on Azure. Ensure that you are logged in with an account that has administrator privileges for Microsoft Entra ID and Microsoft 365 in your organisation. If you are not logged in, you must log in when the script runs.
You will be asked if you want to install the modules, to which you need to answer yes.

When the script is ready, information that needs to be entered in the office settings will be displayed. Do not close the PowerShell console before you have entered the information or pasted it into a text file or somewhere else that you can copy from.
The client secret cannot be retrieved or restored. If it is not pasted in anywhere, you will have to create a new one in the Azure portal. The other information can be retrieved from the Azure portal afterwards if needed.
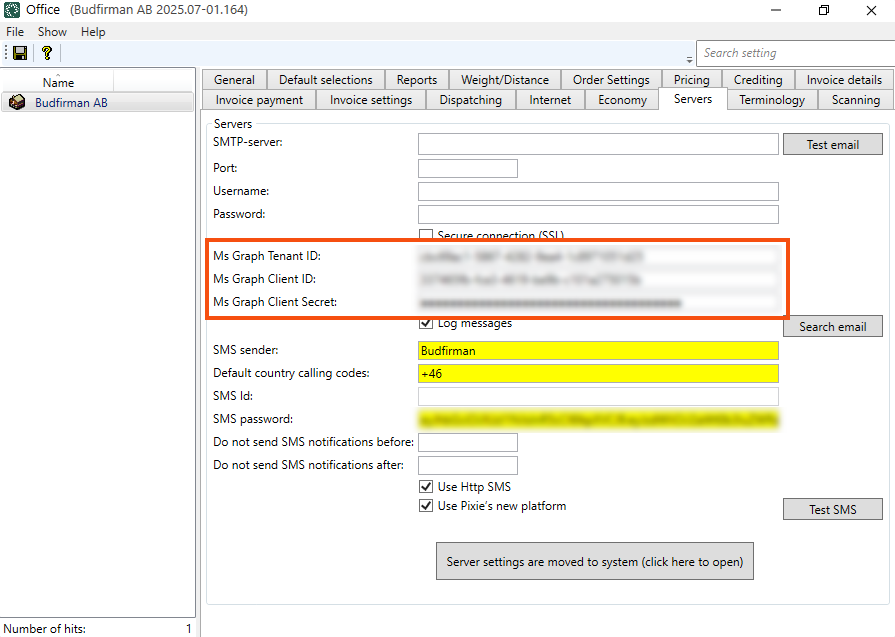
Step 5: Connecting Opter with Microsoft 365/MS Graph
Click Settings > Offices > the Servers tab and fill in the following fields with the information displayed in the PowerShell console:
-
Ms Graph Tenant ID
-
Ms Graph Client ID
-
Ms Graph Client Secret
Save the settings and then click Test email. Enter yourself as the recipient and check that you receive a message.
If there is a value in the Ms Graph Tenant ID field, it does not matter whether or not the fields above on this tab are filled in (SMTP-server, Port, Username, Password and Secure connection (SSL)). This information is not used, as the authentication is done through the app registration in Azure. It can be a good idea to remove the information in them, so that there is no risk of misunderstanding.
Registration of the app in Azure
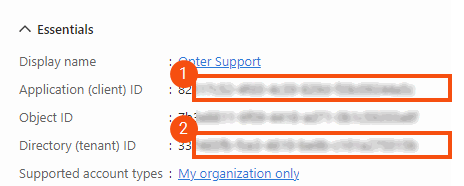
The app registration can be found on portal.azure.com by searching for “optermessageproxy” and selecting the search result labelled Application. You can also go to the app registrations and look in the list of registered applications.
Under OpterMessageProxy, you can see and copy Ms Graph Tenant ID = Directory (tenant) ID (2) and Ms Graph Client ID = Application (client) ID (1).
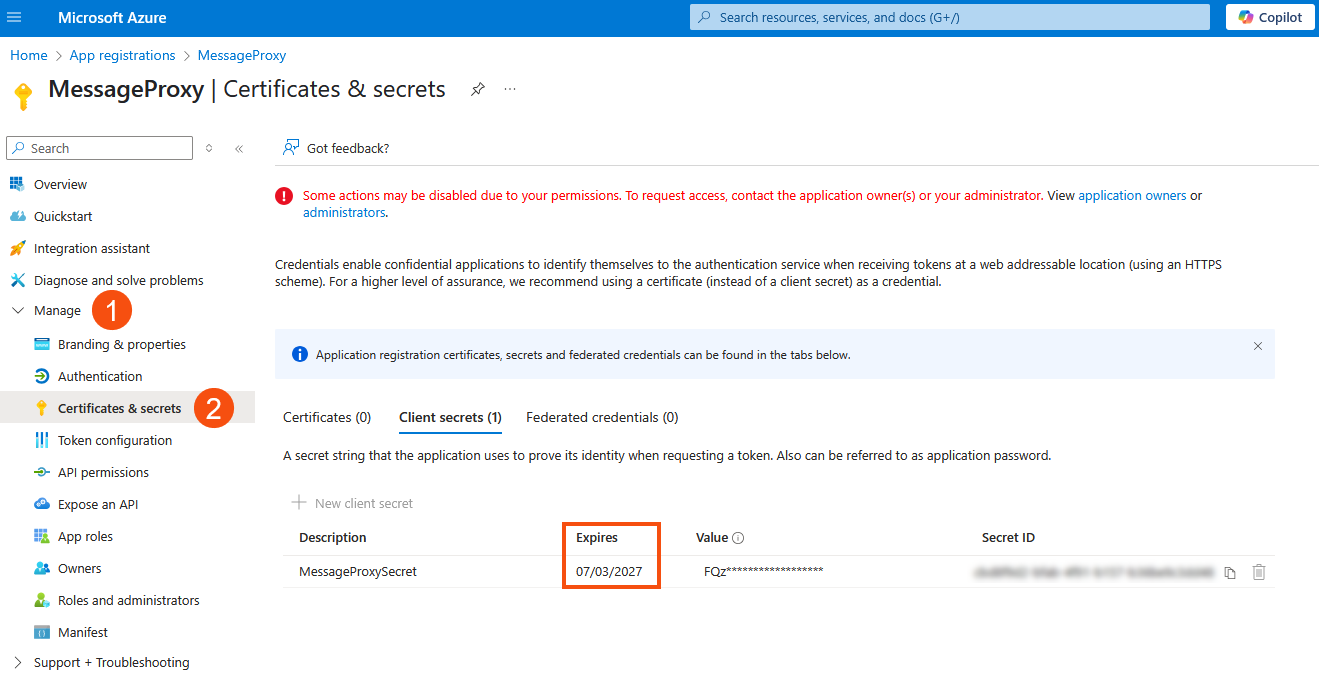
Ms Graph Client Secret cannot be shown or reset in the Azure portal. If you missed pasting it when the script ran, you will need to create a new secret. Go to Manage (1) > Certificates & secrets (2) in the menu on the left and click on New client secret. It is also possible to check when the client secret expires there.
Multiple domains
If you have multiple domains, for example "transportfirman.centraleurope.se" and "transportfirman.nordics.se", you will need to run the script once for each domain, and change the name of the app registration each time you run it. Unless the name is changed, the previous app registration is overwritten when the script is run again. Proceed as follows:
-
Change line 27 in the script so that the name identifies the first domain. In the case of Transport Company, line 27 is changed from
[string]$AppDisplayName = "OpterMessageProxy",
to
[string]$AppDisplayName = "OpterMessageProxy-centraleurope",
-
Save and run the script.
-
Change line 27 to the name of the next domain. In the case of Transport Company from
[string]$AppDisplayName = "OpterMessageProxy-centraleurope",
to
[string]$AppDisplayName = "OpterMessageProxy-nordics",
-
Save and run the script again.
Now there are two app registrations in Azure that can be managed separately.
Alternative sender addresses
If you did not add the alternate addresses when you started the script, you can do so in the OpterMessageProxy_group security group in Exchange. If you changed the name when registering Opter in Azure, the group will be called the name you specified + “_group”. All the sender addresses you have added to Opter must be included as members of the security group.
For more information and examples on how to add different sender addresses, see Alternative email addresses.
To add a sender address as a member of the OpterMessageProxy_group in the Exchange admin centre. More information is available on the Microsoft website.
