Information linked to the customer’s address
Last updated: 11 November 2025
In this article
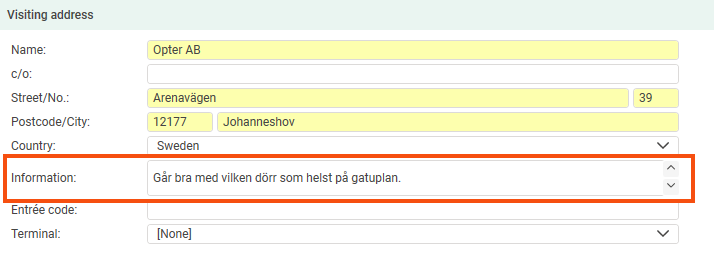
There is a free text field for the customer's visiting address in the customer registry where you can enter special instructions that apply to that address, such as safety instructions for loading or unloading. The information in the field can then be displayed in Order reception, Order control and in Opter Driver.
View the information field in the customer register
The field must be activated in the customer register so that you can add the information. Proceed as follows:
-
Click on Settings > Address settings.
-
Select Registry from the list on the left.
-
Select the checkbox in the Visible column for the Info field.
The field appears under Visiting address in the tab General.
View the information in the Order reception
-
Click on Settings > Address settings.
-
Select Order reception from the list on the left.
-
Select the checkbox in the Visible column for the Info field.
-
Close the Order reception and open it again.
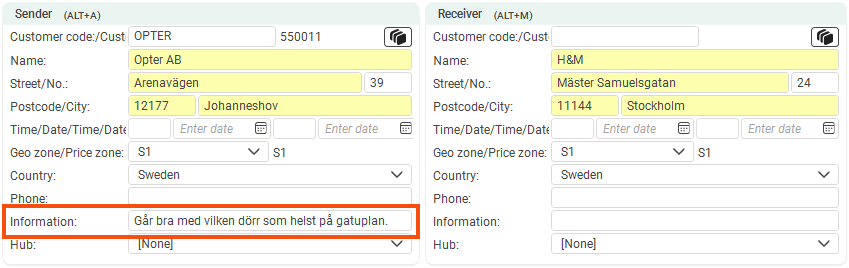
If there is information about the address, it is displayed in the field under Sender and/or Receiver and in the column Information under Addresses.
It is possible to overwrite the preset text. If you change the text under Sender/Receiver, it will also change in the address list and vice versa.

View the information in the order check
-
Click on
 next to the Setting drop-down list in order check.
-
Go to the Columns tab and double-click on Information - sender and Information - receiver to add them to Included.
View the information on the web portals
If you create a new order on the web portal, the information is not retrieved from the customer register, but if the order has been created in Order reception, the information is displayed in the preview.
If you want the information field to be editable on the web portals, include the fields Info sender and Info receiver in the Fields on the order page tab of the internet order settings.

View the information in Opter Driver (classic)
The information can be displayed in the task list, detail view and POD view and is set in App.Design.
-
Click on Settings > Mobile data > Settings mobile data.
-
Click on Edit, next to App.Design.
-
Choose where in the app the information is to be displayed.
-
The mission list = summaryrows
-
Detail view = expandedrows
-
POD view = podrows
-
-
You add the information separately for the sender address and the recipient address.
-
Sender: Add the row <row><item itemname="DELIVERYADDRESSINFOFROM" /></row>.
-
Receiver: Add the row <row><item itemname="DELIVERYADDRESSINFOTO" /></row>.
-
In the example below, we have added the text "Info:" in front of the information text in the task list (summaryrows). We have also added a condition that will not display a blank space if there is no text to display. Rows 7-12.
<summaryrows>
<row>
<item itemname="CURRENTSTATUS" position="0" width="60" positioning="relative" font="NORMAL" />
<item itemname="EARLIESTPICKUPTIME" position="0" width="20" positioning="relative" font="NORMAL" />
<item itemname="LATESTDELIVERYTIME" position="0" width="20" positioning="relative" font="NORMAL" />
</row>
<row>
<item itemname="'Info: ',DELIVERYADDRESSINFOFROM" condition="DELIVERYADDRESSINFOFROM" font="NORMAL" />
</row>
<row>
<item itemname="'Info: ',DELIVERYADDRESSINFOTO" condition="DELIVERYADDRESSINFOTO" font="NORMAL" />
</row>
<row>
<item itemname="ADDRESSFROM,' / ',STREETFROM,' ',STREETNOFROM,' / ',CITYFROM" position="0" width="100" positioning="relative" font="NORMAL" />
</row>
<row>
<item itemname="ADDRESSTO,' / ',STREETTO,' ',STREETNOTO,' / ',CITYTO" position="0" width="100" positioning="relative" font="NORMAL" />
</row>
</summaryrows>You can also display information about intermediate shipments, such as terminal address information, with the tags ADDRESSINFOFROM/ADDRESSINFOTO.
Further information on how to edit the layout can be found in App.Design.
View the information in Opter Driver
Design field for mobile
The information can be displayed in the order list, the detail view and on the pod.
-
Click on Settings > Mobile data > Design field for mobile.
-
Add the fields Order - Address information (from) [DELIVERYADDRESSINFOFROM] and Order - Address information (to) [DELIVERYADDRESSINFOTO] under Included in the views where you want to display the information.
App.OpterDriver.Design/App.Design
The information can be displayed in the task list (summary), the detail view (expanded) and the POD view (pod).
If you use App.Design, see View the information in Opter Driver (classic) above.
You add the information separately for the sender address and the recipient address.
-
Sender: <item itemname="DELIVERYADDRESSINFOFROM" />.
-
Receiver: <item itemname="DELIVERYADDRESSINFOTO" />.
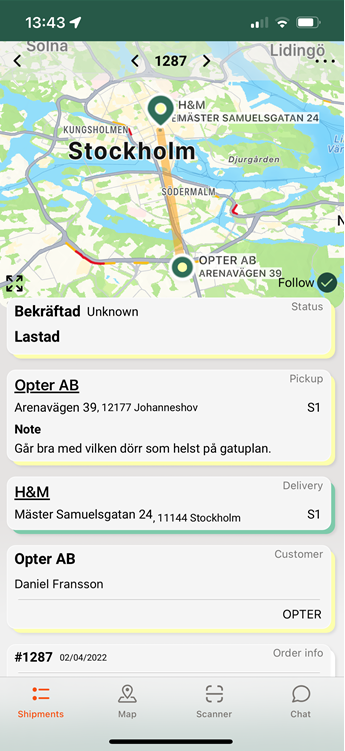
In the example below, we have added the text Note in front of the information text with the tag $Design_Note. We have also added a condition that will not display a blank space if there is no text to display.
<item itemname="'$Design_Note'" font="BOLD" condition="(DELIVERYADDRESSINFOFROM != | DRIVERMESSAGEFROM != )" />
<item itemname="DELIVERYADDRESSINFOFROM" multiLine="True" />
<item itemname="DRIVERMESSAGEFROM" multiLine="True" />Further information on how to edit the layout can be found in App.OpterDriver.Design.
Example
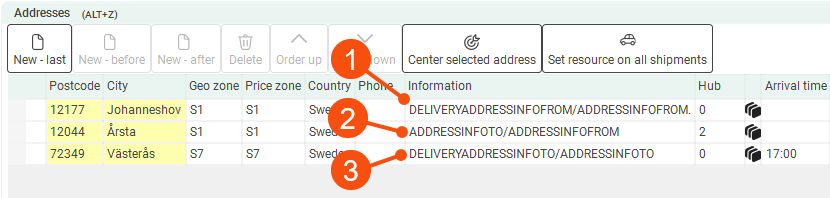
In this example we have two missions, sender-terminal, terminal-receiver. That is, three addresses where the Terminal is the recipient on shipment 1 and the sender on shipment 2. Then the fields and tags work like this:
-
DELIVERYADDRESSINFOFROM: Displays the text from the information bar under Sender. Also the tag ADDRESSINFOFROM works. It shows the text of the sender on the shipment, which in this case is the same as it is the first shipment on the order.
-
ADDRESSINFOTO (shipment 1)/ADDRESSINFOFROM (shipment 2): This text can be retrieved from the information field of the terminal register or entered directly into the address list. As the Terminal is not the sender or recipient of the order, this text is not displayed under Sender/Receiver. The text can be displayed in Opter Driver with ADDRESSINFOTO on shipment 1, where the Terminal is the recipient, and with ADDRESSINFOFROM on shipment 2, where the Terminal is the sender.
-
DELIVERYADDRESSINFOTO: Displays the text from the information bar under Receiver. Also the tag ADDRESSINFOTO works. It displays the text of the recipient on the shipment, which in this case is the same thing as it is the last shipment on the order
The information itself in DELIVERYADDRESSINFOFROM and DELIVERYADDRESSINFOTO only applies to the first and last addresses on the order, but you can display this information on the intermediate shipments if you wish.