Set the minimum number of POD images
Last updated: 28 July 2026
In this article
Applies to Opter Driver Labs for Android and Opter Driver for iOS version 2.4.136 and later, and Opter version 2026.06.00 and later.
You can choose how many photos drivers and subcontractors must add before the proof of delivery can be saved in the app and on the status page (on the website), by ticking the checkbox Require image and setting Minimum number for the POD-type. The requirement to add images may be waived for individual customers.
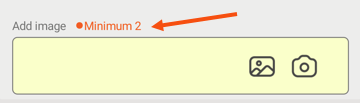
This is what it might look like in Opter Driver (on the delivery note page) if you have ticked the box Require image and set Minimum number to “2”.
This is what the status page might look like if you have ticked the box Require image and set Minimum number to “2”.
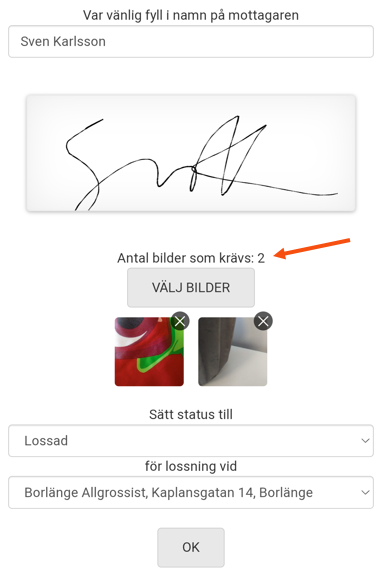
The status page is the web page that appears when you scan a QR code to update the status on the freight bill. For more information, see QR codes for status change on Freight bills.
Step 1: Set the minimum number of POD images
Select the minimum number of images that must be attached to the POD. This setting applies in the following cases:
-
The minimum number of photos that drivers must upload before they can save the proof of delivery in Opter Driver.
-
The minimum number of images that subcontractors must upload once they have scanned a QR code on the freight bill and registered a proof of delivery on the status page (website).
You cannot set Minimum number to a value higher than “10”.
For more information, see POD view in Opter Driver, Proof of Delivery (POD) in Opter Driver and QR codes for status change on Freight bills.
Proceed as follows
Set the minimum number of POD images that must be added before the proof of delivery can be saved in the app and on the status page:
-
Click Settings > Proof of Delivery (POD) > Proof of delivery types (and the tab General). Select the POD-type for which you wish to configure the settings, for example Delivered.
-
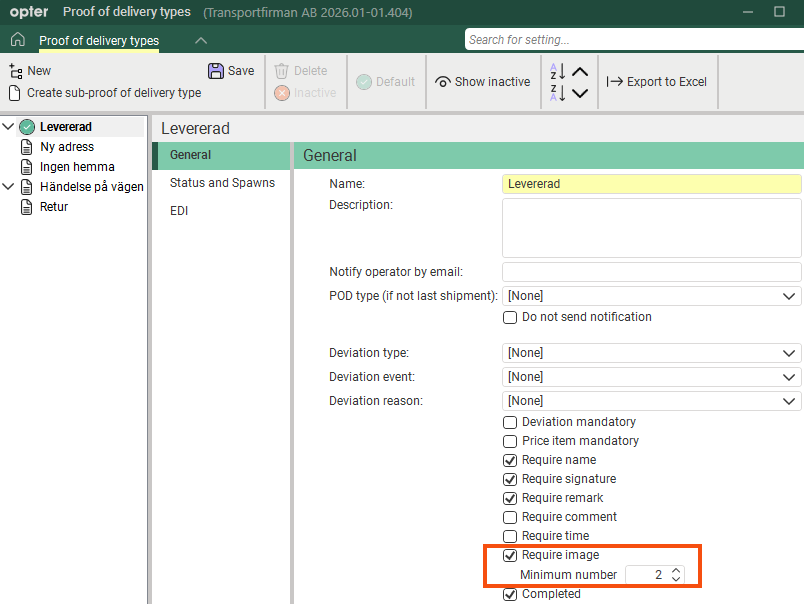
Tick the box Require image and set Minimum number. For more information, see Proof of delivery types (window).
For example, if you want drivers and subcontractors to add at least two photos, tick the Require image tick box and set Minimum number to “2”.
-
Click on Save to save all changes.
Step 2 (optional): Make exceptions for certain customers
The requirement to add images can be waived for individual customers by ticking Image always optional on the Proof of Delivery (POD) tab in the customer register.
Step 3 (optional): Configure the Add image field in Opter Driver
You can choose whether or not the Add image field should be displayed in the app. If the field is displayed, drivers can add images by taking a new picture (a new photo) and attaching it (2). You can choose whether drivers should also be able to add images that they already have on their mobile device (1). For instructions, see POD view in Opter Driver.

For example, if you have ticked box Require image and set Minimum number to ‘2’ (in Step 1 above), the drivers must add at least two images. (See the image below.)
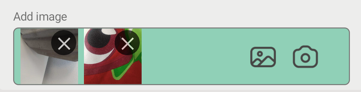
This is what it looks like once the driver has added the required number of photos (see the image below). Drivers can add more photos if they wish.
Instructions for drivers (app users) can be found in Proof of Delivery (POD) in Opter Driver and Adding images to Opter Driver.
Step 4 (optional): Show the Select images button on the status page
If the Select images button is displayed, subcontractors can add as many images as they like to the proof of delivery, but at least the required number.
This is what the status page might look like if you have ticked the box Require image and set Minimum number to “2”.
As it stands at present, the Select images button is only displayed if the Require image tick box in the Proof of delivery types window is ticked (and Minimum number is set to “1” or a higher number).
For more information, see QR codes for status change on Freight bills.
Step 5 (optional): View the photos in the order reception area
In the order reception section for groups Proof of delivery (POD) and Attachments, you can view images that have been added to proofs of delivery.
Proceed as follows:
-
If the groups Proof of delivery (POD) and Attachments are not displayed, or if you would like them to appear in a different position in the order reception area, you can configure this. For more information, see Organising the groups in Order reception.
-
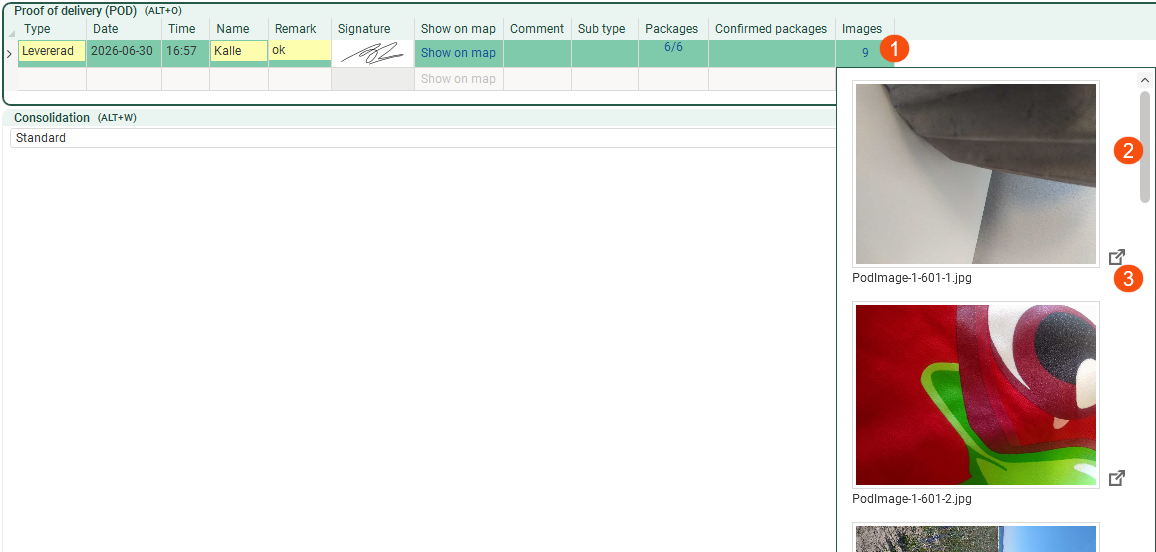
In group Proof of delivery (POD), you can add column Images (1) by clicking Settings > Order reception > POD settings and moving Images from list Excluded to Included, then save.
The picture below shows the group Proof of delivery (POD). If there are a lot of images, you can scroll through them (2). If you want to see them larger, click on the icon (3).
For more information, see Proof of delivery (POD) (order reception) and Attachments (order reception).
Step 6 (optional): View the images on the web portals
The following applies to all of the resource webs and the customer web:
-
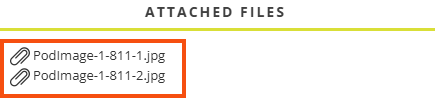
Images attached to the proof of delivery are displayed in window Preview (the detail view) in sections POD Information and Attached files. In section Tracking log from Track & Trace, one POD image can be displayed. (If there is more than one POD image, the first one added will be displayed.)
-
In section POD Information, the figure in column Images shows the number of images. Click on the images in the column if you’d like to view them in a larger size. You can then scroll through the images by clicking on the arrows.

-
In section Attached files, you can click on the images if you wish to download them.
-
In section Tracking log from Track & Trace, it is not possible to view the image in a larger size, nor is it possible to download the image.
Follow these steps for the customer web
To view sections POD Information, Attached files and Tracking log from Track & Trace on the customer web:
-
Click Settings > Internet > Internet order settings and select the customer web from the list on the left.
-
To display section Attached files, tick the box Show attachments (on the General tab under Settings).
-
To display section Tracking log from Track & Trace, tick the box Show tracking log from Track & Trace in the detail view (on the General tab under Settings).
-
To display section POD Information, tick the box Search for POD (on the Menu alternatives and functions tab under The customer web).
(Section POD Information is only displayed if the order has a proof of delivery.)
-
Click on Save to save all changes.
Follow these steps for the resource webs
To display sections POD Information, Attached files and Tracking log from Track & Trace on the resource webs (for example, on the driver web):
-
Click Settings > Internet > Internet order settings and select the web portal you wish to work with from the list on the left.
-
To display section Attached files, tick the box Show attachments (on the General tab under Settings) and/or the box Enable add attachments on internet orders (on the General tab under Settings for new orders).
Tick the box Show attachments if the user is only to be able to view attached files.
Tick the box Enable add attachments on internet orders if you want the user to be able to attach files. The user will also be able to view attached files.
-
To display section Tracking log from Track & Trace on the resource webs (for example, on the driver web), tick the box Show tracking log from Track & Trace in the detail view (on the Menu alternatives and functions tab under The resource webs).
-
To display section POD Information, tick the box Available on the web for the POD-type (e.g. Delivered) in the window Proof of delivery types.
-
Click on Save to save all changes.
For more information, see Internet order settings (window).
When registering proofs of delivery on the web portals, you cannot add images to the proofs of delivery, but you can attach files to the order by clicking the Attached files button at the bottom of the window Preview.
Step 7 (optional): View the images on Track & Trace
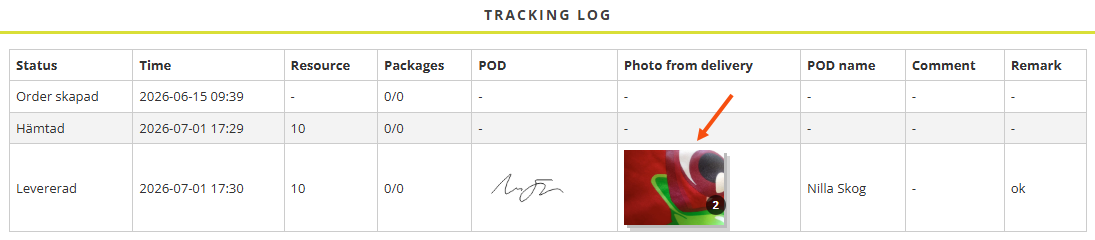
Images attached to the proof of delivery are displayed in section Tracking log in column Photo from delivery and in section Delivery Attachment in column File name. Click on the images in the column if you’d like to view them in a larger size.
Proceed as follows
To display sections Tracking log and Delivery Attachment:
-
Click Settings > Internet > Internet order settings and select the customer portal from the list on the left.
-
Click on the Track & Trace tab.
-
To display section Delivery Attachment, tick the box Show attachments (under Fields on Track & Trace).
-
To display section Tracking log, tick the box Show tracking log (under Fields on Track & Trace).
-
Click on Save to save all changes.
POD images via EDI
From Opter version 2026.06.00 onwards All images on the proof of delivery can be included during import and export. Please contact the EDI team at . They need to add the element proofOfDelivery/attachment in your exports/imports.
 For Opter version 2025.12.00 or earlier
Even if a proof of delivery contains more than one image, only one image can be sent via EDI.
Please bear the following in mind
-
You can add as many images as you like to the app and on the status page, but if the tick box Require image (in the window Proof of delivery types) is unticked, you won’t be able to add any images at all to the status page. (In future, it will be possible to add images even when there is no minimum number required.)
-
You cannot set Minimum number (in the Proof of delivery types window) to a value higher than “10”. The setting in field Minimum number does not apply to Opter Terminal and Opter Driver (classic). For more information, see Proof of delivery types (window).
-
When registering proofs of delivery on the web portals, you cannot add images to the proofs of delivery, but you can attach files to the order by clicking the Attached files button at the bottom of the window Preview.
Troubleshooting
-
Please check that your Opter is version 2026.06.00 or later.
-
Please ensure that all drivers are using Opter Driver Labs for Android or Opter Driver for iOS, version 2.4.136 or later.

