QR codes for status change on Freight bills
Last updated: 2 July 2026
In this article
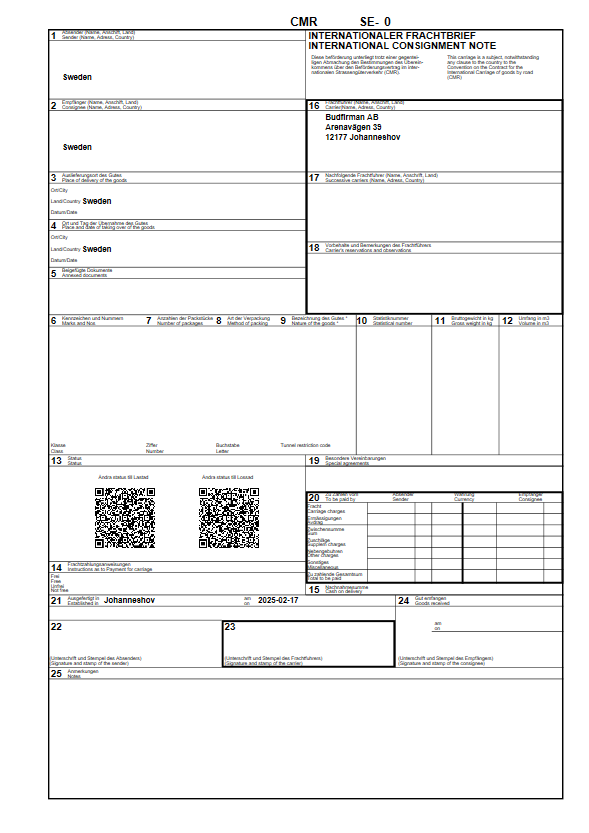
You can insert a QR code on the Freight bill which will open a webpage where you can change the status.
There are two different QR codes, one that is preset to change the status to Picked up and one that is preset to change the status to Delivered. Both QR codes lead to the same web page, and you can choose which status to put, so you only need to put one of them on the Freight bill, unless both fit. When the status changes to Delivered, a POD is created on the order.
You must have set a base address on the Internet tab in the office settings for the website to work.
Insert the QR code in the report
The easiest way is to preview the existing Freight bill in Order reception and modify the report from there. (Click on Preview above Freight bill in the order reception area. The Print preview window opens. Click on Edit report.)
If you do not want to experiment in the existing Freight bill, you can make a copy of it in (Settings > Reports) and then preview and modify the copy in the Order reception.
In this example, we have added a block with both QR codes with the different default statuses, Picked up/Delivered.
-
Row 1: The position of the block itself is controlled by the x and y parameters.
-
Rows 3 and 5: Optional text, "Change status to Loaded" and "Change status to Unloaded". The position within the block is controlled by the x and y parameters.
-
Lines 4 and 6: STS_Id=3 specifies that the default status of the web page that opens is Picked up, and STS_Id=4 that it is Delivered.
<block x="10" y="180">
<item name="Ändra status till Lastad" x="30"/>
<barcode internetdirectoryuri="/" x="22" y="3" name="'DEL_Id=',DEL_Id,';STS_Id=3'" symbology="qr" height="45" width="45" />
<item name="Ändra status till Lossad" x="100"/>
<barcode internetdirectoryuri="/" x="92" y="3" name="'DEL_Id=',DEL_Id,';STS_Id=4'" symbology="qr" height="45" width="45" />
</block>Check that it works by previewing the freight bill for an existing order and scanning the QR codes. The order must be allocated to a resource.
Setting up the website
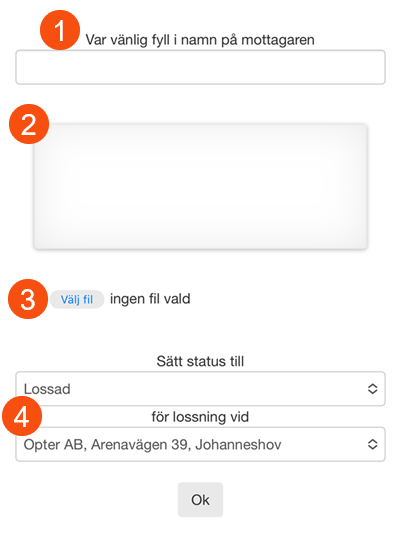
You can set which fields on the POD must be filled in on the webpage. You do this on the POD-type that you have as your default POD.
The POD applied to the order when the status is changed to Delivered is the one selected by default in the window Proof of delivery types. No account is taken of sub-POD-types.
For the function to work as intended, you must have Delivered as your default POD. For example, if you have Nobody home as the default POD, the status of the order will be Failed delivery, but the web page will say that the status has been set to Delivered.
Go to Settings > Proof of Delivery (POD) > Proof of delivery types and select Delivered in the list on the left. The following settings affect what is displayed on the web page:
-
Require name: Shows/hides the name field.
-
Require signature: Show/hide the signature field. The signature is saved as an attachment to the order.
-
Require image (and Minimum number set to “1” or a larger number): shows/hides the Select images tab. The images are saved as attachments to the order. It is not possible to upload files other than images.
-
The status and address drop-down lists are always displayed.
For more information, see Set the minimum number of POD images.
Scan the QR code
When the user scans the QR code, the web page opens on the device with the status and address pre-filled. To change the status of the shipment, you can usually just click on Ok. If you change the status in the drop-down list, the address will also change.
-
Picked up = the sender's address is displayed.
-
Delivered = the recipient address is displayed.
When the user changes status to Delivered, a POD is created on the order. Any signature and images are saved as attachments to the order.
The proof of delivery and any images are also displayed in group Proof of delivery (POD) in the order reception section. (If you cannot see the images, click Settings > Order reception > POD settings and add the Images column). For more information, see Set the minimum number of POD images.
The status change is displayed in the order log in the Order reception with the user Internet.