Last updated: 2025-04-15
Creating and setting up routes
In this article
There are two types of routes: distribution routes and line haul (line haul routes). Distribution routes run to and from distribution areas while liner routes run between Terminals. For more information, see Routes and Auto dispatch, overview and Routes (window).
Creating a route
To create and set up a route, proceed as follows:
-
Click on Order > Routes and then on
 to create a new route.
 -
Enter Name, Type and any other information that applies to the route. For more information, see Routes (window) and in the instructions below.
If some routes are often excessively full, the maximum number of shipments the route can handle per day can be entered in the Maximum number of stops on same day field. If the maximum capacity is reached, Opter will not place any more shipments on that route on that day. Instead, other routes that are suitable or a later date are used.
-
Click on Schedule and select the days on which the route will be operated. For more information, see Schedule, routes (window).
-
Configure the following settings, depending on the route’s type:
 Distribution
-
Go to the Pickup tab.
-
Under From postcodes, in the upper part of the window, create the rows needed for the route’s pickup area.
Choose Country, Postcode, City and/or Street, and maybe even Street no.. Examples are given below.
In the columns Monday to Sunday inclusive, tick the checkbox for the day(s) on which the pick-up area in the row is to be served. If the column for a day is grey, it means that the route is not operated on that day of the week according to the schedule on the tab General. (The columns Monday - Sunday are available in Opter as of 2024.12.16.)
In order for the area to be served for collection on a specific day of the week (e.g. Tuesday), the following is required as of Opter 2024.12.16
-
The schedule on the General tab must be set to operate on that day of the week (for example, Tuesday or weekday). (See the setting in step 3 above.)
-
The checkbox in the day of the week column (for example Tuesday) must be ticked under From postcodes in the tab Pickup.
Enter the earliest and latest pickup times in the Time - Earliest and Time - Latest columns.
-
-
Under To terminals, in the lower part of the window, create the rows needed for the route’s arrival at terminals.
Enter the earliest and latest times that the shipments can be left at the terminal in the Time - Earliest and Time - Latest columns.
Enter whether the unloading at the terminal should take place one or more days after pickup in the Plus days column. In other words, which date in relation to the pickup date.
For example, if you stated that the pickup should take place between 07.00 and 08.00 every Monday, and if the orders are to be unloaded at the terminal between 16.00 and 19.00 on Tuesday, enter "1" in the Plus days column. If, instead, arrival is between 16.00 and 19.00 on Monday (same day), leave it as "0".
-
Go to the Delivery tab.
-
Under From terminals, in the upper part of the window, create the rows needed for the route’s departures from terminals.
Enter the earliest and latest times that the shipments are to leave the terminal in the Time - Earliest and Time - Latest columns.
In the Deadline column, enter the time and any minus days to indicate the latest time at which the shipments must have arrived at the terminal for the transhipment to be carried out. Example: If you enter "8:00" in the Time - Latest column, and if the terminal needs 25 hours for transshipment, enter "7:00 -1d" in the Deadline column. This means that the shipment must have arrived at the terminal by 07:00 at the latest on the day before the goods leave the terminal again, in order to allow delivery in accordance with the time in the route. If the shipment arrives later than the deadline, the delivery will be rescheduled to one day later. This means that you can ensure there is always time to handle the shipments at the terminal.
In the case of auto dispatch, the order deadline is calculated on the basis of the terminal’s transhipment time, the route’s schedule, and the terminal’s opening hours or off-time opening hours. Make sure the opening hours of the terminals have been entered under Register > Terminals > Opening hours. For more information about opening hours, see Terminals (window).
-
Under To postcodes in the lower part of the window, create the rows needed for the route’s delivery area.
Choose Country, Postcode, City and/or Street, and maybe even Street no.. Examples are given below.
In the columns Monday to Sunday inclusive, tick the checkbox for the day(s) on which the delivery area in the row is to be served. If the column for a day is grey, it means that the route is not operated on that day of the week according to the schedule on the tab General. (The columns Monday - Sunday are available in Opter as of 2024.12.16.)
In order for the area to be used for deliveries on a certain day of the week (e.g. Tuesday), the following is required as of Opter 2024.12.16
-
The schedule on the General tab must be set to operate on that day of the week (for example, Tuesday or weekday). (See the setting in step 3 above.)
-
The checkbox in the day of the week column (for example Tuesday) must be ticked under To postcodes in the tab Delivery.
Enter the earliest and latest times that the shipments are to delivered in the Time - Earliest and Time - Latest columns. Enter any plus days to adjust the date (e.g. if arrival is on the day after loading) in the Plus days column.
-
 Line haul
-
Go to the Line haul tab.
-
Under From terminals in the upper part of the window, create the rows needed for the route’s stops for transhipments at terminals.
Enter the earliest and latest times that the shipments are to leave the terminal in the Time - Earliest and Time - Latest columns.
In the Deadline column, enter the time and any minus days to indicate the latest time at which the shipments must have arrived at the terminal for the transhipment to be carried out. Example: If you enter "18:00" in the Time - Earliest column, and if the terminal needs 25 hours for transshipment, enter "17:00 -1d" in the Deadline column. This means that the shipment must have arrived at the terminal by 5 pm at the latest on the day before the goods leave the terminal again for onward transport in accordance with the time in the route. If the shipment arrives later than the specified deadline, the next stage of the journey will be rescheduled to one day later. This means that you can ensure there is always time to handle the shipments at the terminal.
In the case of auto dispatch, the order deadline is calculated on the basis of the terminal’s transhipment time, the route’s schedule, and the terminal’s opening hours or off-time opening hours. Make sure the opening hours of the terminals have been entered under Register > Terminals > Opening hours. For more information about opening hours, see Terminals (window).
-
Under To terminals in the lower part of the window, create the rows needed for the route’s stops for transhipments at terminals.
Enter the earliest and latest times at which the shipments can arrive at the terminal in the Time - Earliest and Time - Latest columns.
In the Plus days column, enter any plus days to adjust the date.
Example: If for the terminal it was stated in the first row under From terminals that the shipments should leave the terminal between 17.00 och 18.00, and if the shipments must have arrived at the terminal on one of the rows under To terminals by 01.00 am on the following day, enter “1” in the Plus days column. If, instead, it is 11.00 pm on the same day, enter “0” in the Plus days column.
-
-
If you want the route to have a default vehicle or status, set this.
For instructions on how to define that a specific driver and/or vehicle, or a specific subcontractor, is assigned shipments associated with the route, see Linking vehicles or drivers to routes.
-
Click on Save to save all changes.
-
Check that the services you plan to use allow auto dispatch. See Auto dispatch.
Testing that a route works
To test that a route works, open order reception and proceed as follows:
-
On an order, select a service that has the Allow automatic dispatching checkbox selected.
-
Enter a sender address that is in the route’s pickup area (for a distribution route) or that matches a terminal (for a line haul route).
-
Enter a receiver address that is in the route’s delivery area (for a distribution route) or that matches a terminal (for a line haul route).
-
Go to the Shipments box in order reception and make sure that the shipment is assigned to the route.
Examples of routes
We want to create a route from the area in Stockholm in which postcodes start with 12 to the area in which the postcodes start with 11. It should be a distribution route.
Summary:
|
Name |
Type |
From |
To |
|---|---|---|---|
|
Stockholm 12*–11* |
Distribution |
Postcode 12* |
Postcode 11* |
To set the route, proceed as follows:
-
Click on Order > Routes. Click on
 to create a new route. Give the route the name “Stockholm 12*–11*”.
 -
In the Type drop-down list, select Distribution.
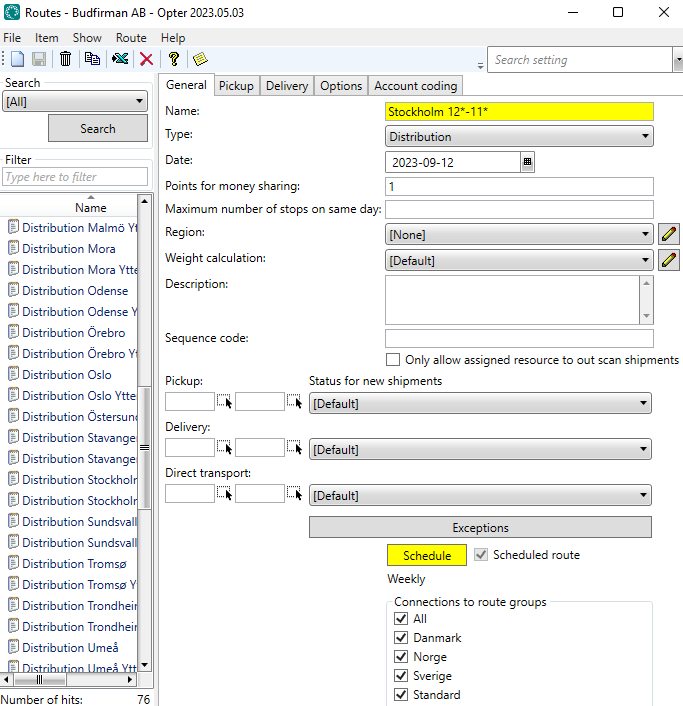
-
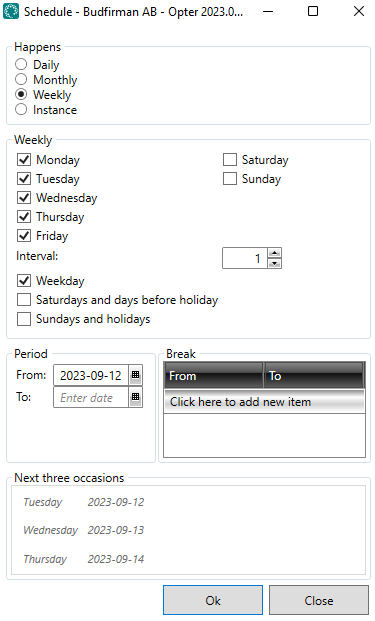
Click on the route’s Schedule and use the option buttons on the left to select Weekly schedule. Select the checkboxes for the days of the week that the route will operate, in our case Monday to Friday. For more information, see Schedule, routes (window).
-
Click on the Pickup tab and create a new row under From postcodes. Choose Country “Sweden” and enter “12*” in the Postcode field.
We tick the boxes in the columns Monday to Friday inclusive, because we want the postcode area "12*" to be served for collection on those days. (The columns Monday - Sunday are available in Opter as of 2024.12.16.)
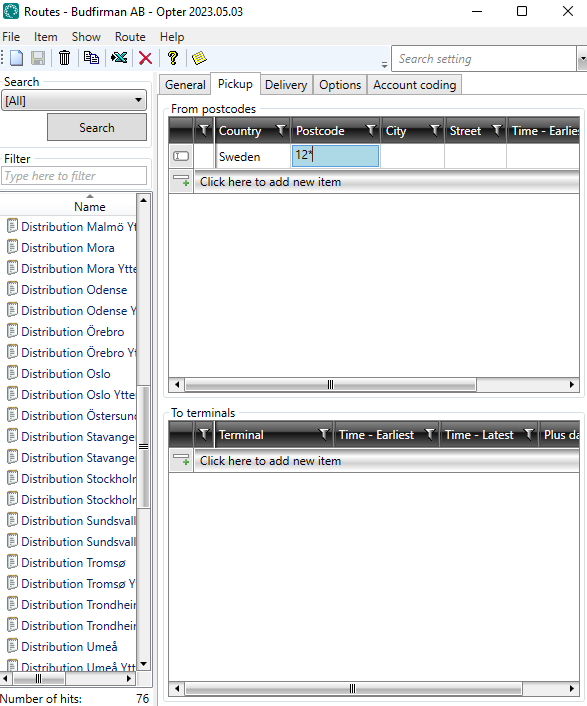
The columns for Saturday and Sunday are greyed out because the route is not operated on those days of the week (according to the schedule on the tab General). This means that it does not matter whether the checkboxes in the columns for Saturday and Sunday are ticked or not.
-
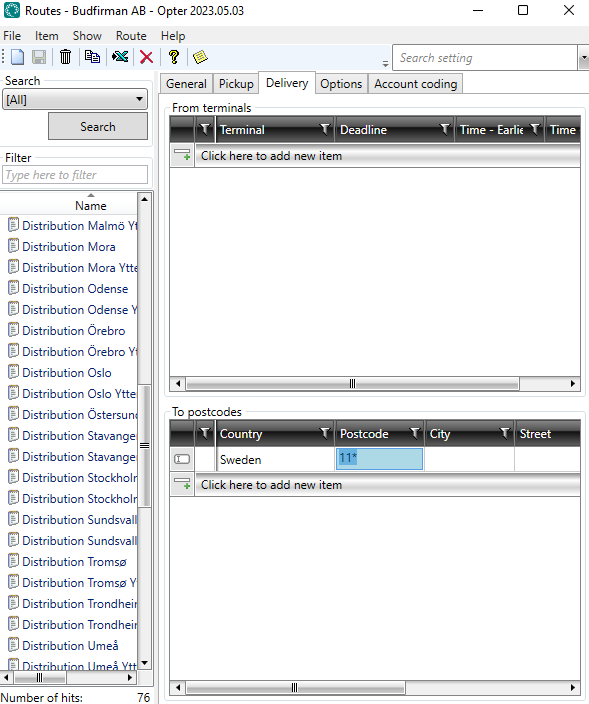
On the Delivery tab, create a new row under To postcodes and also select Country “Sweden” there and then enter “11*” in the Postcode field.
We tick the boxes in the columns Monday to Friday inclusive, because we want the postcode area "11*" to be served for delivery on those days.
-
Click on
 to save all changes. (If it cannot be saved, see Comments below).
 -
In order reception on the Shipments tab, it can now be seen that there is an order going from a sender address with the postcode “120 07” to a receiver address with the postcode “111 52”, so the order is assigned to the “Stockholm 12* - 11*” route.
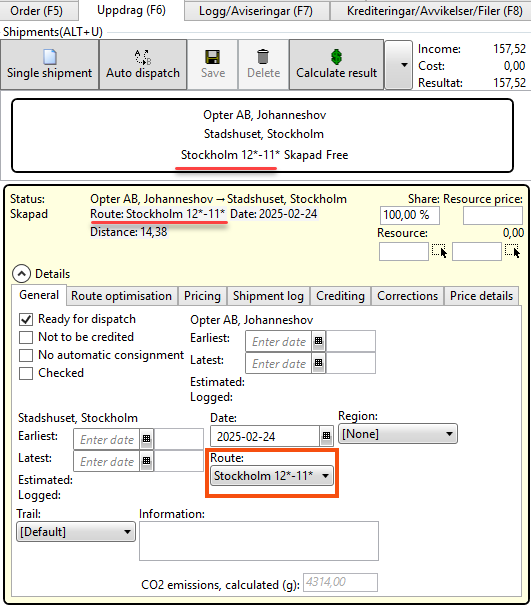
-
In dispatch on the Routes tab it is possible to see how many shipments are assigned to the “Stockholm 12* - 11*” route, which in this case is one shipment.
Comments
In this example, we have no intermediate stops and the route therefore involves direct transport. For a shipment to receive this route, we need to go to Economy > Price lists > Services, select the service to be used and on the tab Dispatch select the checkbox Allow automatic dispatching, and also select the checkbox Allow direct connections (one leg).
The pickup or delivery area could also be a terminal. In order for the route to be selected, the address on the order must then be a selected Terminal from the Terminal Register.
Routes can be likened to train timetables in which train departures are routes and railway stations are terminals.
This example shows an arrangement where goods can be transported from Stockholm to Gothenburg and Malmö via transhipments in terminals on the way.
From: Akademigränd 3, 11152 Stockholm
To: Storgatan 2, 21141 Malmö
The sender is matched via the postcode to the “Stockholm pickup” route, which takes the goods to the terminal in Stockholm. A line haul vehicle then takes the goods to the terminal in Jönköping where they are unloaded. A further line haul vehicle takes the goods to the terminal in Malmö where they arrive. Finally, the goods are delivered to the receiver address via “Malmö delivery”, which is matched via the postcode in the receiver address.
A total of four shipments are created for the order, each of which is carried out by a vehicle.
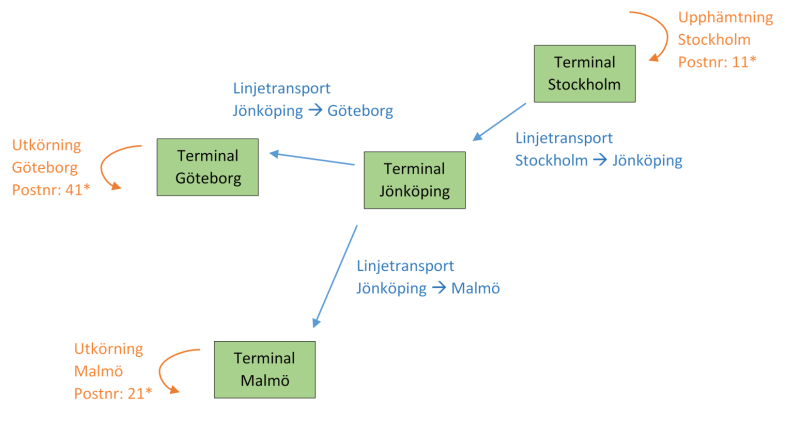
For this to work, the following applies:
-
The Allow automatic dispatching checkbox must be selected on the service to be used. (The checkbox can be accessed under Economy > Price lists > Services, on the Dispatch tab).
-
The terminals in the above image are in the terminal registry. (The terminal registry can be accessed under Register > Terminals).
-
The following routes are created.
Name Type From To Stockholm pickup Distribution Postcode 11* Stockholm terminal Gothenburg delivery Distribution Gothenburg terminal Postcode 41* Malmö delivery Distribution Malmö terminal Postcode 21* Stockholm → Jönköping Line haul service Stockholm terminal Jönköping terminal Jönköping → Gothenburg Line haul service Jönköping terminal Gothenburg terminal Jönköping → Malmö Line haul service Jönköping terminal Malmö terminal
We will not go through how all these routes are created, but will just show how to create a distribution route and a line haul route:
This is how to create one of the required distribution routes:
-
We click on Order > Routes. We click on
 to create a new route and name the route "Pickup Stockholm".
 -
In the Type drop-down list, select Distribution.
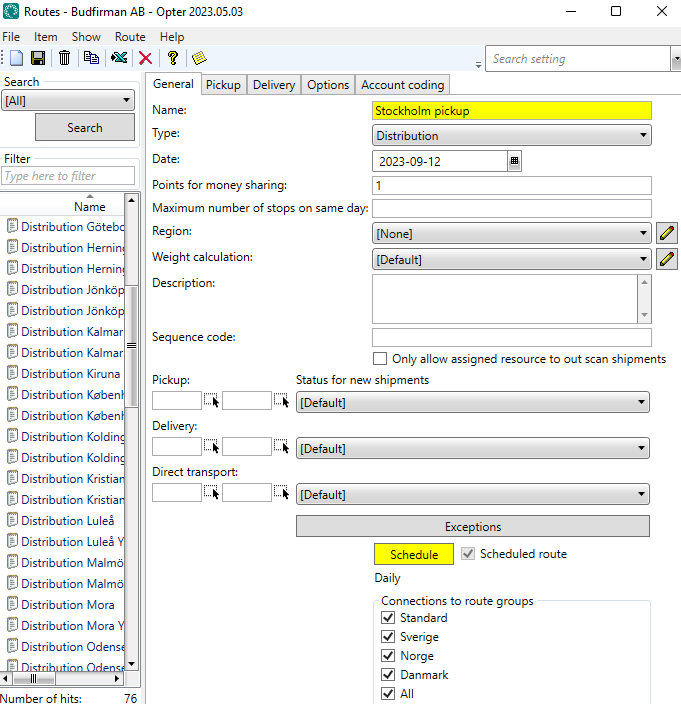
-
Click on the route’s Schedule and use the option buttons on the left to select Weekly schedule. Select the checkboxes for the days of the week that the route will operate, in our case Monday to Friday. For more information, see Schedule, routes (window).

-
Click on the Pickup tab and create a new row under From postcodes. We choose Country “Sweden” and enter “11*” in the Postcode column.
We tick the boxes in the columns Monday to Friday inclusive, because we want the postcode area "11*" to be served for collection on those days. (The columns Monday - Sunday are available in Opter as of 2024.12.16.)

The columns for Saturday and Sunday are greyed out because the route is not operated on those days of the week (according to the schedule on the tab General). This means that it does not matter whether the checkboxes in the columns for Saturday and Sunday are ticked or not.
-
We select the “Stockholm terminal” on a row under To terminals and click on
 to save all changes.
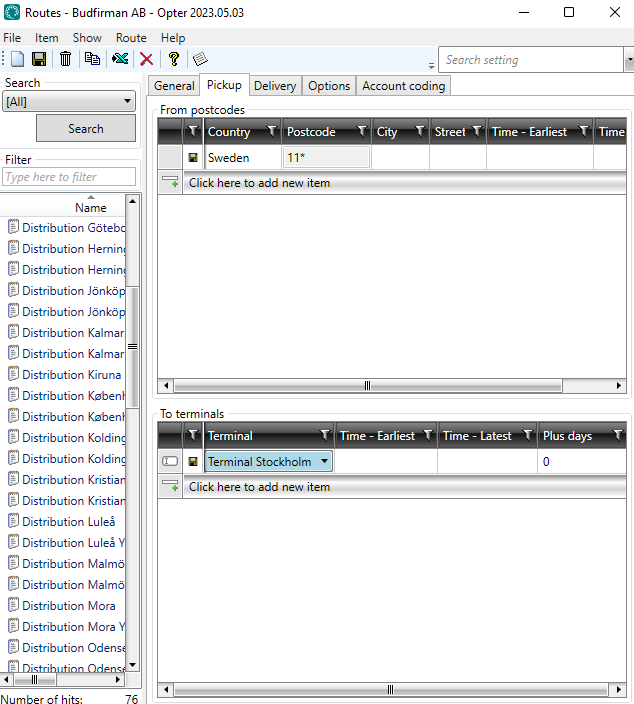
We proceed as follows to create one of the required line haul routes:
-
We click on Order > Routes. We click on
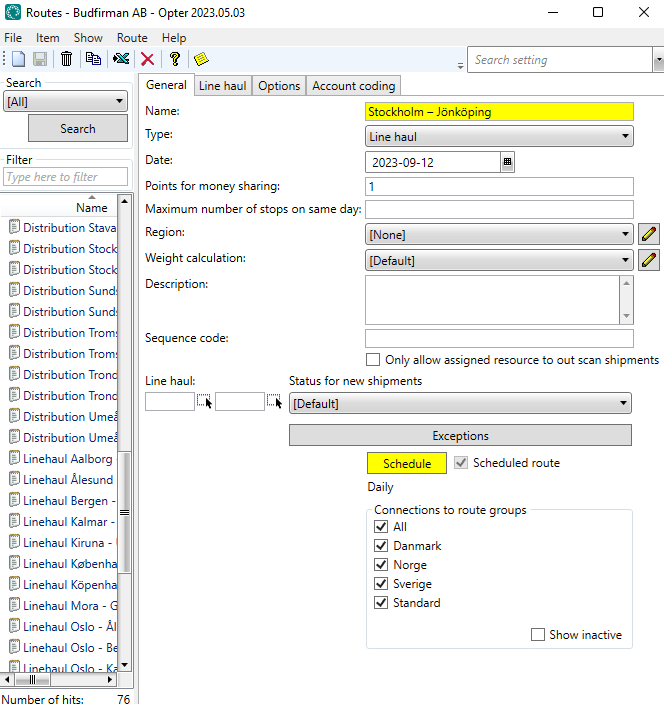
 to create a new route and name the route "Stockholm – Jönköping".
 -
In the Type drop-down list, select Line haul.
-
Click on the route’s Schedule and use the option buttons on the left to select Weekly schedule. Select the checkboxes for the days of the week that the route will operate, in our case Monday to Friday. For more information, see Schedule, routes (window).

-
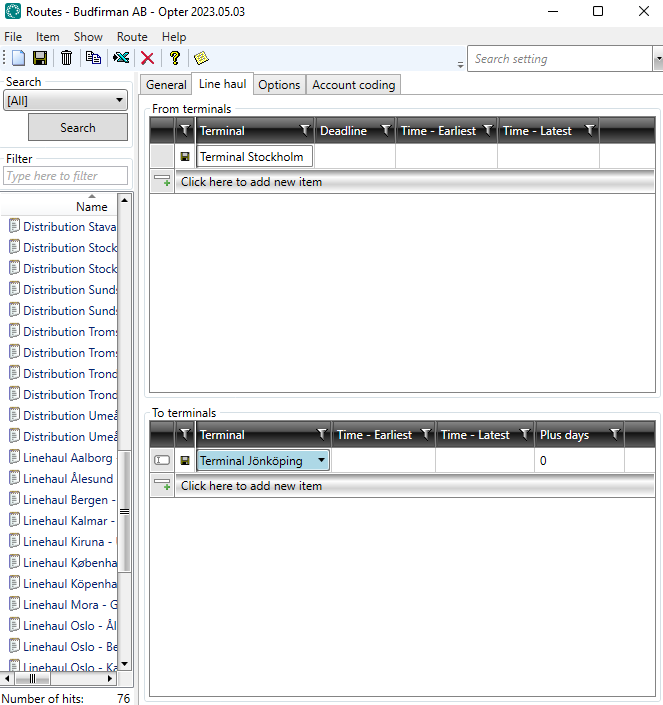
We click on the Line haul tab and select the terminal “Stockholm terminal” on a row under From terminals.
-
We select the terminal “Jönköping terminal” on a row under To terminals and click on
 to save all changes.
Once the set-up has been completed for the service, all the terminals are in place and all the routes have been created, so we can test how the routes work.
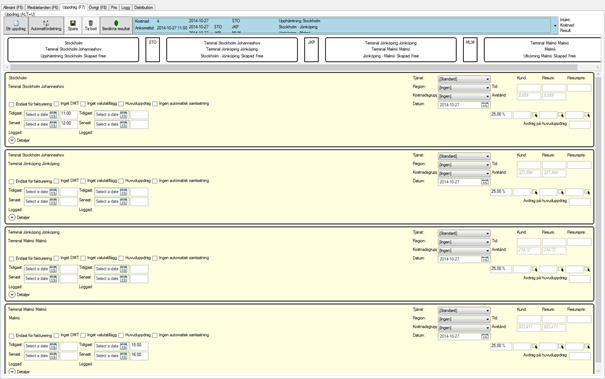
In order reception, we create an order with the sender address “Akademigränd 3, 111 52 Stockholm” and the receiver address “Storgatan 2, 211 41 Malmö”.

Opter then automatically creates four shipments (also called sub-routes or legs), which we can see in the Shipments window in dispatch. One pickup, two line haul services and one delivery.
If the route is to be operated for collection from postcode area "82*" on Mondays, "84*" on Tuesdays, "86*" on Wednesdays, "87*" on Thursdays and "88*" on Fridays, proceed as follows:
-
On the tab General, click the button Schedule. Set the route schedule at Weekly, and tick the boxes for Monday to Friday inclusive. For more information, see Schedule, routes (window).
-
On the Pickup tab, in the From postcodes box, create a row for each postcode area and only tick the box for the day of the week that the postcode area in the row is served for collection. (The columns Monday - Sunday are available in Opter as of 2024.12.16.)
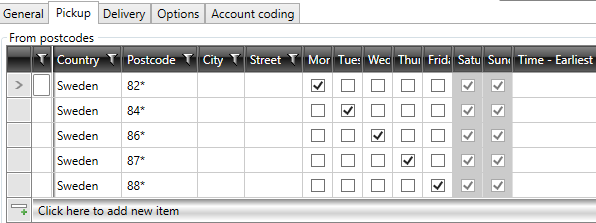
The columns for Saturday and Sunday are greyed out because the route is not operated on those days of the week (according to the schedule on the tab General). This means that it does not matter whether the checkboxes in the columns for Saturday and Sunday are ticked or not.
-
If the route is also to be used for deliveries to different postcode areas on different days of the week, see the example below.
-
Click on Save to save all changes.
If the route is to be operated for delivery to postcode area '82*' on Mondays, '84*' on Tuesdays and Fridays, '86*' on Wednesdays, '87*' on Thursdays and '88*' on Fridays, proceed as follows:
-
On the tab General, click the button Schedule. Set the route schedule at Weekly, and tick the boxes for Monday to Friday inclusive. For more information, see Schedule, routes (window).
-
On the Delivery tab, in the To postcodes box, create a row for each postcode area and only tick the box for the day of the week on which the postcode area in the row is served for delivery.

The columns for Saturday and Sunday are greyed out because the route is not operated on those days of the week (according to the schedule on the tab General). This means that it does not matter whether the checkboxes in the columns for Saturday and Sunday are ticked or not.
-
Click on Save to save all changes.
If at a later date you want to change so that, for example, the postcode area "82*" is served for deliveries on both Mondays and Thursdays, tick the checkbox in the column Thursday in the row with postcode area "82*".
If at a later date you want to change so that, for example, the postcode area "82*" is served for deliveries on Mondays, Thursdays and now also on Saturdays, tick the checkbox in the column Saturday on the row with the postcode area "82*". On the General tab, click the Schedule button. Set the route schedule so that the route is also operated on Saturdays, by ticking the checkbox for Saturday in the box Weekly.
Applies to Opter from 2024.12.16.
If you have many rows of different postcode areas on the Pickup and Delivery tabs, and you want to easily see which postcode areas are served on Tuesdays, for example, do this:
-
In the Routes window, click on the Pickup or Delivery tab.
-
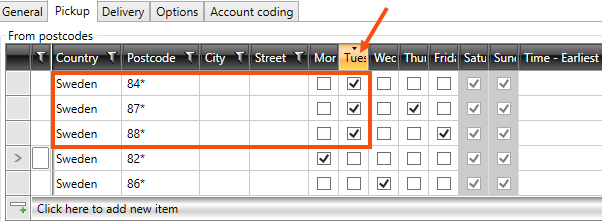
In the To postcodes or From postcodes box, click twice at the top of the Tuesday column. The column is then sorted so that the rows where the checkbox is selected are listed at the top of the table. The picture below shows that the postcode areas "84*", "87*" and "88*" are served for collection on Tuesdays.
-
If you want the rows to be listed in the order they were originally in, click once more at the top of the column Tuesday.
To see which postcodes are not served on Tuesdays, click once at the top of the column Tuesday. The column is then sorted so that the rows with the tick box unchecked are listed at the top of the table.
Areas
The areas can be differently specific (see image below). Opter will first select the line that is most specific and matches the address. That is, Opter selects rows in the following order of priority:
-
The row contains both the street (street name) and the postcode. (1 in the picture below.)
-
The row contains only postcodes.
-
A postcode, for example '34135'. (2)
-
A range of postcodes, for example "34000 - 35000". (3)
-
Beginning of a postcode and then star instead last digit, for example "3410*". (4)
-
Beginning of a postcode and then star instead the last digits, for example "341*". (5)
-
That is, Opter selects in the first instance the row that is most specific. The image below shows the order of priority using the numbers 1-5.
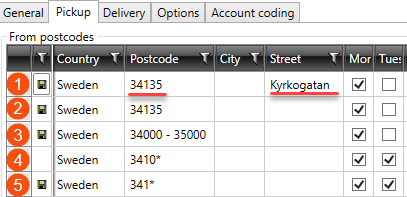
For example, if a row has a street name and a postcode that matches the address, Opter will select that row (1). In addition, if there is a row (2) without a street name, but with a matching postcode, Opter will not select that row, as there is a row that is more specific. That is, the row (1) where the street name also matches the address.
Areas and times
The rows can also have times in the columns Time - Earliest and Time - Latest. Opter first selects the line that is most specific and matches the shipment. That is, Opter selects rows in the following order of priority:
-
The row contains both postcode area and times. (1 in the picture below.)
-
The row contains only the postcode area, no times. (2)

Days and times
If we have a postcode area with different days and times, for example postcode 3413* is served for deliveries on Wednesdays at 9.30am. 17:00-19:00 and Thursdays 13:00-15:00, Opter follows the order of priority in the drop-down menu Cost calculation when choosing a route.

One of the following is prioritised:
-
The route with the lowest score (cost).
-
The route that gives the earliest arrival time.
The Cost calculation list box can be found under Settings > Offices, on the Dispatching tab in the Auto dispatch box . For more information, see Defining how Opter prioritises routes.
Applies to Opter from 2025.06.00.
If you have large volumes of goods to/from the same street, it can be useful to enter the street number on the tabs Pickup and Delivery. If you enter a street number, we recommend that you also enter the street name, and preferably also the country, postcode and/or town.

The image shows that you can enter a specific street number (1) or a range (2). It is not possible to use "*" in this column.
Working with routes
If you have many routes, it may be easier to export them to Excel, and work with them there instead of in Opter, and then import them back into Opter. For more information, see Exporting and importing routes to/from Excel.