New orders in Opter Driver
Last updated: 27 May 2025
In this article
Drivers can create new orders in Opter Driver by selecting Uus tellimus from the menu. The Uus tellimus view opens in which the driver enters the new order’s sender, receiver, number of packages, etc.
It is possible to select which fields are displayed in the Uus tellimus view, in addition to the Saatja/Sender reference, Saaja/Receiver reference and Pakkeüksused fields which are always displayed. The order in which fields are displayed can also be set and they can be renamed. It is possible to set the customer and service that should be used as the default for new orders.
It can also be configured so that drivers cannot create new orders in the app.
If no settings are configured, drivers can create new orders in the app and all fields in the Uus tellimus view are displayed.
To create a new order in the different variants of Opter Driver:
-
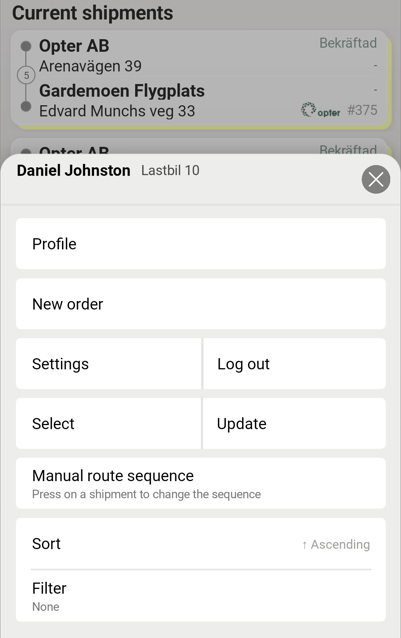
In Opter Driver for iOS and Opter Driver Labs for Android, the driver selects New order from the menu on the mission page, in the tabs Todo and Done.
-
In Opter Driver (classic) for Android, the driver selects Uus tellimus from the menu (
 ) on any of the tabs Uus, Töös and Valmis.
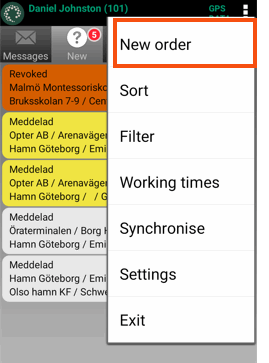
Defining whether or not drivers can create new orders
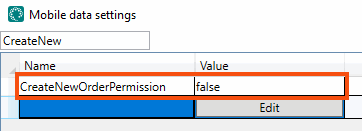
Use the CreateNewOrderPermission mobile data setting to define whether or not drivers can create new orders in Opter Driver. Proceed as follows:
-
In Opter, click on Seaded > Mobiilne andmeside > Mobiilse andmeside seaded.
-
Click on an empty row in the Nimi column and then on the down arrow in the row being added.
-
Select CreateNewOrderPermission from the list.
-
Enter “true” or “false” in the Väärtus column as follows:
-
”True” (default): The Uus tellimus option is displayed on the menu in Opter Driver. Drivers can create new orders in the app.
-
“False”: The Uus tellimus option is not displayed in the menu. Drivers cannot create new orders in the app.
-
-
Click on Salvesta.
Users who are logged in to the app when the changes are saved in Opter must log out and then log back in to the app to see the changes.
If Uus tellimus has been set to be displayed (“true” or no value for CreateNewOrderPermission), it is also possible to choose where on the menu the option is displayed. For example, if Uus tellimus should be at the top of the menu, select CreateNewOrderOrder in the Nimi column in the mobile data settings and enter “1” in the Väärtus column. The lower the number, the higher up the menu it is.
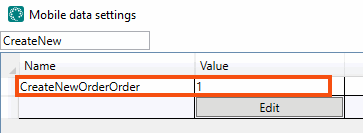
The default setting for all options on the menu is “99”. This means that it is not sufficient to set one of them to “2” for that menu option to appear second on the menu. If “1” is not entered for any other option, the menu option with the value “2” will be placed at the top. The menu option with the lowest number appears at the top of the menu.
Customising the Uus tellimus view
When drivers select Uus tellimus from the menu, the Uus tellimus view opens.
-
This is what the New order view looks like in Opter Driver for iOS and Opter Driver Labs for Android:
-
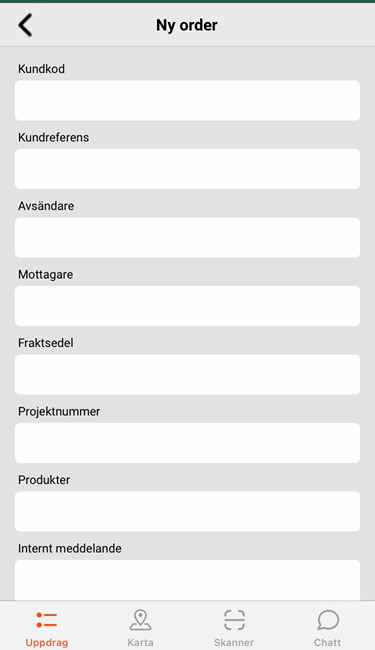
This is what the Uus tellimus view looks like in Opter Driver (classic) for Android:
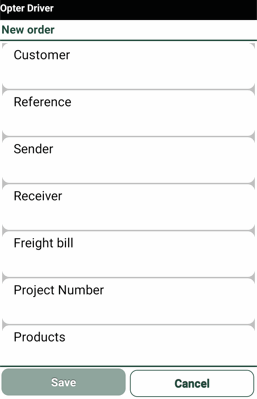
If CreateNewOrderPermission is set to "true", you can set which fields are displayed in the Uus tellimus view, except for the fields Sender/Sender reference, Receiver/Receiver reference and Packages which are always displayed. The order in which fields are displayed can also be set and they can be renamed.
The view is managed with the settings starting with “SHI_” in the mobile data settings. There are three types of SHI_settings:
-
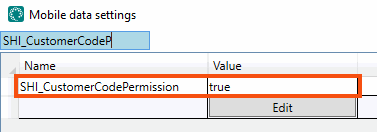
"SHI_XyzPermission", for example SHI_CustomerCodePermission: Controls whether or not the field is displayed in the view.
-
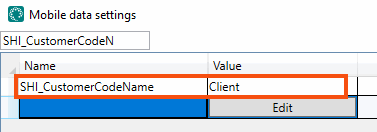
”SHI_XyzName”, for example SHI_CustomerCodeName: the default name for the field can be replaced by a custom name.
-
"SHI_XyzOrder", for example SHI_CustomerCodeOrder: where in the view the field should be displayed. The lower the number, the higher up the view it is.
If no settings are configured for any of the mobile data settings starting with “SHI_” all the fields will be displayed with their default names.
For more information about the fields and their settings, see Mobiilse andmeside seaded (window). Some of the settings also affect the Muudatused view, for example SHI_PackagesName and SHI_PackagesOrder.
-
All SHI_Permission is "True" by default, which means that all fields are displayed if you do not make any settings at all.
-
If you set the Permission for one field to "True", you must set the Permission for all other fields to be displayed to "True" as well. Otherwise, only the field that you set to "True" will be displayed.
-
If you set the Permission for one field to "False", you must set the Permission for all fields to be displayed to "True". Otherwise, no fields are displayed at all in the New order view.
To set which fields should be displayed, proceed as follows:
-
Click on Seaded > Mobiilne andmeside > Mobiilse andmeside seaded.
-
Click on an empty row in the Nimi column and then on the down arrow in the row being added. Select the SHI_XyzPermission setting for the field to be displayed/hidden, for example SHI_CustomerCodePermission (which controls whether the Klient field is displayed or not). For more information on which settings correspond to which fields, see Mobiilse andmeside seaded (window).
-
Enter one of the following in the Väärtus column:
-
”True” (default): if the field should be displayed.
-
“False”: if the field should not be displayed.
-
-
Repeat steps 2 and 3 and set the value to“true” for all other fields to be displayed in the view. If a field is given the value “true” or “false”, no other fields are displayed unless they are set to “true”.
-
Click on Salvesta. When you have finished configuring the settings, you can close the window.
To change the default names of the fields to your own names, proceed as follows:
-
Click on Seaded > Mobiilne andmeside > Mobiilse andmeside seaded.
-
Click on an empty row in the Nimi column and then on the down arrow in the row being added. Select the SHI_XyzName setting for the field to be renamed, for example SHI_CustomerCodeName (which is the Klient field). For more information on which settings correspond to which fields, see Mobiilse andmeside seaded (window).
-
Enter the new name of the field in the Väärtus column, for example “Customer”.
-
Repeat steps 2 and 3 for all fields to be renamed.
-
Click on Salvesta. When you have finished configuring the settings, you can close the window.
To specify the order in which the fields are displayed, proceed as follows:
-
Click on Seaded > Mobiilne andmeside > Mobiilse andmeside seaded.
-
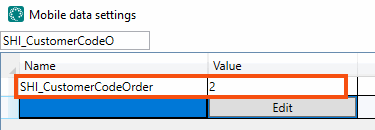
Click on an empty row in the Nimi column and then on the down arrow in the row being added. Select the SHI_XyzOrder setting for the field to be moved up or down in the view, for example SHI_CustomerCodeOrder (which is the Klient field). For more information on which settings correspond to which fields, see Mobiilse andmeside seaded (window).
-
In the Väärtus column, enter a number to indicate where in the view the field should be located. The lower the number, the higher up it is. If “1” is entered, the field will be at the top of the list.
The default setting for all fields is “99”. This means that it is not sufficient to set one of them to “2” for that field to appear second in the view. If “1” is not entered for any other option, the field with the value “2” will be placed at the top. The field with the lowest number appears at the top of the view.
-
Repeat steps 2 and 3 for all fields to be moved.
-
Click on Salvesta. When you have finished configuring the settings, you can close the window.
Users who are logged in to the app when the changes are saved in Opter must log out and then log back in to the app to see the changes.
Setting a preselected customer and service for new orders
It is possible to set the customer and service that should be used as the default for new orders created in Opter Driver.
-
Click on Seaded > Mobiilne andmeside > Mobiilse andmeside seaded.
-
Click on an empty row in the Nimi column and then on the down arrow in the row being added.
-
To set a default customer: select App.DefaultCustomerCode from the list and enter the customer code for the customer that is to be preselected in the Väärtus column.
-
To set a default service: select App.DefaultServiceTypeCode from the list and enter the name of the service that is to be preselected in the Väärtus column, for example “Home delivery”.
-
-
Click on Salvesta.
Users who are logged in to the app when the changes are saved in Opter must log out and then log back in to the app to see the changes.