Handling load carriers in Opter Terminal
Last updated: 9 October 2025
In this article
A load carrier can be, for example, a pallet with a pallet collar or a cage. The purpose of load carriers is that not all the packages in the load carrier need to be scanned at each transhipment; instead only the load carrier has to be scanned. A package can only belong to one load carrier at a time.

The picture above shows 3 packages (1, 2, 3), and one load carrier (4), and 3 terminals (A, B, C). For example, the flow in the image could be one of the following scenarios:
The driver can put packages in the load carrier when picking up packages from one or more senders, and then leave the load carrier at a terminal (A). The load carrier label is then scanned at each transhipment between terminals A, B and C. A driver then departure scans the load carrier at terminal C. The driver drives to one or more receivers, and scans each package individually (as usual). The packages thus leave the load carrier.
The flow is as follows:
-
The driver is at the sender. The driver taps Fill load carrier and scans the load carrier label. The driver scans one or more packages; the packages are then added to the load carrier in Opter. The driver puts the physical packages in the load cage (load carrier). The driver then pickup scans the load carrier. The pickup scan is registered on all the packages in the load carrier.
-
The driver drives to terminal A and arrival scans the load carrier there. The arrival scan is registered on all the packages in the load carrier.
-
A terminal employee arrival scans the load carrier at terminal A. The arrival scan is registered on all the packages in the load carrier. (It is sufficient for either the driver or the terminal employee to arrival scan the load carrier, but it is also acceptable that both of them arrival scan the load carrier. You can choose how you want to work in this regard).
-
A terminal employee scans the load carrier’s departure from terminal A. The departure scan is registered on all the packages in the load carrier. The load carrier then departs from terminal A.
-
The load carrier arrives at terminal B. A terminal employee arrival scans the load carrier. The arrival scan is registered on all the packages in the load carrier.
-
A terminal employee scans the load carrier’s departure from terminal B. The departure scan is registered on all the packages in the load carrier. The load carrier then departs from terminal B.
-
The load carrier arrives at terminal C. A terminal employee scans the load carrier upon arrival. The arrival scan is registered on all the packages in the load carrier.
-
A terminal employee scans the load carrier’s departure from terminal C. The departure scan is registered on all the packages in the load carrier.
-
A driver scans the load carrier’s departure from terminal C. The departure scan is registered on all the packages in the load carrier. The load carrier then departs from terminal C. (It is sufficient for either the driver or the terminal employee to departure scan the load carrier, but it is also acceptable that both of them departure scan the load carrier. You can choose how you want to work in this regard).
-
The driver then drives to one or more receivers, and scans each package individually (as usual). The packages thus leave the load carrier, which means that the packages are no longer affected by scans made on the load carrier to which they previously belonged. (The driver can also delivery scan the load carrier at the receiver. The delivery scan is then registered on all the packages in the load carrier).
For this scenario to work, the load carrier function must be enabled in both Opter Driver and Opter Terminal.
-
The terminal employee presses Fill load carrier, and scans the load carrier’s label. The terminal employee scans one or more packages, the packages are then added to the load carrier in Opter. The terminal employee then places the physical packages in the load cage (load carrier) at terminal A.
-
A terminal employee scans the load carrier’s departure from terminal A. The departure scan is registered for all the packages in the load carrier. The load carrier then departs from terminal A.
-
The load carrier arrives at terminal B. A terminal employee arrival scans the load carrier. The arrival scan is registered on all the packages in the load carrier.
-
A terminal employee scans the load carrier’s departure from terminal B. The departure scan is registered on all the packages in the load carrier. The load carrier then departs from terminal B.
-
The load carrier arrives at terminal C. A terminal employee scans the load carrier upon arrival. The arrival scan is registered for all the packages in the load carrier.
-
One or more different terminal employees can now remove packages from the load carrier, by scanning each package individually with an arrival, departure or floor check scan type. The packages thus leave the load carrier, which means that the packages are no longer affected by scans made on the load carrier to which they previously belonged.
For this scenario to work, the load carrier function must be enabled in the Opter Terminal app.
It is possible to create a proof of delivery for a load carrier when making the scan. That proof of delivery is then registered on all the packages in the load carrier and on the orders to which the packages belong.
In the Example section below, different scenarios are described to increase understanding of how the load carrier function works.
Consider the following
The load carrier function has the following intentional limitations:
-
"Unknown packages" cannot be placed in a load carrier.
-
Deviations cannot be registered on a load carrier, but deviations can be registered on packages in the load carrier.
(For more information, see Registering a deviation on a package in a load carrier below).
-
Undoing a load carrier scan is not possible.
(For more information, see Undoing the adding of a package to the load carrier and Removing packages from load carriers below).
Conditions
If the text Load carrier (update app) appears in the app when a load carrier is scanned, this is a prompt to update to the latest version of Opter Terminal, as Opter Terminal version 66.0 or earlier is currently installed.
The load carrier’s label
The load carrier's label can be a QR code, a barcode or a note stating the load carrier's ID. The load carrier's label can be scanned or the load carrier ID, for example "LC555", can be entered manually.
Add parcels to a load carrier
To add packages to a load carrier, proceed as follows:
-
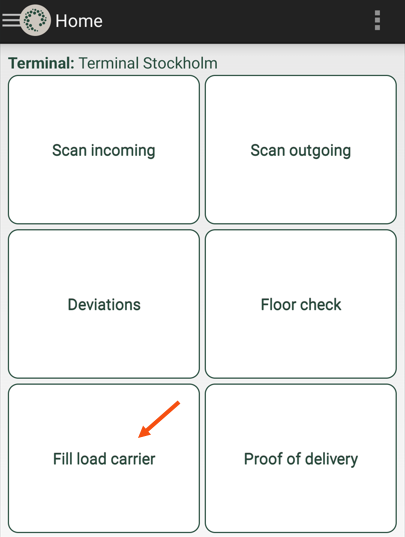
Tap Fill load carrier.
 If the Fill load carrier option is not displayed
If the Fill load carrier option is not displayed in the app, the load carrier function cannot be used. Whether or not the Fill load carrier option is displayed depends on the following:
-
Your system administrator can choose whether or not the load carrier function can be used, based on a setting in Opter.
-
Opter Terminal version 67.0 or later should be installed on all the devices being used to enable the load carrier function to be used.
If it instead says Load carrier scanning
You have Opter Terminal version 75.0 or earlier. The load carrier function has been improved in version 76.0. We recommend that you and your colleagues use the latest version of the app.
-
-
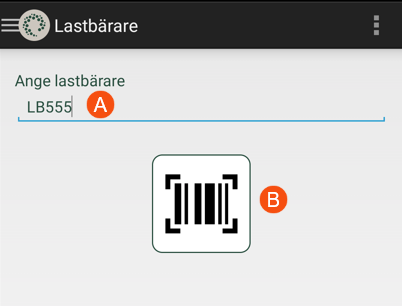
Scan the load carrier label by tapping the scan icon (B), or enter the load carrier ID (A), for example "LC555" and then tap OK at the bottom.
One of the following happens:
-
If there is not already a load carrier with the ID "LC555", a new load carrier with the ID "LC555" is created in Opter. The new load carrier does not contain any packages.
All the packages that are scanned will then be added to the load carrier "LC555", until Done under the scan list is pressed.
-
If load carrier "LC555" is already registered in Opter, the number of packages it contains is displayed. Tap the Keep packages or Empty load carrier button, depending on the following:
-
To add more packages to the load carrier, tap Keep packages.
All the packages that are scanned will then be added to the load carrier, until Done under the scan list is pressed.
-
To empty load carriers in Opter (and then add packages to the load carrier), tap Empty load carrier.
All the packages that were in the load carrier are removed, and then any packages that are subsequently scanned will be added to the load carrier, until Done under the scan list is pressed.
-
If you do not know which carrier it is and/or scan the load carrier label by mistake, tap Keep packages and finish the scan by tapping Done. Nothing has then changed in Opter.
For Opter Terminal versions 67.0 to 75.0
For these versions of Opter Terminal, it instead works as follows:
If the load carrier "LC555" is already registered in Opter, you will be asked Do you want to remove all the existing packages from the load carrier? If you choose No, all the existing packages remain in the load carrier and you can add more packages.
Select one of the following:
-
To add more packages to the load carrier, tap No.
All the packages that are scanned will then be added to the "LC555" load carrier, until Done is tapped.
-
To empty load carriers in Opter (and then add packages to the load carrier), tap Yes.
All the packages that were in the load carrier are removed, and then any packages that are subsequently scanned will be added to the load carrier, until Done is tapped.
-
If you do not know which carrier it is and/or scan the load carrier label by mistake, tap No and finish the scan by tapping Done. Nothing has then changed in Opter.
-
-
-
Scan a package. The package is added to the load carrier "LC555".
Place the physical package in the load cage (load carrier).
-
To add more packages to the load carrier, repeat the step above.
-
Once you're done, tap the back button at the bottom left.
The scan list is then displayed. The Scan list for the Fill load carrier scan type is described below.
-
When the load carrier filling has been completed, tap Done.
Scan list for scan type Fill load carrier
The amount of information displayed in the scan list depends on a setting made by your system administrator.
This is what the scan list might look like once Fill load carrier has been tapped and three packages that are now part of the load carrier ("LC555") have been scanned, see image.
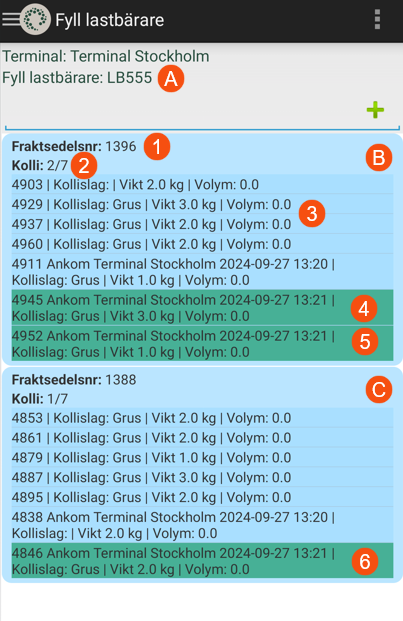
In the image above, the ID of the load carrier is "LC555" (A), and the freight bill number is also shown (1).
The packages are displayed grouped by shipment (B, C). For each shipment that has at least one package in the load carrier, all the shipment's package IDs and how many of the shipment's packages have been scanned and added to the load carrier are displayed, for example "2/7" (2).
The three packages that have been scanned and thus added to the carrier are shown in green (4, 5, 6), the rest are shown in blue (3) in the scan list. (In other words, the packages shown in blue belong to the shipment, but are not part of the load carrier. A package marked as blue can be added to the load carrier by scanning it using the Fill load carrier scan type. If the scan is successful, the package is shown in green in the scan list).
The package IDs, for example 4903, 4929, 4937, are always displayed. In the example in the image above, the system administrator has made a setting so that the following information is also displayed for each package in the list:
-
the last scan direction of the package, for example if it was arrival or departure scanned at another terminal. (If the parcel has not been scanned before, the information is not displayed.)
-
the terminal at which the package was last scanned.
-
the day the package was last scanned.
-
the time the package was last scanned.
-
Package dimensions. In the image above, the choice has been made to show the type of package, weight and volume.
If you tap on a package, more details about the package are displayed, for example, tapping on a blue highlighted package displays the information that it is part of another load carrier or that it is not part of any load carrier. Deviations can also be added to packages; instructions are available at Registering a deviation on a package in a load carrier below.
The scan list does not show the packages that were already in the load carrier
If the load carrier already contained parcels, you selected Keep packages, and then scanned packages and added them to the load carrier, the scan list will not show the packages that were already in the load carrier. (The idea is that the scan list focuses on the new items that are scanned and added to the load carrier).
To see all the packages in the load carrier, a floor-check scan of the load carrier can be carried out, see Floor-check scanning a load carrier below.
Departure or arrival scan the load carrier
When a departure or arrival scan is carried out on a load carrier, the scan is registered on all the packages in the load carrier.
Proceed as follows:
-
Tap Scan outgoing (departure scan) or Scan incoming (arrival scan).
-
Tap Package.
-
Possibly select the driver/vehicle and write a scan comment.
-
Then scan the load carrier's label or manually enter the load carrier ID, for example "LC555".
To enter the load carrier ID, tap the back button (to exit scan mode) and then tap the empty line at the top. This opens the keyboard. Type the load carrier ID and press Enter on the keyboard.
-
The scan list shows the load carrier ID and the packages that are in the load carrier.
The scan list for arrival, departure and floor-check scanning is described below.
During departure and arrival scanning of load carriers, deviations can be registered for the packages in the load carrier. To register a deviation on a package in a load carrier, press and hold down on the package in the scan list. A new small window opens; tap on Deviations and register the deviation. Tap Save when finished. (For more information, see Registering deviations in Opter Terminal).
-
Tap Done. The scan is registered on all the packages in the load carrier.
Depending on the settings made by your system administrator, a prompt may appear offering the chance to create a proof of delivery for the load carrier or stating that this is mandatory. If a proof of delivery is created, it is registered on all the packages in the load carrier and on the orders to which the packages belong.
The scan list for arrival, departure and floor-check scanning
The amount of information displayed in the scan list depends on a setting made by your system administrator.
This is what the scan list may look like when a load carrier has been departure, arrival or floor-check scanned.
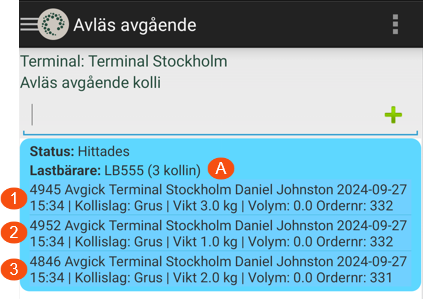
The example in the image shows that the terminal employee has clicked on Scan outgoing and scanned the load carrier label (or entered the load carrier ID). The load carrier has the ID "LC555" and contains three packages (A). The package numbers (4945, 4952, 4846) are always displayed for packages (1, 2, 3) in the list.
In the example, the system administrator has made a setting so that the following information is also displayed for each package in the list:
-
the last scan direction of the package, for example if it was arrival or departure scanned at another terminal.
-
the terminal at which the package was last scanned.
-
The resource that last scanned the package.
-
the day the package was last scanned.
-
the time the package was last scanned.
-
Package dimensions. In the image above, the choice has been made to show the type of package, weight and volume.
-
Order number.
If you tap a package in the list, more details about it are shown.
Floor-check scanning a load carrier
To see all the packages in the load carrier, a floor-check scan of the load carrier can be carried out.
When a floor-check scan is done on a load carrier, the scan is registered for all the packages in the load carrier, but no status change occurs. (In other words, the load carrier does not change status, nor do any of the packages, shipments or orders).
Proceed as follows:
-
Tap Floor check.
-
Tap Package.
-
Possibly select the driver/vehicle and write a scan comment.
-
Then scan the load carrier's label or manually enter the load carrier ID, for example "LC555".
To enter the load carrier ID, tap the back button (to exit scan mode) and then tap the empty line at the top. This opens the keyboard. Type the load carrier ID and press Enter on the keyboard.
-
The scan list for arrival, departure and floor-check scanning is described above.
During floor-check scanning of load carriers, deviations can be registered for the packages in the load carrier. To register a deviation on a package in a load carrier, press and hold down on the package in the scan list. A new small window opens; tap on Deviations and register the deviation. Tap Save when finished. (For more information, see Registering deviations in Opter Terminal).
-
Tap Done.
Registering deviations.
The following applies regarding the registration of deviations:
-
It is not possible to register deviations on load carriers, but deviations can be registered on packages in the load carrier.
-
It is possible to Register deviations on a package when adding packages to a load carrier, see below.
-
During departure, arrival and floor-check scanning of a load carrier, deviations can be registered for the packages in the load carrier. See Registering deviations on a package during departure, arrival and floor-check scanning of load carriers below.
-
It is also possible to let the package leave the load carrier for a while to register the deviation, and then put the package back into the load carrier again. For instructions, see Allowing a package to leave the load carrier for a moment to register a deviation below.
Proceed as follows:
-
In Opter Terminal, tap Fill load carrier and scan the load carrier label or enter the load carrier ID manually.
-
Scan the package.
The package then appears in the scan list.
-
Tap the package in the scan list to open the detail view, where deviations can be registered.
-
Tap the Deviations button.
-
Enter the deviation’s Type. The system administrator may have specified that Event and Reason must also be entered for the deviation. All yellow fields must be filled in.
-
To add a picture, press Add image and select Use camera (to take a new picture) or Select from the gallery (if the picture has already been taken).
-
To change the file name of a picture, press
 .
. -
To delete a picture that has been added, press
 .
.
-
More pictures can be added by tapping Add image again.
-
A larger preview of a picture that has been added can be shown by pressing on it.
-
-
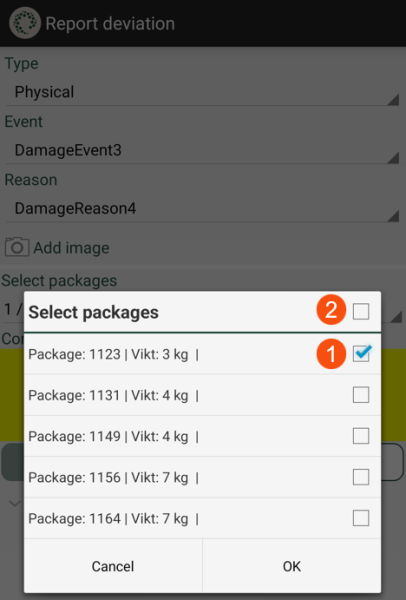
If the shipment consists of several packages, it is also possible to state to which package(s) the deviation refers, by pressing Select packages. The package for which you opened the detail view is preset, as in the image below (1).
Select the packages for which the deviation is to be registered by tapping the checkboxes for those packages. To register the deviation for all the packages in the list, press the (2) checkbox at the top. This selects the checkboxes for all the packages.
Tap OK.
The Select packages dialogue box appears if there is at least one package line on the order.
-
Write a Comment if desired. It can be either voluntary or mandatory. If the field is yellow, it must be filled in.
-
Register the deviation by pressing Save. It is not possible to save the deviation if the required fields have not all been filled in.
Once Save has been tapped, it is no longer possible to change the deviation in Opter Terminal.
When a departure, arrival or floor-check scan of a load carrier is performed, it is possible to register deviations for packages in the load carrier.
To register a deviation on a package in a load carrier, press and hold down on the package in the scan list. A new small window opens; tap on Deviations and register the deviation. Tap Save when finished. (For more information, see Registering deviations in Opter Terminal).
It is also possible to do as follows to register deviations on a package in a load carrier:
-
Tap Scan outgoing, Scan incoming or Floor check in the Opter Terminal and scan the package.
After scanning, the package is no longer in the load carrier.
-
Tap the package in the scan list to open the detail view, where deviations can be registered. For instructions, see Registering deviations in Opter Terminal.
-
Put the package back into the load carrier by tapping Fill load carrier, scan the load carrier’s label and then scan the package. (For detailed instructions, see Adding packages to a load carrier above).
Removing packages from load carriers
You can remove one package at a time or remove all the packages from the load carrier by doing one of the following:
-
Take the physical package out of the load cage (load carrier).
-
Tap Scan outgoing, Scan incoming or Floor check in the Opter Terminal and scan the package.
The package then leaves the load carrier in Opter and the scan is registered on the package. The load carrier does not change status, but the number of packages in it is reduced by one.
-
If you are offered the opportunity to create a proof of delivery, it is only registered on the package that has been scanned.
-
Tap Fill load carrier and scan the load carrier label or enter the load carrier ID, for example "LC555".
-
If load carrier "LC555" is already registered in Opter, the number of packages it contains is displayed.
Tap Empty load carrier to empty the load carrier "LC555" in Opter.
All the packages that were in the load carrier are removed. We recommend taking all the physical packages out of the actual load carrier (load cage).
For Opter Terminal versions 67.0 to 75.0
If the load carrier "LC555" is already registered in Opter, you will be asked Do you want to remove all the existing packages from the load carrier? If you choose No, all the existing packages remain in the load carrier and you can add more packages.
Tap Yes to empty the load carrier "LC555" in Opter.
All the packages are removed from the load carrier in Opter. We recommend taking all the physical packages out of the actual load carrier (load cage).
-
Select one of the following:
-
To finish using the load carrier, press Done.
-
To continue using the load carrier, scan a package. The package is added to the load carrier "LC555".
Place the physical package in the load carrier (load cage). Scan more packages and put them in the load carrier if desired. Tap Done when finished.
-
Example
Different scenarios are described here to increase understanding of how the load carrier function works.
20 parcels are to be transported from Helsinki Terminal to Stockholm Terminal, and then on to Oslo Terminal. All the packages fit in one load cage. The load cage has been labelled with the load carrier's ID, for example "LB555".
-
At the Helsinki terminal: In the Opter Terminal app, the terminal employee taps Fill load carrier and scans the load carrier label or enters the load carrier ID, for example "LC555".
A new load carrier is then created in Opter, and it currently contains 0 packages.
(If the load carrier "LC555" is already registered in Opter, the number of packages it contains is displayed. The terminal employee presses Empty load carrier because in this example we want to start with an empty load carrier. The next package that is scanned is added to the load carrier "LC555".)
-
The terminal employee scans a package. The package is then added to that load carrier ("LC555").
The terminal employee then places the physical package in the load cage (load carrier).
-
The terminal employee scans the other 19 packages. The packages are then added to the load carrier ("LC555").
The terminal employee places each physical package in the load cage (load carrier).
-
In Opter Terminal, the terminal employee selects Scan outgoing (departure scan) and then scans the load carrier’s label ("LC555"). The departure scan is then registered on all the packages in the load carrier.
-
The load carrier departs from the Helsinki terminal with 20 packages in it.
-
The load carrier arrives at the Stockholm terminal with 20 packages in it.
-
At the Stockholm terminal: In Opter Terminal, the terminal employee selects Scan incoming (arrival scan) and scans the load carrier’s label or enters the load carrier ID ("LC555").
The arrival scan is then registered on all the packages in the load carrier.
-
At Stockholm terminal there is one more package destined for the Oslo terminal. The package can fit in the load cage (load carrier). In Opter Terminal, the terminal employee taps Fill load carrier and scans the load carrier label or enters the load carrier ID ("LC555").
Opter Terminal shows how many packages the carrier contains (20 packages). The terminal employee presses the Keep packages button and then scans the package.
The package is added to the load carrier in Opter. The load carrier now contains 21 packages.
The terminal employee then places the physical package in the load cage (load carrier).
-
At the Stockholm terminal: In Opter Terminal, the terminal employee selects Scan outgoing (departure scan) and then scans the load carrier’s label ("LC555"). The departure scan is then registered on all the packages in the load carrier.
-
The load carrier departs from the Stockholm terminal with 21 packages in it.
-
The load carrier arrives at the Oslo terminal with 21 packages in it.
-
At the Oslo terminal: In Opter Terminal, the terminal employee selects Scan incoming (arrival scan) and scans the load carrier’s label or enters the load carrier ID ("LC555").
The arrival scan is then registered on all the packages in the load carrier.
-
From the Oslo terminal, the various packages are destined for different recipients, so the load carrier will now be emptied. The terminal employee takes a physical package out of the load cage (load carrier), selects Scan outgoing in Opter Terminal and scans the package. The package then leaves the load carrier in Opter and a departure scan is registered on the package. The load carrier does not change status, but the number of packages in it changes from 21 to 20.
-
The above step is repeated for all the packages.
The empty load carrier remains in the Opter system.
A load cage is used as a load carrier and already contains 14 packages. The load cage has been labelled with the load carrier's ID, for example "444LC". The load cage is at the Copenhagen terminal and is going to the Oslo terminal.
-
At the Copenhagen terminal: In the Opter Terminal app, the terminal employee selects Scan outgoing (departure scan) and then scans the load carrier’s label ("444LC"). The departure scan is then registered on all the packages in the load carrier.
-
When moving the load cage, a package falls out of it. However, that is only discovered later.
The package is still registered in Opter as being on the load carrier "444LC", so the Opter system believes that the package is still in the physical load carrier (i.e. in the cage).
-
The load carrier departs from the Copenhagen terminal with 13 packages in it.
-
The load carrier arrives at the Oslo terminal with 13 packages in it.
-
At the Oslo terminal: In Opter Terminal, the terminal employee selects Scan incoming (arrival scan) and scans the load carrier’s label or enters the load carrier ID "444LC".
The arrival scan is then registered on all the packages that are registered in the load carrier. The arrival scan is thus also registered on the package that fell out of the actual load carrier at the Copenhagen terminal, as the package is still registered on the load carrier in Opter.
-
At the Copenhagen terminal: A terminal employee finds the package that fell out of the physical load carrier earlier. The terminal employee does not know anything about the package and therefore chooses Floor check (or Scan incoming or Scan outgoing). In conjunction with the floor-check scan, the package is removed from the load carrier "444LC" in Opter.
(If the terminal employee chooses Scan incoming (arrival scan) or Scan outgoing (departure scan) instead of floor-check scan, the package is removed from the load carrier "444LC" in Opter in connection with the scan, and the arrival/departure scan is registered on the package.
At a terminal, there is a load cage with 7 physical packages in it. The load carrier is a registered load carrier in Opter, and it has a label with the load carrier ID, for example "LC33". The load carrier has 7 packages registered to it in Opter. Everything is right.
The terminal employee does not know that the load cage is a registered load carrier. Depending on whether the terminal employee scans the load carrier’s label or a package in the load cage, one of the following scenarios occurs:
-
If the terminal employee presses Scan incoming, Scan outgoing or Floor check and scans the package, the package is removed from the load carrier "LC33" in Opter in conjunction with the scan, and the scan is registered in Opter as a normal package scan.
(In Opter Terminal, it cannot be seen that the package belonged to a load carrier before the scan).
If the terminal employee wants to put the package back into the load carrier, he or she taps Fill load carrier, scans the load carrier label and then scans the package.
-
If the terminal employee accidentally presses Fill load carrier and scans the package, Opter Terminal will think that a load carrier has been scanned (because Fill load carrier was pressed) and thus that the scanned package ID is a load carrier ID. One of the following happens in this case:
-
If there is an active load carrier with that load carrier ID, Opter Terminal shows how many packages the load carrier contains and the terminal employee can choose to press the Keep packages or Empty load carrier button.
If the terminal employee taps Keep packages, all the packages remain in the load carrier. Hopefully, the terminal employee realises their mistake, taps Keep packages and ends the scanning by tapping Done. Nothing has then changed in Opter. (If the employee taps Empty load carrier, all the packages are removed from the load carrier that the system thought had been scanned).
-
If there is no active load carrier with that load carrier ID, a new load carrier with that load carrier ID is created. Opter Terminal indicates that a new load carrier has been created. Hopefully, the terminal employee realises their mistake and ends the scan by pressing Done. In Opter there is an empty load carrier, but that doesn't matter.
-
-
If the terminal employee taps Fill load carrier and scans the label of an existing load carrier, Opter Terminal shows that it is a load carrier and how many packages the load carrier contains. The terminal employee may choose to press the Keep packages or Empty load carrier button.
If the terminal employee taps Keep packages, all the packages remain in the load carrier. Hopefully, the terminal employee realises their mistake, taps Keep packages and ends the scanning by tapping Done. Nothing has then changed in Opter. (If the employee taps Empty load carrier, all the packages are removed from the load carrier that the system thought had been scanned).
-
If the terminal employee taps Floor check and scans the label on the load carrier, the app display the load carrier's ID and the number of packages in the load carrier.
-
If the terminal employee taps Scan incoming or Scan outgoingand scans the label on the load carrier, the app display the load carrier's ID and the number of packages in the load carrier. The arrival or departure scan is registered on all the packages in the load carrier.
If a proof of delivery is created for a load carrier, the proof of delivery is registered on all the packages in the load carrier and on the orders to which the packages belong.
If the system administrator has made it possible for the app user to be offered the opportunity to create a proof of delivery for a load carrier during arrival and/or departure scanning, the following happens:
-
The terminal employee presses Scan incoming or Scan outgoing, and then scans the load carrier’s label.
-
When the terminal employee presses Done under the scan list, he/she will be asked if he/she wants to create a proof of delivery for the load carrier. If Yes is selected, that proof of delivery is registered on all the packages in the load carrier and on the orders to which the packages belong.
If the system administrator has set it up so that the app user is offered the opportunity to create a proof of delivery for a load carrier when scanning, the following applies:
To create a proof of delivery for all the packages in the load carrier except for one specific package, first remove that package from the load carrier, by arrival, departure or floor-check scanning the package.
Then a proof of delivery can be created for a load carrier, and this is registered on all the packages that are still in the load carrier and on the orders to which the packages belong. For instructions, see Registering a proof of delivery for load carriers above.
Depending on the settings made by the system administrator, you may be offered the possibility to register a proof of delivery when you departure scan a load carrier.
When you register the proof of delivery, it may look like the image below, for example.

The picture shows that the proof of delivery will be registered for 3 packages and 2 load carriers (A). The three packages belong to order number 1177 (C). The IDs of the two load carriers are listed (B), but this view does not show which packages or how many packages are in the load carriers (because that would take up a lot of space). The departure scan is done at Terminal Stockholm (D).
Removing a package from a load carrier by arrival, departure or floor-check scanning the package. After the scan, the package is no longer in the load carrier in Opter.
For more information, see Removing packages from load carriers above.
-
The terminal employee has tapped Fill load carrier, and created a new load carrier, or chosen to empty or continue filling an existing load carrier.
Opter now expects that package labels will be scanned for adding to the load carrier.
-
The terminal employee inadvertently scans a freight bill instead of a package label.
Opter thinks it is a package label that has been scanned, and interprets the number as a package number. This is because the terminal employee has selected the scan type Fill load carrier and packages are put into a load carrier.
Troubleshooting
If the load carrier function is not working properly, the following list can be used for troubleshooting:
-
Check that you and your colleagues have Opter Terminal version 67.0 or later. The functionality was improved in 76.0.
-
The changes to settings made by the system administrator are displayed in Opter Terminal after the app user has logged out and then logged back in.
-
If a freight bill is scanned instead of a package label, see above.