Adding a new Vehicle
Last updated: 27 February 2026
In this article
In the Vehicle Register, you can add new vehicles, update the information of already registered vehicles and deactivate vehicles that are no longer in use.
The fields in the vehicle register are described in Sõidukid (window).
Information such as CO2 emissions can be entered on the vehicle, vehicle type and/or price vehicle type. When Opter calculates CO2 emissions for an order/shipment, Opter retrieves CO2 emissions data from the vehicle in the first instance. If CO2 emissions data (e.g. fuel and fuel consumption) are not available for the vehicle, Opter will retrieve the data from the vehicle type. If it is not specified for the vehicle type, Opter will retrieve the data from the price vehicle type.
Conditions
When adding a new vehicle, you must specify the vehicle type of the vehicle. If you do not already have the vehicle type registered in Opter, you can add a new vehicle type . For instructions, see Adding a new vehicle type and Sõidukite tüübid (window).
Proceed as follows
To add a new vehicle:
-
Click on Register > Transpordivahendid.
-
Select one of the following:
-
Click on
 to add a new Vehicle.
 -
Copy a vehicle that you already have in the vehicle register.
In the list on the left, select the vehicle you want to copy and click
 or
or  at the top of the menu. (Assign the vehicle a Nimi and a call number (Number), and make the changes you want to make. You can follow the instructions below to check that the data is correct on all tabs of the register).
-
-
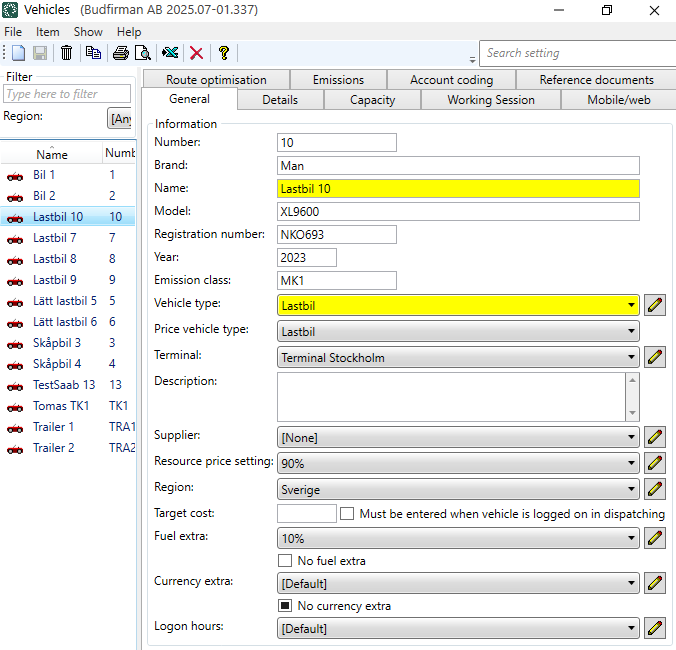
Give the vehicle a call number in the field Number, for example "10". The call number is used, among other things, in dispatch.
-
Enter a name for the vehicle in the field Nimi, for example "Truck 10" (i.e. the vehicle type and call number) or the registration number.
-
Enter the vehicle type in the drop-down box Sõiduki tüüp, for example lorry, light truck or van. If the vehicle type is not in the list, you can add a new vehicle type by clicking on
 . For more information, see Sõidukite tüübid (window) and Adding a new vehicle type.
 -
You can fill in the REST of the fields on the Üldine tab if you wish, for example
-
Enter the price vehicle type in the drop-down menu Sõidukitüübi hind, for example lorry or light truck.
To add new or change existing price vehicle types, go to Majandus > Hinnakirjad > Price vehicle types.
-
If the Vehicle belongs to a Terminal, enter the Terminal in the drop-down list Terminal.
-
If the vehicle belongs to a haulier, enter the haulier in the drop-down list Hankija.
-
In the drop-down menu Ressursi hinna seadistus, select the resource pricing for the Vehicle.
[puudub] means that no cost is generated, even if manual cost is entered. For more information, see Sõidukid (window).
-
If you work with fuel surcharges, you can specify which fuel surcharge the vehicle should receive in the field Kütuselisa, and untick the checkboxes Kütuselisa pole. For more information, see Fuel surcharge (fuel extra), overview and Selecting fuel extra for a vehicle.
The fields are described in Sõidukid (window).
-
-
Click on Salvesta to save all changes.
The REST of the tabs in the vehicle register are optional to fill in. You fill them in according to your needs and wishes. See the steps below.
-
On the Detailid tab, you can enter more information about the vehicle if you wish, for example Vastutav isik and Kulude kogumid.
-
On the Mahutavus tab, you can enter information about the capacity of the vehicle, such as maximum load weight.
-
In the Laadige teave box, enter the maximum load the vehicle can carry.
If the value in the field is shown in italics, it means that the value comes from the vehicle type (which you have selected in the drop-down list Sõiduki tüüp on the tab Üldine). If you wish, you can enter other values for the vehicle here in the vehicle register. Opter takes information on capacity primarily from the vehicle, and secondarily from the vehicle type.
-
In box Mõõtmed, you can enter the vehicle's dimensions, such as length, width and total weight. Opter does not use the information in these fields for any purpose.
If you use route optimisation, it is important what is entered in fields Length (cm), Width (cm), Height (cm) and Total weight (kg) on vehicle type (see tab Route optimisation under Dimensions for PTV in the vehicle type register). For more information, see Sõidukite tüübid (window).
-
If the vehicle has capacities (types of loads) listed in the box Mahutavus, enter the maximum capacity of the vehicle. For example, there may be cargo cages and the vehicle may hold a maximum of 8 cargo cages.
If you want to add capacities (load types) that are then displayed here, click on Seaded > Kapatsiteedi tüübid. Give the load type a name and then the weight, Pallet space, volume and/or load metre. For more information, see Kapatsiteedi tüübid (window).
-
In the Valikud box, tick the options that the vehicle has.
The options shown here are added in the window Valikud. For more information, see Options and Valikud (window). The options displayed in the vehicle register are those that have the checkbox Saadaval sõidukitele ticked in the window Valikud.
-
-
On the tab Tööseanss you can view, edit and export shifts. Work shifts are created based on the activities entered by the Vehicles/Drivers in Opter Driver, or added by the dispatchers to the drivers or vehicles in the dispatch. For more information, see Sõidukid (window).
-
For example, on the Mobiil/veeb tab, you can enter the username and password for logging in to The vehicle web and also to the Opter Driver app if the user logs in as a vehicle.
-
For Opter version 2025.12.00 and later:
Enter Kasutajanimi and then click on Salvesta (
 ). You can then enter the password by clicking on the button Vaheta parool (1) and typing the password similarly in the fields Uus salasõna (2) and Kinnita parool (3). Then click on Okei (4) and the password will be saved.
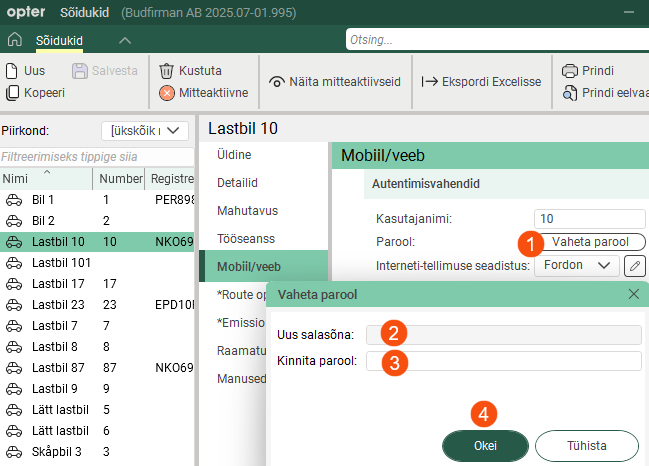
-
For Opter version 2025.06.00 and earlier, enter Kasutajanimi and Parool in the fields and then click Salvesta.
For more information, see Sõidukid (window), User accounts for The vehicle web and Installing Opter Driver.
-
-
If you are using route optimisation, click on the tab Route optimisation and make settings for the vehicle. For more information, see Sõidukid (window).
-
If you want Opter to be able to calculate CO2 emissions based on, for example, the vehicle's fuel and fuel consumption, click on the tab Emissions and make settings for the vehicle.
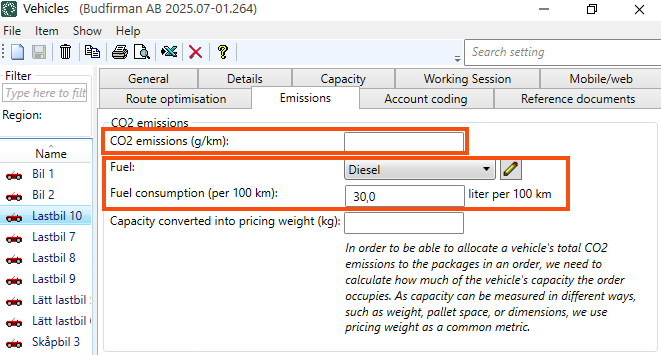
The data on CO2 emissions is taken firstly from the vehicle, secondly from the vehicle type and thirdly from the price vehicle type. If the shipment is subcontracted, the CO2 emissions data will be obtained firstly from the subcontractor and secondly from the price vehicle type.
For more information, see CO2 emissions, overview, Settings for CO2 emission calculations and Sõidukid (window).
-
On the Raamatupidamine tab, you can set how income and expenses are to be posted to the posting source (i.e. the Vehicle). For more information, see Account coding, overview.
-
On the Manused tab, files that can be opened on other computers can be added. The files that are added are not attached to orders, instead the function works as a file server and is intended for exchanging information. The files are saved in the database.
-
Click on Salvesta to save all changes.
Changing the details of registered Vehicles
If you want to change the details of one of your vehicles, do this:
-
Click on Register > Transpordivahendid.
-
Select the vehicle in the list on the left and change the data to be modified for the vehicle. The fields in the vehicle register are described in Sõidukid (window).
-
Click on Salvesta to save all changes.
Deactivating vehicles
You can deactivate vehicles that are no longer in use:
-
Click on Register > Transpordivahendid.
-
Select the vehicle in the list on the left.
-
To deactivate the vehicle, click on
 in the top menu.
The change is saved when you close the window. The next time you open the Vehicle Register, the vehicle will no longer appear in the list. The Vehicle is now also hidden in other listings in Opter.
The history of the vehicle remains in Opter and you can reactivate the vehicle, see below.
Activate deactivated vehicles
If you have deactivated a vehicle, but want to activate it again, do the following
-
Click on Register > Transpordivahendid.
-
Click on Näita and then Näita mitteaktiivseid in the top menu.
Now all vehicles are shown in the list, both active and inactive. The inactive ones are indicated by
. -
Select the vehicle in the list on the left.
-
Activate the vehicle by clicking on
at the top of the menu.The change is saved when you close the window.
Export to Excel
You can export the vehicle register to Excel, proceed as follows:
-
Click on Register > Transpordivahendid.
-
Click on
 . The Ekspordi Excelisse dialogue box opens.
 -
Click on OK. Excel opens and displays information on all vehicles in the Vehicle Register, one vehicle per row.