Adding a new vehicle type
Last updated: 21 August 2025
In this article
In the vehicle type register, you can add new vehicle types, update the information of already registered vehicle types and deactivate vehicle types that are no longer in use.
The fields in the register of vehicle types are described in Sõidukite tüübid (window).
The difference between vehicle type and price vehicle type
The price vehicle type forms the price basis. It is applied to the order and can be selected by the customer in the customer portal, for example. The vehicle type is used in dispatch and affects how the transport is carried out. It is basically the same, but there is a registry for each of them, so it is possible to make different settings depending on how you want to handle vehicle types that form the basis for prices and planning..
The vehicle types can, but do not have to, match the price vehicle types in the Sõidukitüübi hind registry.
Proceed as follows
To add a new vehicle type:
-
Click on Register > Sõiduki tüübid.
-
Click on
 to add a new vehicle type.
 -
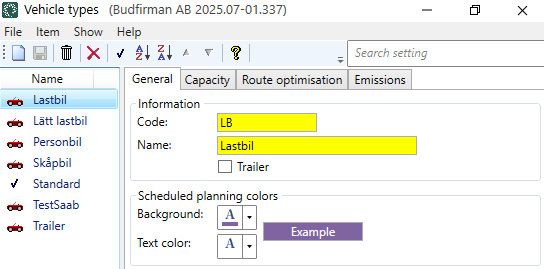
In the tab Üldine, give the vehicle type a Kood and a Nimi. For example Kood "TL" and Nimi "Heavy lorry".
-
If the vehicle type is a trailer, tick the checkbox Treiler.
-
In the box Plaanitud planeerimisvärvid you can select the colours for the vehicle type. These colours are only displayed on the Ajakava planeerimine tab of the dispatch system.
-
On the Mahutavus tab, you can enter information about the capacity of the vehicle type, such as maximum load weight.
-
In the Laadige teave box, enter the maximum load of the vehicle type.
-
If the vehicle type has capacities (load types) listed in the box Mahutavus, then enter the maximum capacity of the vehicle type. For example, they may be load cages and the vehicle type may have a maximum of 8 load cages.
If you want to add capacities (load types) that are then displayed here, click on Seaded > Kapatsiteedi tüübid. Give the load type a name and then the weight, Pallet space, volume and/or load metres. For more information, see Kapatsiteedi tüübid (window).
-
-
If you are using route optimisation, click on the tab Route optimisation and make settings for the vehicle type. The fields are described in Sõidukite tüübid (window).
If the vehicle type is a trailer, you should enter your own values on the tab Route optimisation as PTV does not have a vehicle profile for trailers only.
It is not possible to route optimise trailers on their own; it is instead the vehicle pulling the trailer that is route optimised.
-
If you want Opter to be able to calculate CO2 emissions based on, for example, the vehicle type's fuel and fuel consumption, click on the tab Emissions and make settings for the vehicle type.
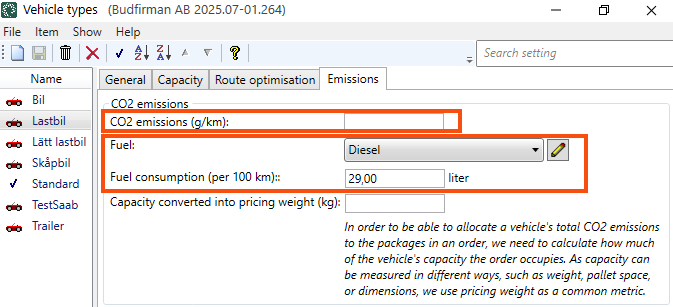
For more information, see CO2 emissions, overview, Settings for CO2 emission calculations and Sõidukite tüübid (window).
The data on CO2 emissions is taken firstly from the vehicle, secondly from the vehicle type and thirdly from the price vehicle type. If the shipment is subcontracted, the CO2 emissions data will be obtained firstly from the subcontractor and secondly from the price vehicle type.
-
Click on Salvesta to save all changes.
Change details of registered vehicle types
If you want to change the details of one of your vehicle types, do this:
-
Click on Register > Sõiduki tüübid.
-
Select the vehicle type in the list on the left and modify the data to be changed for the vehicle type. The fields in the register of vehicle types are described in Sõidukite tüübid (window).
-
Click on Salvesta to save all changes.
Deactivate vehicle types
You can deactivate vehicle types that are no longer in use:
-
Click on Register > Sõiduki tüübid.
-
Select the vehicle type in the list on the left.
-
To deactivate the vehicle type, click on
 in the top menu.
The change is saved when you close the window. The next time you open the Sõidukite tüübid window, the vehicle type will no longer appear in the list. The vehicle type is now also hidden in other lists in Opter.
The history of the vehicle type remains in Opter and you can reactivate the vehicle type, see below.
Activate deactivated vehicle types
If you have deactivated a vehicle type, but want to activate the vehicle type again, proceed as follows:
-
Click on Register > Sõiduki tüübid.
-
Click on Näita and then Näita mitteaktiivseid in the top menu.
Now all vehicle types are shown in the list, both active and inactive. The inactive ones are indicated by
. -
Select the vehicle type in the list on the left.
-
Activate the vehicle type by clicking on
in the top menu.The change is saved when you close the window.