Creating zones
Last updated: 23 October 2023
In this article
To be able to price orders based on zones, both geographical zones and price zones have to be created. The price zone is used for price collections, but it must contain one or more geographical zones to work.
Geographical zones contain postcodes. A specific postcode can only be included in one geographical zone per geo-zone collection.
Price zones contain one or more geo-zones. A specific geo-zone can only be included in one price zone per price zone collection.
Geographical zones
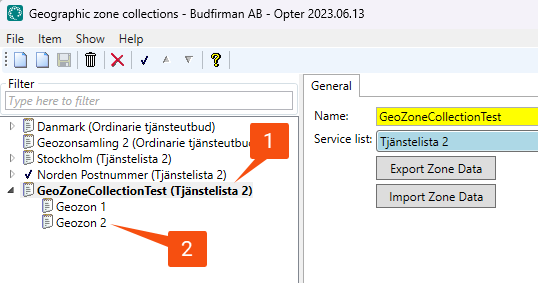
Geo-zones are managed in the Geographic zone collections window, which can be opened by clicking on Economy > Price lists > Geo-zones.
The tree structure on the left contains geo-zone collections (1) and geo-zones (2).
Creating geo-zone collections
-
Click on
 (New collection of geographic zones) and give the zone collection a name, such as 'Stockholm' or 'Helsinki'.
 -
Select to which service list the geo-zone collection should belong. The service list that is chosen is of no practical importance, as price zone collections and price zones can be selected directly in the price list at different levels. But it can be used to organise geo-zone collections.
-
Click on Save to save all changes.
Creating geo-zones
A geo-zone collection must exist before a geo-zone can be created (see above).
-
Select the geo-zone collection in which the new geo-zone will be included.
-
Click on
(New geographic zone) and give the zone a name, such as “Kungsholmen” or “Kampen”. (A geo-zone can be a city district, for example). For more information about other settings, see Geographic zone collections (window). -
Click on Save to save all changes.
-
Go to the Postcodes tab to specify the postcodes to be included in the geographical zone.
Under Search - Not Selected it is possible to search for postcodes by entering the postcode or town in the top field. "11" finds all postcodes starting with "11", e.g. "112 34", and "mal" finds all postcodes in all towns starting with "Mal", e.g. Malmberget. In the first drop-down menu, choose whether to search for Postcode or City. In the next drop-down box, select the country in which to search by postcode. Then click on Search.
To search for all the postcodes in a country, select All from the top drop-down list and the country from the bottom one.
-
The postcodes for the new geo-zone are selected by dragging and dropping them into the right-hand list (under Selected). Multiple postcodes can be selected and moved at the same time.
-
Click on Save to save all changes.
Adding and removing postcodes in existing geo-zones
Postcodes can be added to an existing geo-zone by selecting the geo-zone in the list on the left and then adding postcodes in the same way as when creating a new geo-zone.
Postcodes can be removed from the geo-zone by selecting them in the list, pressing Delete and then clicking ![]() in the toolbar to save the changes. Another way of deleting a postcode is to drag it to the list under Search - Not Selected and then click on
in the toolbar to save the changes. Another way of deleting a postcode is to drag it to the list under Search - Not Selected and then click on ![]() in the toolbar to save the changes.
in the toolbar to save the changes.
Exporting and importing geo-zones
To work with the geo-zones in Excel, for example, a geo-zone collection can be exported to a CSV file and then subsequently imported back into Opter. Select the geo-zone collection in the list on the left and click on Export Zone Data. When exporting, a CSV file containing all the geo-zones in the geo-zone collection is created.
It is not possible to create new geo-zone collections outside Opter and then import them into Opter. Instead, a zone collection can be created in Opter (with name and service list), and it can then be exported and edited, before the edited geo-zone collection is then imported back into Opter.
Only import zone data into empty geo-zone collections. If the geo-zone collection already contains geo-zones, there is a risk of duplication as the import does not check if a similar geo-zone already exists in the geo-zone collection, but instead simply adds all the geo-zones from the CSV file.