Returning to the same address in a consignment, example
Last updated: 5 September 2025
In this article
Normally, Opter’s consolidated delivery function is based on unique stops, where each address appears once. However, in real-world scenarios, it is sometimes necessary to return to the same address several times during a single consignment; for example, if one of the orders in the consignment fills the entire vehicle and the driver has to drive back to the sender’s address to collect the remaining goods. (See 2 in the image below.)
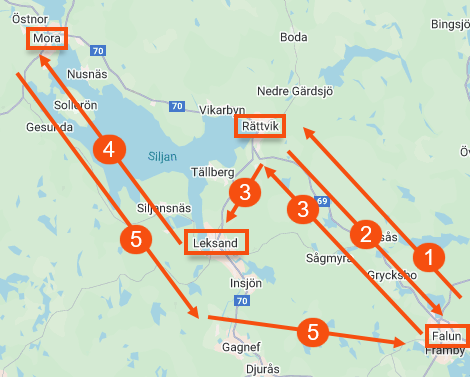
In Opter, it is possible to include the same address multiple times in a consignment, so that:
-
The route is correctly recorded in Opter, which results in:
-
A more accurate calculation of CO₂ emissions for the consignment order, as the CO₂ emissions calculation is based on distance (among other factors).
-
Appropriate remuneration for the resource carrying out the consignment shipments, if the remuneration is based on distance.
-
-
The driver can view the correct route sequence in the Opter Driver app.
-
The dispatch manager can adjust the route manually by splitting the deliveries across several stops.
Below, we use an example to show you how to include the same address multiple times in a consignment. See also Examples, further details and Conditions below.
This is how we handle it at Opter
-
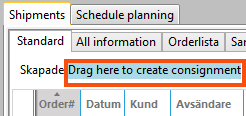
We create a consignment, for example by selecting all the customer orders (shipments) and dragging and dropping them onto area Drag here to create consignment in the dispatch system.
-
In the order reception area, in section Addresses, we click on Calculate route sequence. The addresses are arranged in the most efficient order.
(The route sequence can only be calculated if all stops are unique addresses.)
-
Order No. 3401 takes up the entire vehicle, and we would like the driver to take this order to Rättvik first. So we need to separate order no. 3401 from the rest of the orders, which we want to collect later.
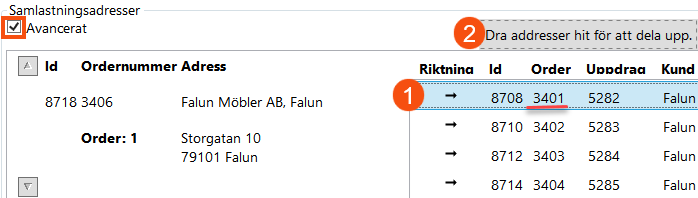
In the order reception area, in section Consignment Addresses, we select the row with order no. 3401 (1) and drag and drop it onto area Drop addresses here to split it. (2).
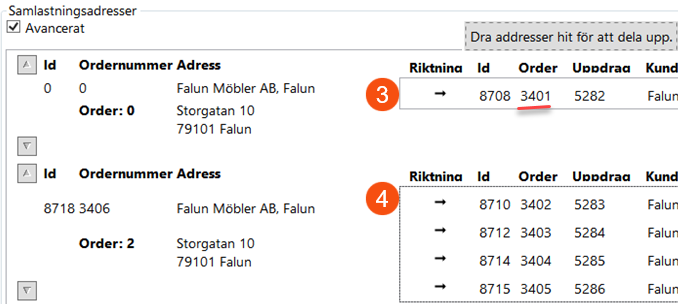
We have now separated order no. 3401 (3) from the rest of the orders (4).
-
In the order reception department, in section Addresses, we move the delivery address (in Rättvik) for order no. 3401 so that the route is as we require. Select the address bar and click the Order up button until you reach the correct position in the route sequence.
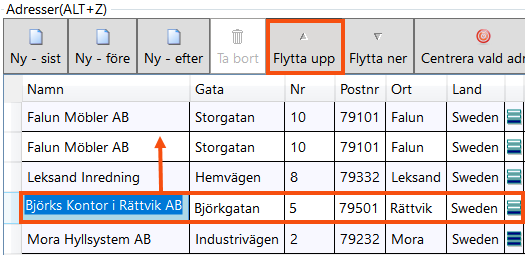
The route sequence is now as we would like it to be:
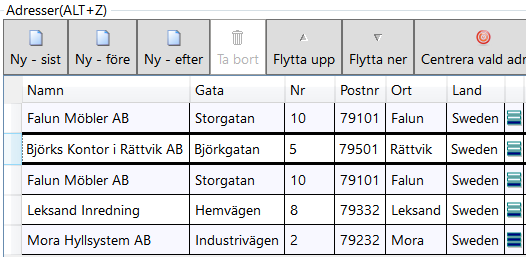
-
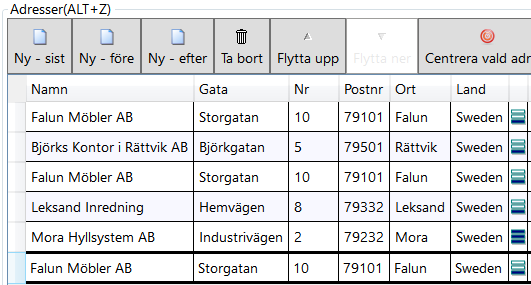
We want the driver and the vehicle to return to Falun (the sender’s address/starting address) once all the consignment shipments have been completed, so we are adding a final destination manually.
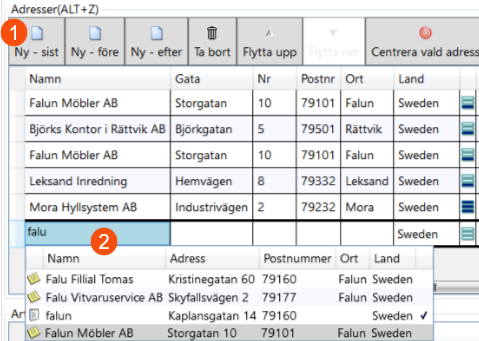
In the order reception section Addresses, we click the button New - last (1) and enter the delivery address (2), then we save the order.
-
The route in Opter now matches the actual route, and the distances are correct.
Examples, further details
In this example (above), the transport company works for a furniture company based in the town of Falun, where it also has its warehouse.
We have the following customer orders to be fulfilled on the same day, and we would like to consign them; see the image below.

Order No. 3401 takes up the entire vehicle, and the driver must first transport this order from Falun to Rättvik and then drive back to Falun to collect the remaining goods.
The image shows the route (simplified to provide an overview):
-
Falun —> Rättvik. (Transport of order no. 3401, which fills the entire vehicle.)
-
Rättvik —> Falun. (The driver and the vehicle will return to the sender’s address to collect the remaining goods.)
-
Falun —> Leksand.
-
Leksand —> Mora.
-
Mora —> Falun. (If you want the driver and the vehicle to return to Falun once all the consignment shipments have been completed, you can add a final destination manually.)
Conditions
-
Display section Consignment Addresses on any tab in the order reception area. This gives you a better overview and allows you to easily separate certain orders from the rest of the orders in a consignment, for example, if you are unable to collect all the orders from the sender’s address at the same time.
If you do not have section Consignment Addresses, you can add it in the order settings. For instructions, see Organising the groups in Order reception.
Tick the box Advanced at the top of section Consignment Addresses, and you can easily move addresses up and down the list and access the area Drop addresses here to split it. (so that you can separate certain orders from the rest).
-
Display section Addresses on any tab in the order reception module.
You’ll have a better overview, you can plan your route sequence, and you can easily add addresses and reorder them.
By default, section Addresses is located on the tab Shipments. If you do not have section Addresses, you can add it in the order settings. For instructions, see Organising the groups in Order reception.
-
Display area Drag here to create consignment in the dispatch system. You can then select the shipments you want to include in the consignment and drag and drop them onto the workspace Drag here to create consignment.
The Create consignment window opens.
If you do not have the Drag here to create consignment area, you can choose to display it; see Dispatch settings (window).

