Printing a job list after scanning (Opter Terminal)
Last updated: 18 January 2022
In this article
Once a set of packages has been scanned with Opter Terminal, a list of scanned shipments can be created. The list can be viewed and printed in the Assignment List Followup window of Opter.
Step 1: Open the Opter Terminal layout settings
-
Click on Settings > Mobile data > Settings mobile data.
-
Click on Edit, next to Terminal.Settings.
If Terminal.Settings does not appear in the list, click on an empty line in the Name column and select Terminal.Settings from the list.
If you have configured specific Opter Terminal settings for the terminal whose setting you want to adjust, the following setting must be applied for that terminal in the terminal registry, rather than in Terminal.Settings. For more information, see Separate Opter Terminal settings for individual terminals.
Step 2: Specify that a scan batch should be created in Opter Terminal when scanning
A scan batch is a collection of scans to be kept together, for example all the packages on a trailer. The scan directions for which a scan batch should be created can be selected in Terminal.Settings, which can be useful if, for example, you want to be able to print shipment lists from arrival scans, rather than from inventory scans.
You activate scan batches by putting comment > enabled to true (line 15 in the example below). We also recommend to make it mandatory by putting mandatory on the same line to true. If it is not mandatory, the person doing the scanning can choose not to create a batch, which means that it is not possible to print a shipment list.
In this example, the printing of mission lists is enabled for arrival scans (arrival, line 7).
<?xml version="1.0" encoding="utf-8" ?>
<fleet101>
<k2>
<windowsce>
<terminal>
<arrival> <!-- specific settings for arrival scanning-->
<shipment visible="true" /> <!-- enable disable freightbill scanning-->
<package visible="true" /> <!-- enable disable package scanning-->
<resource mandatory="false" skipVisible="false" /> <!-- if mandatory="true" you must choose resource. if mandatory="false" and skipVisible="true" it's optional to choose resource -->
<route visible="false" choice="false" /> <!-- visible="true" show route in scanresult list. choise="true" you have too choose route before scanning-->
<nextroute visible="false"/> <!-- visible="true" next route is visible in scanresult list and scandetails-->
<orderdate visible="false"/> <!-- visible="true" sets orderdate visible in scanlist -->
<autoprintsortlabel enabled="false" /> <!-- enabled="true" automatic printing of sortlabels after every scan -->
<comment enabled="true" mandatory="true"/> <!-- enabled="true" Lets you add ScanComment. Use mandadory true/false to make it mandatory/optional. -->
<pod enabled="false"/> <!-- enabled="true" a POD-dialog is visible after finnshing scanning to add ProofOfDelivery -->
<nextresource visible="false" /> <!-- visible="true" sets next resource visible in scanlist (SHI_NextResource) -->
<nextorder visible="false" /> <!-- visible="true" sets next order visible in scanlist (SHI_AddressIndexFrom) -->
<!--pkgdimensions>
<![CDATA[ add text, html and variables here ]]>
</pkgdimensions--> <!-- define own text in scanresultlist with simple html and variables: "PACKAGEWEIGHT", "PACKAGELOADMETER", "PACKAGEDEPTH", "PACKAGEWIDTH", "PACKAGEHEIGHT", "PACKAGEVOLUME", "PACKAGEQUANTITY", "PACKAGEAREA" -->
<!--fbdimensions>
<![CDATA[ add text, html and variables here ]]>
</fbdimensions--> <!-- define own text in scanresultlist with simple html and variables: "DEL_CalculatedVolume", "DEL_CalculatedArea", "DEL_CalculatedLoadMeter", "DEL_CalculatedLength", "DEL_CalculatedWidth", "DEL_CalculatedWeight" -->
<!--listdesign>
<![CDATA[ add text, html and variables here ]]>
</listdesign--> <!-- define own text in scanresultlist with simple html and variables: "ADR_AddrLine1From", "ADR_StreetFrom", "ADR_StreetNoFrom", "ADR_ZipCodeFrom", "ADR_CityFrom", "ADR_EntreCodeFrom", "ADR_PhoneFrom", "ADR_AddrLine1To", "ADR_StreetTo", "ADR_StreetNoTo", "ADR_ZipCodeTo", "ADR_CityTo", "ADR_EntreCodeTo", "ADR_PhoneTo", "PST_Name", "SHI_NextStatus", "SHI_NextResource", "NextRouteName", "ROU_Name", "SHI_AddressIndexFrom" -->
<!--detailsdesign>
<![CDATA[ add text, html and variables here ]]>
</detailsdesign--> <!-- define own text in scandetails with simple html and variables: "ADR_AddrLine1From", "ADR_StreetFrom", "ADR_StreetNoFrom", "ADR_ZipCodeFrom", "ADR_CityFrom", "ADR_EntreCodeFrom", "ADR_PhoneFrom", "ADR_AddrLine1To", "ADR_StreetTo", "ADR_StreetNoTo", "ADR_ZipCodeTo", "ADR_CityTo", "ADR_EntreCodeTo", "ADR_PhoneTo", "DEL_CalculatedVolume", "DEL_CalculatedArea", "DEL_CalculatedLoadMeter", "DEL_CalculatedLength", "DEL_CalculatedWidth", "DEL_CalculatedWeight", "PST_Name", "SHI_NextStatus", "SHI_NextResource", "NextRouteName", "ROU_Name", "SHI_AddressIndexFrom" -->
</arrival>Step 3: Scan the packages
After setting comment > enabled to true, the following dialogue box appears when you start scanning in Opter Terminal To create a new scan batch, select Yes and write a comment. Since the batch ID is not displayed in Opter Terminal, it may be useful to write a comment that really sets the batch apart.
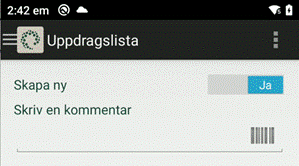
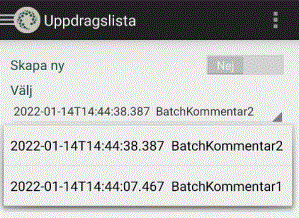
Several people can help with scanning. The first person creates the scan batch and the others select No in the above dialogue box and link the scan to the existing scan batch instead by selecting it from the drop-down list under Select.
If freight bills are being scanned, it is not possible to connect to an existing scanning batch. As there is only one freight bill per order, there is no need for several people to help.
When the scanning has been completed, you need to answer Yes to the question to print the shipment list. It is not printed directly but sent to Opter, where it can be printed as a PDF or on paper.
Step 4: Create and print the shipment list in Opter
-
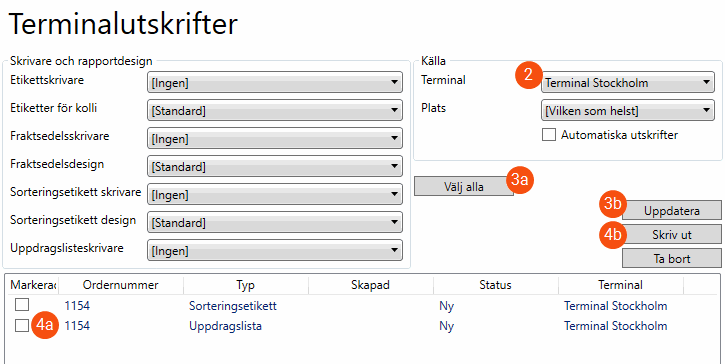
Click on Order > Terminal printing.
-
Select the Terminal where the scan was performed from the drop-down list Terminal.
-
Click on Select all (which retrieves all the printouts made at the terminal) and then on Refresh. The list of scans at the bottom of the window is updated.
-
Select the shipment list to be printed and click on Print. A preview is displayed, which can then be saved as a PDF or printed.
Printing shipment lists later on
If the terminal staff have scanned a batch previously and chosen to send it to Opter as described above, the shipment list can be printed later on. Proceed as follows:
-
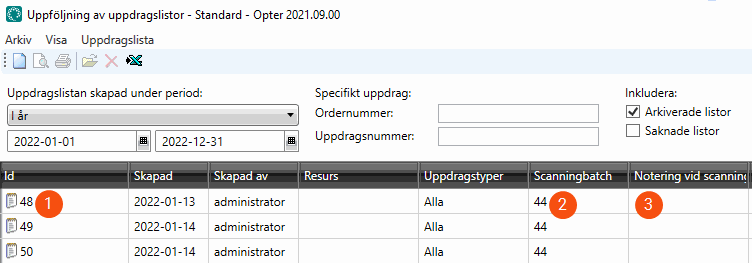
Click on Order > Assignment List Followup.
-
Find the scan batch from which a shipment list should be created, either from an order number/shipment number that you know is included in the scan batch, or from a time interval. The batch ID of the scan is displayed in the Scan batch column.
-
Click on
 , enter the batch ID in the dialogue box that opens, and then click on Create shipment list for scan batch. If shipment lists have previously been created for the same batch ID, they can be disabled so that they are not displayed in the overview by selecting Disable lists with the same scan batch.
A new shipment list with a new ID is created.
-
Print the list by clicking on
 .
.
The difference between a scan batch and a shipment list
A scan batch is a container for a number of packages that have been scanned. The scan batch has a batch ID and is stored in the database.
A shipment list retrieves information from the orders to which the packages in a scan batch belong, such as addresses, times and weight, and functions as a summary of a shipment. The shipment list can be printed or saved as a PDF. The default report for shipment lists is set on the Reports tab in the office settings.
-
ID for the shipment lists.
-
ID for the scan batch.
-
This shows the comment entered in Opter Terminal when the scan batch is created (see step 3 above).