Tabs and menu in Opter Driver (classic)
Last updated: 12 August 2025
In this article
Tabs
There are five tabs below the status bar that provide access to the app’s features.

On the tab, messages can be sent to and received from dispatch. The number of unread messages is displayed with a number in a red circle next to the icon.

If there are no new messages, the circle is grey. When you have read a message, you can mark it as read.

New
The New tab shows new shipments that the dispatcher has given you, but which you have not yet accepted. They have the Assigned status in dispatch. The number of new, unaccepted shipments is shown with a number in a red circle next to the icon. Press and hold a shipment in the list to change the status of the shipment. If you accept the shipment, it will be moved to the Todo tab.

Todo
The Todo tab is a list of the shipments you have accepted and will carry out.

More information about a shipment can be displayed by tapping on it. If a shipment is open, you can go to the previous and next shipments by swiping sideways across the screen. The number in the upper right corner indicates the shipment’s position in the Todo list (1 of 4 in the image below).

Done
The Done tab is a list of the shipments you have completed during the working session and which have the Delivered status in dispatch. When the working session is over, or when you log out of Opter Driver, the list of completed shipments is cleared.
Scan
On the Scan tab, freight bills and package labels can be scanned, and the status of shipments can thus be changed, which is synchronised with dispatch. Press one of the options, then choose whether to scan a freight bill or a package label. When you select the arrival or departure terminal, you can also choose at which terminal to scan.
|
Option |
Description |
|---|---|
|
Loading |
Used when the goods are picked up from the sender. The status of the shipment is set to Pickup. |
|
Unloading |
Used when the goods are delivered to the receiver. The status of the shipment is set to Delivered. |
|
Terminal arrival |
Used when dropping off goods at a terminal. The status of the shipment is set to Delivered. |
|
Terminal departure |
Used when loading goods at a terminal. The status of the shipment is set to Pickup. |
A scan can be cancelled by tapping and holding the scan and then selecting Undo. When you cancel a scan, the status of the shipment is reset to what it was before the scan, and you are deleted as a resource from the shipment.
-
If you accidentally scan a package on a shipment that has already been assigned to someone else, and then cancel that scan, that driver will not get the shipment back. The status is set to Created in dispatch. This is the case even if you only scan and cancel one of a number of packages in the shipment.
-
If the scan is sent to another system via EDI, the EDI transfer is not cancelled. This could mean, for example, sending SMS notifications from the other system stating that the goods are on their way to a receiver.
Menu
There is a menu, ![]() , in the top right-hand corner. The options displayed in the menu depend on whether you are on a tab with a list of shipments, or have a single shipment open.
, in the top right-hand corner. The options displayed in the menu depend on whether you are on a tab with a list of shipments, or have a single shipment open.
Menu options on the New, Todo and Done tabs
The menu icon is also displayed on the and Scan tabs, but nothing happens when it is pressed. The dispatcher can set what is displayed in the menu, so it may look slightly different in your version of the app.

|
Option |
Description |
|---|---|
|
New order |
Creates a new order. |
|
Sort |
Sorts the shipments. You can sort based on various fields. An arrow indicates whether the field is sorted in ascending or descending order. Up arrow = A-Z, down arrow = Z-A. Press the option again to change the route sequence. The route sequence is not synchronised with dispatch. |
|
Filter |
Displays only certain shipments in the list.
|
|
Working hours |
Notifies dispatch that you are taking a break. The resource name in the status row will be red (rest) or turquoise (lunch) and your status will be visible in dispatch. Start break: Breaks are included in working time. Start lunch: Lunchtime is not included in working time. You can only have lunch once per working session. Press |
|
Select status |
Changes the status of several shipments at the same time. Select the shipments whose status you want to change. Press and hold one of the selected shipments and choose the status it should have. If you change your mind, press the menu and select Cancel so that the checkboxes disappear. The statuses displayed are configured by the dispatcher. In addition to the statuses, you can also choose two other options:
We recommend changing the status of one shipment at a time. Shipments may contain details, such as a checklist to be completed during loading or unloading. Such details are skipped if the statuses of several shipments are changed at the same time. |
|
Settings |
Configures Opter Driver. For more information, see Settings in Opter Driver (classic) for Android. |
|
End |
Logs out and exits Opter Driver. You have to exit Opter Driver in this way, or by using the mobile phone's back button and going back until you are logged out, to log out correctly. If you exit the app in any other way, it will still look as though you are logged into dispatch. |
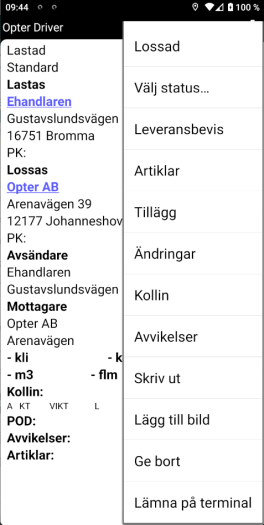
Menu options when you display a shipment
When you tap a shipment in a list, the shipment opens. When a shipment is open, the following options are available in the menu. The dispatcher can set what is displayed in the menu, so it may look slightly different in your version of the app. Close the shipment by tapping the back button on your phone.
|
Option |
Description |
|---|---|
|
Next status |
The first option in the menu is to change the status of the shipment to the next in the flow (Delivered in the above image). To set a different status for the shipment, press Select status instead. |
|
Select status |
Changes the status of the shipment. It is also possible to select a status earlier in the flow than the current one. When a status is selected, more information can be added about the shipment. Sometimes some information may be mandatory, for example providing a proof of delivery when the shipment is given the Delivered status. If the fields are yellow, they must be filled in before you can proceed.
|
|
Proof of delivery |
Registers a proof of delivery for the shipment. |
|
Price items |
Displays a list of price items on the shipment. You can add, modify and delete Price items. |
|
Extras |
Adds extras to the shipment. The dispatcher decides which extras can be selected. |
|
Changes |
Informs dispatch of changes to the shipment, such as the weight and load metres. The changes are synchronised with dispatch. |
|
Packages |
Displays a list of packages on the shipment. You can add and change packages. The changes are synchronised with dispatch. |
|
Deviations |
Displays a list of deviations on the shipment. You can add deviations. For more information, see Registering damage in Opter Driver for Android. |
|
|
Displays a list of attachments associated with the shipment. Attached photos can be opened directly in Opter Driver or the attachments can be downloaded to your mobile device. For more information, see Attachments in Opter Driver and Opening and downloading attachments in Opter Driver for Android. |
|
|
|
|
Add image |
Adds an image to the shipment. |
|
Give away |
Hands over the shipment to another resource. For more information, see Giving away shipments in Opter Driver for Android. |
|
Leave at terminal |
Select this option to cancel the shipment and leave it at a terminal. The change is synchronised and displayed in dispatch, and another shipment is added to the order. The shipment you leave on the Terminal is moved to the tab Done. The new shipment that has been created is not allocated to anyone and its status is set to Created in dispatch. |