Suppliers (window)
Last updated: 17 September 2026
 Register > Suppliers
In this article
In this window, you can manage your suppliers. For more information, see Adding new riders.
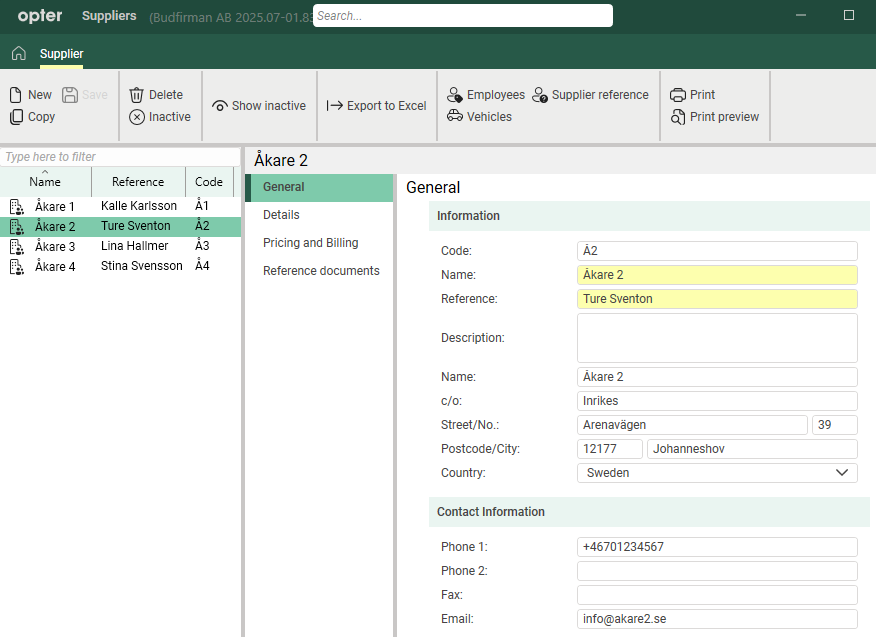
General
Information
|
Function |
Description |
|---|---|
|
Code |
The code is an abbreviation for the supplier and is used, for example, in dispatch. |
|
Name |
The supplier’s name as you would like it to appear in Opter. |
|
Reference |
Contact person at the supplier. |
|
Description |
Free text field for internal notes. The description is not displayed anywhere else but here. |
|
Name c/o Street/No. Postcode/City Country |
Company details. |
Contact Information
|
Function |
Description |
|---|---|
|
Phone 1 Phone 2 |
The rider's telephone number. |
|
Fax |
Fax number if applicable. |
|
|
The driver's main address. Supplier bills will be sent here unless you enter an address in the Email supplier bill export field on the tab Pricing and Billing. |
Details
Details
|
Function |
Description |
|---|---|
|
Corporate ID number |
Corporate ID number. |
|
VAT registration number |
VAT registration number. |
|
VAT reg. until |
This applies only in Norway, where newly registered companies cannot apply for VAT registration until their turnover has exceeded NOK 50,000. If you engage a newly established supplier in Norway, you should therefore not add VAT to the supplier bills until they have become VAT-registered. Here, you enter the date on which the supplier becomes VAT-registered, i.e. the date from which you are required to pay VAT to them. You can also tick Withhold VAT on the Pricing and Billing tab to indicate that VAT is not payable on supplier bills. Rapporttagg: ResTaxRegistrationEndDate Lägg till format="yyyy-MM-dd" i data-taggen för att få datumet i formatet ”2026-09-16”. |
|
Which price details are shown in the order preview on the supplier web. Clicking on [Default]: The setting in field Resource price supplier on the Crediting tab in the office settings applies. |
|
|
Internet order setting |
Select which view the supplier should have on the supplier web. Click [Default]: The setting on the Internet tab in the office settings is used. |
|
Starting date |
The date on which the supplier starts working for you. |
 opens the
 Login information
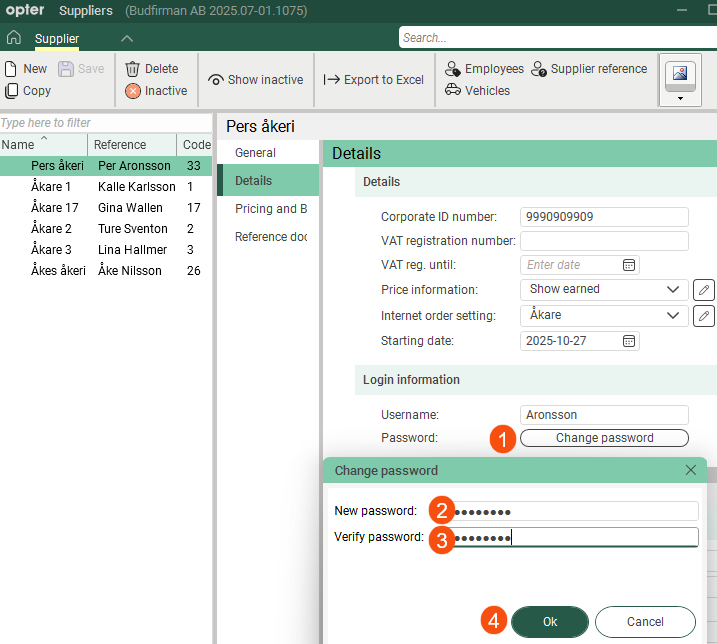
Here you can create a shared user account that all users of the rider can use to log in to the supplier web. If you want more control, you can create individual user accounts for each user; see User accounts for the supplier web.
|
Function |
Explanation |
|---|---|
|
Username |
Username for logging in to the supplier web. |
|
Change password |
Password for logging in to the supplier web. Click on Change password (1), enter the same password in both fields (2, 3) and then click on Ok (4) to save the password.
|
Pricing and Billing
Pricing
|
Function |
Description |
|---|---|
|
Add new resource pricing schemes and edit existing ones by clicking on [None]: No expected or actual cost is generated for the supplier bill, even if you enter a manual cost for the shipment.
|
|
|
Fuel extra |
This rule also applies to all drivers and vehicles belonging to the supplier. [Default]: The fuel extra setting for the customer on the order applies (tab Pricing in the customer register). For more information, see Fuel extra (surcharge). |
|
No fuel extra |
Another way to avoid a fuel surcharge is to set a fuel extra of 0% and select it. |
|
Currency extra |
This rule also applies to all drivers and vehicles belonging to the supplier. [Default]: The currency surcharge for the customer on the order applies (tab Pricing in the customer register). For more information, see Currencies. |
|
No currency extra |
Another way to avoid currency surcharges is to create a 0% rate and select it. |
|
Create cost price items automatically |
Specify whether cost price items should be created automatically. For more information, see Receiving invoices from subcontractors and suppliers, Settings for receiving invoices and tracking costs and Adding new cost price items to cost check. |
 : The driver does not receive a fuel surcharge. Drivers and vehicles belonging to the supplier are also not entitled to any fuel allowance. You can enable fuel extra for individual drivers/vehicles in the relevant register (depending on what you are crediting).
 : The supplier receives a fuel allowance in accordance with the settings above.
Billing
|
Function |
Description |
|---|---|
|
Crediting interval |
The timing interval is a way of grouping different suppliers. For example, those that are to be credited weekly or monthly, but you can actually give the credit interval (grouping) any name you like; it is not linked to a specific date or time. When you create supplier bills, you can select a supplier bill interval, which acts as a filter to determine which suppliers are to be credited. Click |
|
Supplier bill export |
The supplier’s bill export settings (this does not, therefore, apply to an individual settlement export). For more information, see Supplier bill export settings (window). [Default]: The settings on tab Crediting in the Kotor settings apply. |
|
Ledger number |
The supplier’s sales ledger number. Used in settlement exports to match the supplier in the other system. |
|
Supplier bill design |
The template for the supplier’s bill. [Default]: The setting in field Credit note - supplier on the Reports tab in the Kotor settings applies. If you wish to edit the template, you can preview an existing supplier bill in the Credit notes window and then click Edit report in the editor that opens. |
|
You can pay the suppliers in two different ways: either by a supplier bill (self-invoicing), or by them invoicing you. For more information, see Receiving invoices from subcontractors and suppliers and Settings for receiving invoices and tracking costs. |
|
|
Withhold VAT |
This applies only in Norway, where newly registered companies cannot apply for VAT registration until their turnover has exceeded NOK 50,000. If you engage a newly established supplier in Norway, you should therefore not add VAT to the supplier bills until they have become VAT-registered. This setting does nothing. VAT is not deducted from the supplier bills; you will need to do this manually yourselves. This setting acts as a flag that can be used as a condition in transformation-based invoice exports to post the VAT amount to specific accounts. The setting for the tick box can be displayed on settlement reports as “True/False” using the report tag ResWithholdVAT. You can also enter a date by which the supplier is expected to be registered for VAT in VAT reg. until on the tab Details.
|
|
Email supplier bill export |
The email address to which supplier bills should be sent. If you do not enter an email address here, the supplier bills will be sent to the main address on the tab General. Applies only to settlement exports of types PDF, XmlSerializer and Fortnox. |
|
VAT Account number |
Applies only to settlement exports to Visma Business (not Visma Business NXT). The bank account number to which the VAT portion of the supplier bill is paid when Withhold VAT is ticked, i.e. if the supplier is not yet registered for VAT. The supplier can then easily keep track of the VAT that is to be paid to the tax authorities at a later date. If this field is left blank, the VAT will be paid into the same account as the rest of the credit amount (the field Bank account number). |
|
The rider's bank account number. If you export supplier bills to other financial systems, it is important that you enter the bank account number and, where applicable, the clearing number in the correct format. Check which format the receiving system expects. |
|
|
Bank giro account Post giro account |
The supplier’s Bankgiro and Plusgiro account numbers used for domestic payments. |
|
IBAN BIC/SWIFT |
The supplier’s international bank account number and BIC code, which are used for international payments. |
|
Payment Condition |
For more information, see Payment Condition (window). [Default]: The settings on tab Invoice settings in the office settings apply. |
|
Currency |
If the supplier is based in another country, you can make things easier for them by crediting payments in their currency. Bear in mind that you need to use an exchange rate between your currency and the supplier’s currency for the calculation to be correct. For more information, see Currencies. [Default]: The settings on tab Pricing in the office settings apply. |
Reference documents
On the Reference documents tab, files that can be opened on other computers can be added. The files that are added are not attached to orders, instead the function works as a file server and is intended for exchanging information. The files are saved in the database.
|
Function |
Description |
|---|---|
|
New |
Adds a file that is on the computer. It is only possible to add one file at a time. |
|
Delete |
Deletes files from the registry. It is only possible to delete one file at a time. |
|
Open |
Opens the selected file in the list. |
|
File name (column) |
The file name. |
|
Created |
When the file was added as a document in Opter. |
|
File name (field) |
The file name of the selected file. You can rename the file by typing the new name and clicking Save on the menu. Remember to keep the same file extension (for example “.docx”), otherwise the application to use has to be selected when the file is opened. |
|
Comment |
Free text. Information about the file. The information is only shown here. |

