Vehicles (window)
Last updated: 6 October 2026
 Register > Vehicles
In this article
Register your vehicles and manage their properties in this window.
For instructions, see Adding a new Vehicle.
General
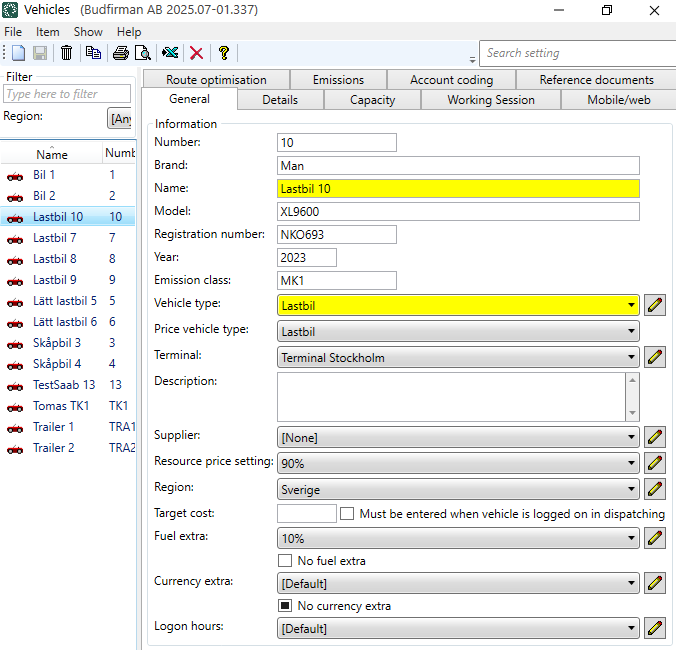
On this tab, enter basic information about the vehicle, such as the number, name, registration number, vehicle type, price vehicle type and whether the vehicle is associated with a supplier or not, and whether the vehicle should receive fuel extra and currency extra.
|
Function |
Description |
|---|---|
|
Number |
The vehicle’s call number. Used in dispatch, among other things. A call number is required for each vehicle. |
|
Brand |
The make of the vehicle, for example DAF, Scania, Volvo or MAN. |
|
Name |
Give the vehicle a name, such as “Truck 10” (i.e. the vehicle type and call number) or the registration number. |
|
Model |
The vehicle model. |
|
Registration number |
The vehicle registration number. |
|
Year |
Model year of the vehicle, for example 2021. |
|
Emission class |
The environmental class of the vehicle, e.g. Euro 5. |
|
Vehicle type |
Type of vehicle, such as truck, light truck, van or trailer. Click on To enter specific capacities for a specific vehicle, go to Register > Vehicles on the Capacity tab. These capacities then apply instead of the capacities applicable to the vehicle type. For more information, see Vehicle types (window). |
|
Price vehicle type |
To add new or change existing price vehicle types, go to Economy > Price lists > Price vehicle types. |
|
Terminal |
If the vehicle belongs to a terminal, select that terminal. You can also add new terminals or edit existing ones by clicking on |
|
Description |
A free text field. Describe the vehicle if desired. |
|
Supplier |
If the vehicle belongs to a supplier, select that supplier. You can also add new suppliers or edit existing ones by clicking on |
|
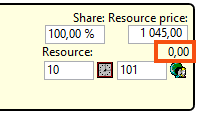
Select resource pricing for the vehicle. You can also add new resource pricing or edit existing ones by clicking on [None] means that no cost is generated, even if a cost is entered manually on the order.
In the image above, no cost has been generated for the shipment. The picture shows group Shipments in the order reception area. [None] This therefore means:
|
|
|
Region |
The region to which the vehicle belongs. |
|
Target cost |
The budgeted cost per shift. For more information, see Budgeted cost of resources. |
|
Must be entered when vehicle is logged on in dispatching |
Specify whether the traffic controller must enter a target cost when he or she logs the vehicle into the dispatch system. |
|
Fuel extra |
Applies only if No fuel extra (below) is unchecked. [Default]: The DMT setting for the driver to whom the vehicle belongs applies (tab Pricing and Billing in the driver register). If you own the vehicle, and it therefore does not belong to a supplier, no resource charges are calculated. For more information, see Fuel extra (surcharge). |
|
No fuel extra |
If you credit costs to drivers (tab Crediting in the office settings), this setting is irrelevant.
|
|
Currency extra |
Applies only if No currency extra (below) is unchecked. Select which currency extra the vehicle should be given. If no setting is configured here, the general setting for currency extras under Settings > Offices, in the Currency extra drop-down list on the Pricing tab, will apply. |
|
No currency extra |
If no setting is configured here, the checkbox will take its value from the general setting for currency extras under Settings > Offices, in the Currency extra drop-down list on the Pricing tab. If the general setting should not apply to this vehicle, use the No currency extra checkbox as follows:
|
|
Login hours |
This feature was not in use and has therefore been removed as of Opter 2025.12.00. |
 to add new vehicle types or change your existing vehicle types. In the
  .
.
 : The vehicle is not eligible for a fuel allowance.
 : The settings for the supplier to whom the vehicle belongs apply.
 : The vehicle is eligible for a fuel allowance. Select which DMT to use from the drop-down list
 Details
Information
Here you can provide further details about the vehicle if you wish.
|
Function |
Description |
|---|---|
|
Shipment date |
Please enter the date on which the vehicle was delivered to you. Free text field. (Opter does not use the information in this field for any purpose.) |
|
Out of service |
If the vehicle is no longer in use, you can enter the date on which it was taken out of service. Free text field. (Opter does not use the information in this field for any purpose.) The vehicle is still visible in the dispatch system, and it is still possible to assign shipments to it. We recommend that you deactivate the vehicle by selecting it in the vehicle register and clicking on |
|
Responsible person |
Select one of the people listed in the register Employees. |
|
Cost pool |
Select the cost group to which the vehicle belongs. |
|
Finance corporation |
Please enter the name of the finance company if you wish. Free text field. (Opter does not use the information in this field for any purpose.) |
|
Finance agreement number |
Please enter the contract number if you wish. Free text field. (Opter does not use the information in this field for any purpose.) |
|
Finance agreement ends |
Enter the date on which the funding ends. Free text field. (Opter does not use the information in this field for any purpose.) |
|
Transport lincense number |
Enter the traffic permit number if you wish. Free text field. (Opter does not use the information in this field for any purpose.) |
 .
.Capacity
Load information
Here you specify the vehicle’s maximum load capacity. If the value in the field is displayed in italics, this means that the value comes from the vehicle type (which you have selected from the drop-down list Vehicle type on the tab General). If you wish, you can enter different values for the vehicle here in the vehicle register. Opter obtains information on capacity primarily from the vehicle itself, and secondarily from the vehicle type.
|
Function |
Description |
|---|---|
|
Weight |
The maximum weight the vehicle can carry. Weight is given in kilograms (kg). |
|
Pallet space |
The maximum number of pallet spaces in the vehicle. |
|
Volume |
The maximum volume the vehicle can carry. Volume is given in cubic metres (m³). |
|
Load metre |
The maximum number of load metres in the vehicle. The load metre gives the flatbed length in metres (m). |
|
Extra dimension 1 — Extra dimension 5 (Displayed if you are using extra dimensions.) |
Enter the maximum load capacity of the vehicle for each additional dimension you are using. |
The standard dimensions and any additional dimensions are shown in box Resource information in the dispatch system. At (2) in the image below, the value you have entered (for example, in field Weight) on tab Capacity in the vehicle register is displayed; alternatively, the value in the vehicle type register is shown.
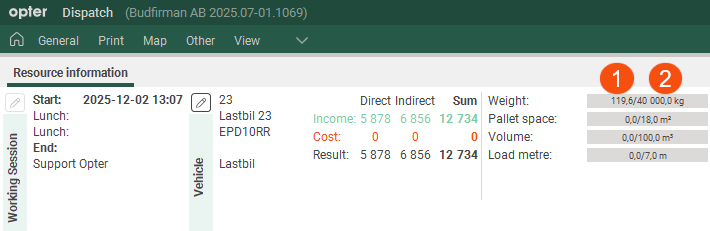
At (1) in the image, the total figure (for example, the weight) for all shipments allocated to the resource (i.e. the vehicle or the driver) is shown.
Dimensions
If you wish, you can enter the vehicle’s dimensions, such as its length, width and total weight. These are free-text fields, and Opter does not use the information in them for any purpose.
|
Function |
Description |
|---|---|
|
Insulation |
The drop-down menu will be removed. |
|
Temp monitoring |
The drop-down menu will be removed. |
|
Cargo hold |
Free text field. (Opter does not use the information in this field for any purpose.) |
|
Vehicle weight |
Free text field. (Opter does not use the information in this field for any purpose.) |
|
Total weight |
Free text field. (Opter does not use the information in this field for any purpose.) If you are using route optimisation, the information in the Total weight (kg) field for the vehicle type is important (see the Route optimisation tab under Dimensions for PTV in the vehicle type register). For more information, see Vehicle types (window). |
|
Length |
Free text field. (Opter does not use the information in this field for any purpose.) If you are using route optimisation, the information in the Length (cm) field for the vehicle type is important (see the Route optimisation tab under Dimensions for PTV in the vehicle type register). For more information, see Vehicle types (window). |
|
Width |
Free text field. (Opter does not use the information in this field for any purpose.) If you are using route optimisation, the information entered in field Width (cm) for the vehicle type is important (see tab Route optimisation under Dimensions for PTV in the vehicle type register). For more information, see Vehicle types (window). |
|
Height |
Free text field. (Opter does not use the information in this field for any purpose.) If you are using route optimisation, the information in the Height (cm) field for the vehicle type is important (see the Route optimisation tab under Dimensions for PTV in the vehicle type register). For more information, see Vehicle types (window). |
Capacity
If the vehicle has the capacities (load types) listed here, please specify the maximum number of vehicles it can accommodate. These could, for example, be cargo cages, and the vehicle may have a maximum capacity of 8 cargo cages.
If you wish to add capacities (load types) that will then be displayed here, click on Settings > Capacity types. Give the load type a name and then enter the weight, pallet space, volume and/or load metres for that load type. For more information, see Capacity types (window).
Options
Indicates the options fitted to the vehicle, e.g. air conditioning. The options that are selected in the vehicle registry are displayed in the resource information in dispatch. When the traffic controller assigns shipments with options (e.g. refrigeration) to vehicles in the dispatch centre, does not Opter check whether the vehicle has those options available. For more information, see Options.
You can add the options shown here in the vehicle register in windows Options, For more information, see and Options, and Options (window). The options shown in the vehicle register are those for which the Available for vehicles tick box is ticked in the window Options.
Working Session
On this tab it is possible to view, edit and export working sessions. Working sessions are created based on the activities that the vehicles/drivers state in Opter Driver, or that the dispatchers add to drivers or vehicles in dispatch.
New rows can be added manually by clicking in a field in the empty row at the bottom of the list. Double-click in the field in the Activity column and a drop-down list will appear, in which it is possible to choose, for example, Working, Sick or On holiday.
Double-click in the From, To, Lunch from and Lunch to fields, and then it is possible to either enter the date and time manually or click on the calendar icon in the field and select the date and time, then click on Close. If the time needs to be adjusted, click in the field again and enter the correct time.
To export working sessions to Excel, see Exporting working sessions to Excel.
|
Function |
Description |
|---|---|
|
Date field Drop-down list with time periods |
Select the start and end dates for which you wish to view work shifts, or a time period from the drop-down list. |
|
|
Copy row. If you click on the far left of a row, it will be selected; you can then click |
|
|
Merging working sessions. To merge work shifts, select two or more rows and then click this button. If two working sessions are merged, the earliest start time and the latest end time are used. Example: If you merge a shift that starts at 9.00–12.00, with a shift starting at 16:00–21:00 on the same day, the next training session will take place at 9:00–21:00. |
|
|
Export to Excel. The shifts currently shown in the list are exported to Excel. |


|
Column |
Description |
|---|---|
|
Activity |
Double-click in the field in the Activity column and a drop-down list will appear, in which it is possible to choose, for example, Working, Sick or On holiday. |
|
From |
Enter the date on and time at which the working session started. Double-click in the From, To, Lunch from and Lunch to fields, and then it is possible to either enter the date and time manually or click on the calendar icon in the field and select the date and time, then click on Close. If the time needs to be adjusted, click in the field again and enter the correct time. |
|
To |
Enter the date on and time at which the working session ended. |
|
Lunch from |
Enter the date on and time at which the lunch break started. Double-click in the From, To, Lunch from and Lunch to fields, and then it is possible to either enter the date and time manually or click on the calendar icon in the field and select the date and time, then click on Close. If the time needs to be adjusted, click in the field again and enter the correct time. |
|
Lunch to |
Enter the date on and time at which the lunch break ended. |
|
Work time |
Opter calculates the working time and displays the number of hours and minutes in the column. |
|
of which break |
Opter calculates the break time and displays the number of hours and minutes in the column. This shows the break time excluding the lunch break time. |
|
Work time incl. lunch |
Opter calculates the working time including the lunch break and displays the number of hours and minutes in the column. |
|
Vehicle |
Shows which vehicle was used. If desired, it is possible to enter or change the vehicle for the working session. |
|
Meter start |
Enter the mileage reading of the vehicle at the start of the working session, if the number of kilometres the vehicle drives during the working session is to be registered. |
|
Meter stop |
Enter the mileage reading of the vehicle at the end of the working session, if the number of kilometres the vehicle drives during the working session is to be registered. |
|
Target cost |
Enter the budgeted cost for the resource. If you wish, you can enter or change the target cost. For more information, seeBudgeted cost of resources. |
|
Office |
Shows at which office the working session was registered. |
|
Comment |
Displays comment for the working session. It is possible to enter or change the comment. |
|
Created by |
Shows who created the working session. If it says "mdc", it means that the working session was created automatically based on the activities entered in Opter Driver by the driver. |
Mobile/web
Credentials
|
Function |
Description |
|---|---|
|
Username |
Username for logging in to the vehicle web and Opter Driver if the user logs in as a vehicle. For more information, see User accounts for The vehicle web and Installing Opter Driver. For information on how to configure what users log in as in Opter Driver (vehicle or driver), see Install Opter Driver (classic). |
|
Change password |
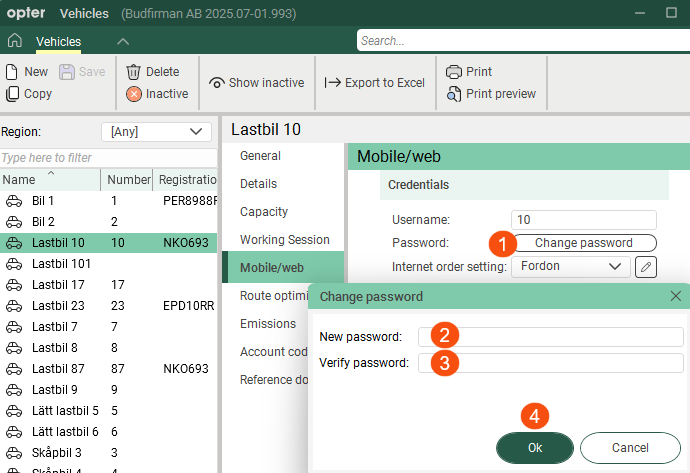
Password for logging in to the vehicle web and to Opter Driver if the user logs in as a vehicle. Click on Change password (1), enter the same password in both fields (2, 3) and then click on Ok (4) to save the password. Passwords are not displayed in the register. If someone has forgotten their password, you can create a new one by clicking on Change password. For more information, see User accounts for The vehicle web and Installing Opter Driver.
|
|
Internet order setting |
Select the internet order setting for the vehicle on the Vehicle Web. To add a new access category or change the access of an existing category, click on |
|
Skip approval for order changes from mobile devices |
The setting only has an effect if App.ApproveChanges = "True". If the mobile data setting App.ApproveChanges is set to "True", the dispatcher must authorise changes made from the vehicle in Opter Driver. This checkbox allows exceptions to be made for a vehicle.
For more information, see Setting how changes made in Opter Driver are approved. |
 : Dispatch must authorise changes made by the vehicle in Opter Driver. In other words, the setting for
  : Dispatch does not have to authorise changes made by the vehicle in Opter Driver.
Mobile devices
The mobile devices used by the vehicle are displayed here.
|
Column |
Description |
|---|---|
|
Mobile device |
If “App” is indicated, this means that the employee uses or has used one of the Opter Driver or Fleet 101 K2 Mobile apps. If it says App <DRIVER>, this means that the driver has logged in as a driver and then added the vehicle as a secondary resource. If several mobile device types have been enabled, they will also be displayed here, e.g. “SMS”. If desired, more mobile device types can be enabled under Settings > Mobile data > Mobile device types. |
|
Address |
Settings for mobile device types, such as SMS and Transics. If desired, more mobile device types can be enabled under Settings > Mobile data > Mobile device types. For example, if SMS is enabled, use the Address field to enter the mobile number to which the SMS is to be sent. |
|
Address 2 |
Settings for mobile device types, such as Transics and DHL. |
|
Active |
For information only. The checkbox provides the following information:
|
|
Version |
This shows which version of Opter Driver or Fleet 101 K2 Mobile the vehicle is using. |
|
Latest use |
This shows the date and time when the vehicle last logged into the app. |
|
|
The operating system on the mobile device, such as Android or iOS. |
|
|
Version of the operating system, for example version 11 (SDK 30). |
|
Model |
The make and model of the mobile device, for example, Sony G8441 or Samsung SM-N770F. |
Scanning
|
Function |
Description |
|---|---|
|
Warn if other resource when departure scan from following status (inclusive) Warn if other resource when pickup scan from following status (inclusive) |
Applies to departure scan at the terminal and pickup scan at the sender’s premises. This applies only if you are directing traffic using a vehicle. If you are managing drivers, you can configure the settings in the driver register. The driver receives a notification in Opter Driver stating that they have taken over a shipment belonging to another resource from this status onwards. You can undo the scan in Opter Driver by swiping right in the scan list, but the original resource is not restored, and the status is reset to Created. So it is not a restoration to the way it looked before the scan. [Default]/[None]: The setting in the office settings applies. All life cycle statuses are included in the list, but you can only take over shipments that have not yet been uploaded. The warning will therefore not appear if you set a later status than Picked up. It’s hard-coded. For more information, see Prevent shipments from being taken over by scanning in Opter Driver. |
|
Block status/resource change if other resource when departure scanning from status (inclusive) Block status/resource change if other resource when pickup scanning from status (inclusive) |
Applies to departure scan at the terminal and pickup scan at the sender’s premises. This applies only if you are directing traffic using a vehicle. If you are managing vehicle traffic, you should configure the settings in the driver register. The driver can take over a shipment by scanning it in Opter Driver until it reaches this status. Once the selected status has been set, it is not possible to take over shipments by scanning. [Default]/[None]: The setting in the office settings applies. All life cycle statuses are included in the list, but you can only take over shipments that have not yet been uploaded, even if you set a later status. It’s hard-coded. It is also possible to prevent shipments from being taken over by scanning at route level. Select Only allow assigned resource to departure scan shipments on the route (the tab General). For more information, see Prevent shipments from being taken over by scanning in Opter Driver. |
Route optimisation
In the Route optimisation tab, configure route optimisation settings for the vehicle, such as Service time factor and Driving time factor.
Route optimisation settings
|
Function |
Description |
|---|---|
|
Allow only automatic calculation of arrival time |
Select whether to allow the automatic calculation of ETA on assigned shipments. Only the ETA is continuously updated. The aim is to be able to send out reliable delivery notifications. The setting for this checkbox only applies if the vehicle is the primary resource and if the Allow only automatic calculation of arrival time or Allow automatic calculation of route sequence and arrival time checkbox is selected in the office settings and for the service. The office settings have priority over the other settings for this checkbox. For rules and instructions, see Automatic route optimisation. |
|
Allow automatic calculation of route sequence and arrival time |
Choose whether to allow the automatic calculation of the route sequence and delivery time. Both the route sequence and the ETA are continuously updated. The aim is to make transport operations as efficient as possible. The setting for this checkbox only applies if the vehicle is the primary resource and if the Allow automatic calculation of route sequence and arrival time checkbox is selected in the office settings and for the service. The office settings have priority over the other settings for this checkbox. For rules and instructions, see Automatic route optimisation. |
|
Service time factor |
If the vehicle is used as a primary resource, a specific Service time factor for the vehicle can be entered here. An experienced driver may only need 80% of the service time, while an inexperienced driver may need 110%. For more information, see Service time. |
|
Driving time factor |
If the vehicle is used as a primary resource, a specific Driving time factor for the vehicle can be entered here. If a driver generally needs a longer driving time than calculated, enter a percentage that is higher than 100. Setting a percentage lower than 100 means that the driver has to move faster than the calculated driving time, which is based on factors such as speed limits. For more information, see Driving time. |
|
Fallback position |
If a vehicle’s position cannot be determined, for example due to poor mobile coverage, a fallback position can be entered. The fallback position is set in the office settings, but a fallback position for a specific vehicle can be set here in the registry by clicking on If there is a setting there already that is to be changed, click on If you do not specify a location at all, Opter’s Stockholm office will be used as the fallback position. For more information, see Vehicle position. |
|
Home location |
Home location can be used to ensure that routes start/end close to the resource’s home so that the system can optimise the route sequence for shipments so that resources are used as efficiently as possible. A home location can be set for a vehicle by clicking on If there is a setting there already that is to be changed, click on For more information, see Home location for vehicles and drivers. |
 and selecting a location on the map or entering the coordinates.
 and select a new location on the map, or enter new coordinates for the vehicle’s fallback position.
Advanced
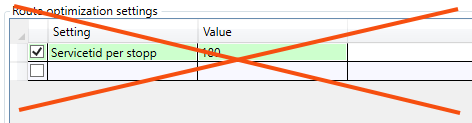
It is only for internal Opter use, and should not be used. Even if a row is added and a value is entered in the table, such as "Service time per stop 180 seconds", it is not used in the route optimisation.
Emissions
On this tab, you can configure settings so that Opter can calculate CO2 emissions. For more information, see CO2 emissions, overview, Settings for CO2 emission calculations (and CO2 emissions in tonnes).
|
Function |
Description |
|---|---|
|
CO2 emissions (g/km) |
Enter the vehicle’s CO2 emissions in grams per kilometre. If you enter Fuel, Fuel consumption (per 100 km), and and CO2 emissions (g/km), Opter will use the value in the CO2 emissions (g/km) field to calculate CO2 emissions for shipments and orders. If you want Opter to calculate the vehicle’s CO2 emissions (in g/km) itself, leave the field CO2 emissions (g/km) blank and fill in the fields Fuel and Fuel consumption (per 100 km). The data on CO2 emissions is taken firstly from the vehicle, secondly from the vehicle type and thirdly from the price vehicle type. If the shipment is subcontracted, the CO2 emissions data will be obtained firstly from the subcontractor and secondly from the price vehicle type. For more information, see Settings for CO2 emission calculations. |
|
Fuel |
Indicate the type of fuel used by the vehicle, e.g. diesel. The CO2 emissions from the fuel must be recorded in the fuel register. For more information, see Settings for CO2 emission calculations. |
|
Fuel consumption (per 100 km) |
Enter the vehicle’s average fuel consumption in the selected unit per 100 km. The unit is set in the fuel registry. Example: 2.5 litres per mil = 25 litres/100 km. If you enter Fuel, Fuel consumption (per 100 km), and and CO2 emissions (g/km), Opter will use the value in the CO2 emissions (g/km) field to calculate CO2 emissions for shipments and orders. If you want Opter to calculate the vehicle’s CO2 emissions (in g/km) itself, leave the field CO2 emissions (g/km) blank and fill in the fields Fuel and Fuel consumption (per 100 km). The data on CO2 emissions is taken firstly from the vehicle, secondly from the vehicle type and thirdly from the price vehicle type. If the shipment is subcontracted, the CO2 emissions data will be obtained firstly from the subcontractor and secondly from the price vehicle type. For more information, see Settings for CO2 emission calculations. |
|
Capacity converted into pricing weight (kg) |
The field is used if the pricing weight of the order compared to the capacity of the vehicle is to be taken into account. For more information, see Settings for CO2 emission calculations. |
Account coding
In Opter, the VAT rate on the order determines the income and cost account to which a certain amount is booked. On this tab you can make exceptions to the regular account coding. The tabs you make changes to are marked with  .
.
Click on  to display the VAT rates held in the system. Then select the account to which amounts with the different VAT rates should be posted. More information on the individual drop-down lists can be found at The Account coding tab. The settings in this tab apply if you reach item 4 in the list in How Opter selects accounts for income and expenses. If [Default] is selected for any of the options here, the account coding is taken from the VAT rate.
For more information on how Opter selects the VAT rate on orders (column Sales) and supplier bills (column Cost), see How Opter chooses the VAT rate for customer invoices and How Opter chooses the VAT rate on credits.
Reference documents
On the Reference documents tab, files that can be opened on other computers can be added. The files that are added are not attached to orders, instead the function works as a file server and is intended for exchanging information. The files are saved in the database.
|
Function |
Description |
|---|---|
|
New |
Adds a file that is on the computer. It is only possible to add one file at a time. |
|
Delete |
Deletes files from the registry. It is only possible to delete one file at a time. |
|
Open |
Opens the selected file in the list. |
|
File name (column) |
The file name. |
|
Created |
When the file was added as a document in Opter. |
|
File name (field) |
The file name of the selected file. You can rename the file by typing the new name and clicking Save on the menu. Remember to keep the same file extension (for example “.docx”), otherwise the application to use has to be selected when the file is opened. |
|
Comment |
Free text. Information about the file. The information is only shown here. |

