Registering payments for invoices
Last updated: 20 November 2025
In this article
This article provides instructions on how to register invoice payments manually. To import payments from an external accounting system instead, see Importing payments.
To register a payment for an invoice, proceed as follows:
-
Click on Economy > Manual payments.
-
At the top left of the window, enter Bank account and Date for the payment being registered.
If your account coding is done by region, you can also specify Region. If your account coding is not done by region, select [None].
-
Search for the invoice number for the invoice for which payment is to be registered. You can also search by Customer code and Amount. For instructions, see Searching for registered payments.

In the example above, the customer uses the same currency as the default currency in Opter. In the example below, the customer's currency differs from the default currency in Opter, as the customer's currency is EUR and the default currency in Opter is SEK.
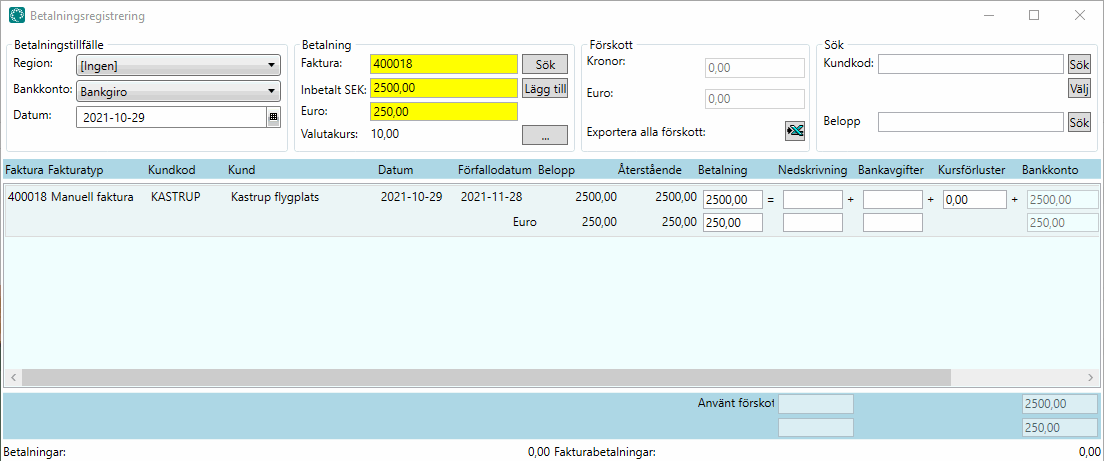
The invoices are listed in the middle of the window. Any payments previously registered for the invoice are shown in the Invoice payments box at the bottom right of the window.
-
The Paid field provides a suggested payment amount based on what is left for the customer to pay on the invoice. If that is correct, click on Accept. If it is not correct, enter the amount paid into the bank account in the Paid field and click on Accept, or make further adjustments as indicated below.
Before clicking on Accept, check that all the amounts and totals in the window are correct, and also correspond to the notification.
Make further adjustments to the payment if necessary, see possible special cases below.
 The customer has paid too little and you want to recover the rest
If there is an advance that covers all or part of the difference, the advance will be used.
On the invoice payment row, check that:
-
the amount in the Payment field is the same as in the Paid field
-
the Depreciation field contains “0” or is empty.
The customer has paid too little and you want to write off the balance due
If there is an advance then that will be used first.If the advance only partially covers the difference and if the amount of your accepted invoice deviation (depreciation) covers the rest of the difference, Opter will suggest booking the rest of the difference to the depreciation account.
Depreciation is recorded in a depreciation account, including VAT (a correction invoice must be issued for VAT to be “recovered”).
You can set the amount of depreciation you accept under Settings > Offices > Invoice payment in the Accepted invoice deviation field.
In the example in the image below, the invoice is for SEK 1,100, but the customer has only paid SEK 1,060. There is an advance of SEK 30 which is now being used. Opter calculates the following for us: 1,100-1,060-30=10 SEK. In this Opter system, Accepted invoice deviation is set to a maximum of SEK 10, so Opter suggests that the remaining SEK 10 be booked to the depreciation account.
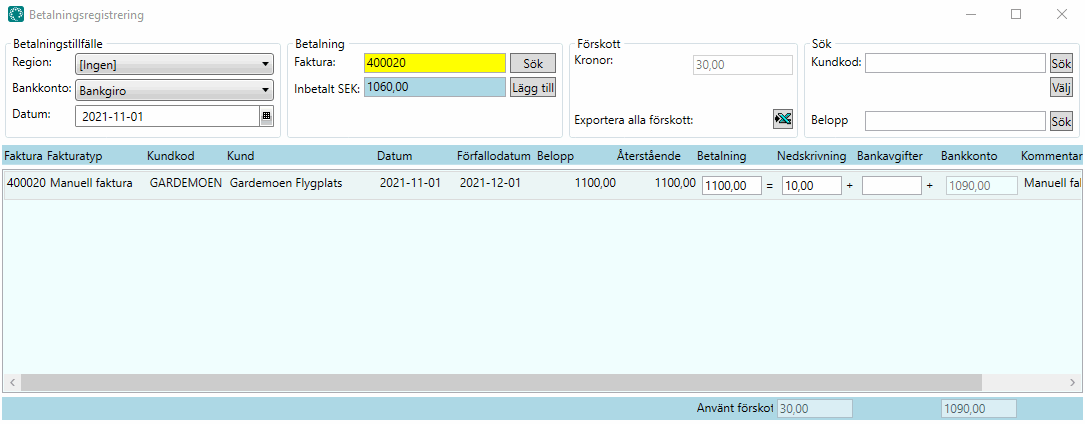
On the invoice payment row, check that:
-
the amount in the Payment field is the same as in the Remaining column
-
the Depreciation field contains the balance due that has not been paid.
The customer has overpaid and you want to enter the excess amount as an advance
On the invoice payment row, check that:
-
the amount in the Payment field is the same as in the Remaining column.
-
the amount in the Used advance field is the same as the excess amount paid, with a negative sign.
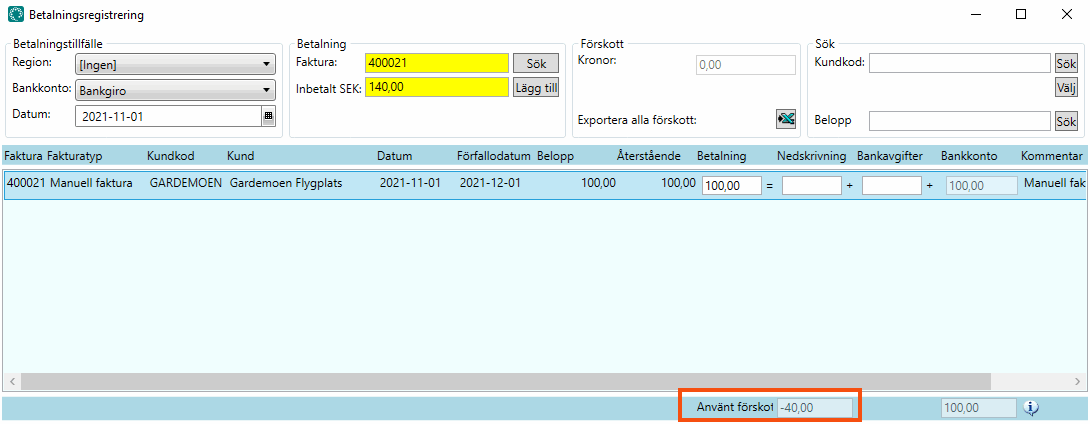
In the example in the above image, the customer has overpaid by SEK 40 and an advance will be created from this SEK 40.
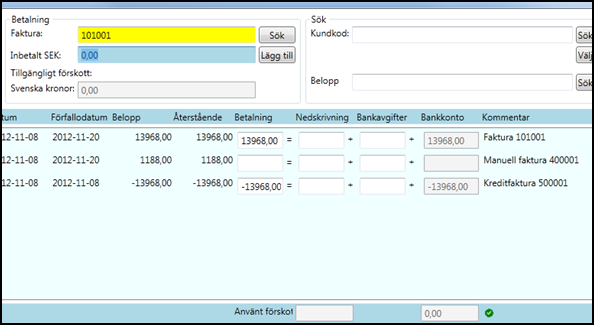
The customer has paid two invoices in the same payment
If the amount paid does not match an invoice, Opter will try to guess which invoices are involved.
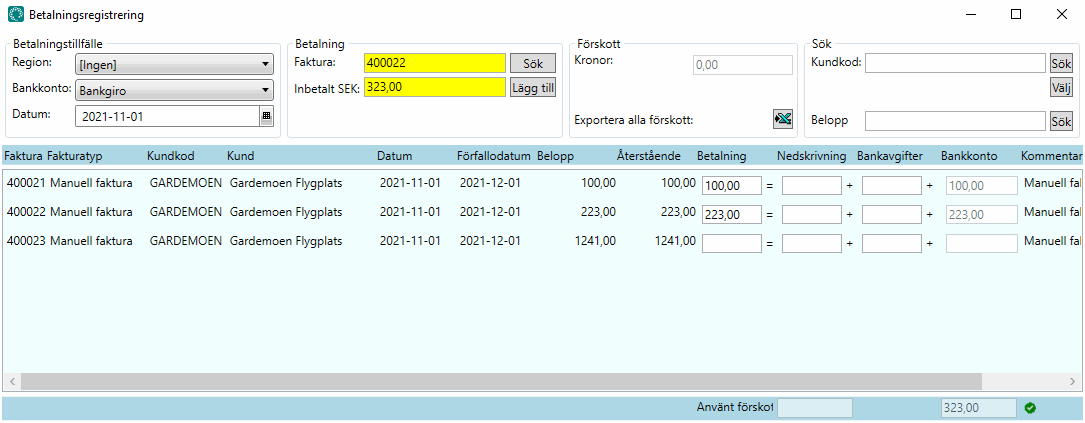
In the example in the image above, Opter has guessed that it is the top two invoices that the customer intends to pay, because the sum of these two invoices matches the amount paid.
-
Check that Opter has split the payment for the two invoices and placed the partial amounts in the Payment fields on the invoice rows.
-
If the partial amounts are not correct, enter the correct amounts in the Payment fields and check that the sum of them is the same as the amount in the Paid field. If the total exceeds the amount in the Paid field, the payment can be registered and the excess saved as an advance, see the case above. If the total is less than the amount in the Paid field, and if there is no advance payment and/or if the amount of the accepted invoice deviation does not cover the difference, the payment cannot be registered. If the amount paid covers one invoice, you can choose to register payment for that invoice, save the excess as an advance, and ask the customer to pay the outstanding amount. Once the customer has paid the outstanding amount, that and the advance can be used to register payment for the second invoice.
The customer has paid an invoice with a correction invoice
Opter tries to automatically deduct the correction invoice from the remaining amount and present the difference as a suggestion in the Amount field.
-
Check that Opter has split the payment for the two invoices and placed the remaining amount in the Payment fields on the invoice rows.
-
If the amounts are not correct, enter the correct amounts in the Payment fields and check that the sum of them is the same as the amount in the Paid field. If the total is less than the amount in Paid, the payment cannot be registered. Remember that payment for correction invoices must be entered with a negative sign!
 Opter suggests using a credit but the customer has entered the full amount
-
On the correction invoice row, check there is a 0 in the Payment field or that it is empty.
-
On the invoice row, check that the amount in the Payment field is the same as in the Paidfield.
Using an advance to pay an invoice
On the invoice row, enter the amount by which to reduce the accounts receivable in the Payment column.
If the amount in the Payment field exceeds the amount in the Paid field then any available advance will be used. If there is an advance, you can see the amount of the advance in the Advance box. The amount of the advance that will be used is shown in the Used advance field below the list of invoices.
If the amount in the Payment field is less than the amount in Paid, an advance is created instead.
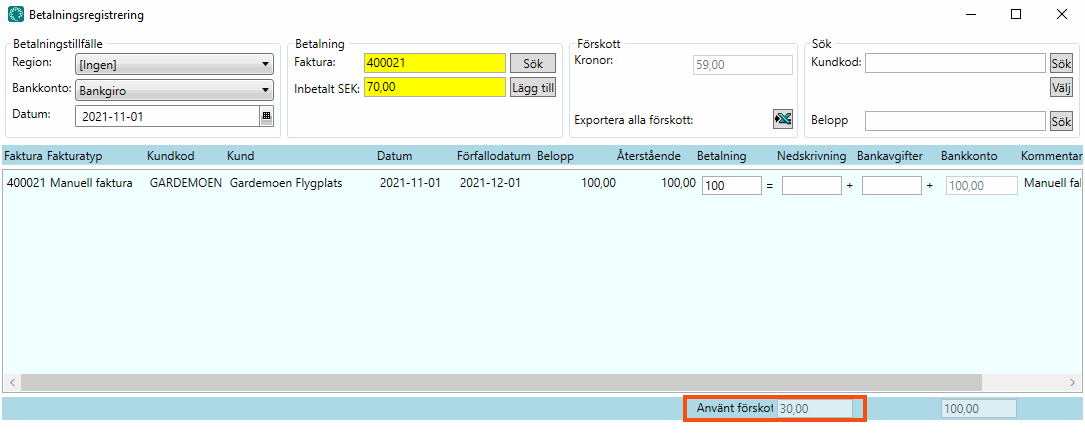
In the example in the image above, the customer pays SEK 70, but the invoice is for SEK 100. There is an advance of SEK 59, and we use SEK 30 of this SEK 59 to pay the whole invoice.
-
-
Check that all the amounts and totals are correct, and also correspond to the notification, and click on Accept.
The payment has now been added and you can close the window.