Printige terminalirakenduse kontrollkood välja, window
Last updated: 28 February 2022
![]() Register > Prindi terminalirakenduse kontrollkood välja
Register > Prindi terminalirakenduse kontrollkood välja
In this article
In this window you can configure scan settings for Opter Terminal and create a QR code that can be read by the scanner. This ensures that everyone working on the same scan can have exactly the same settings on their devices. The QR code and settings can be printed as a PDF or on paper and put up in different locations at the terminal.
Partii juhised
|
Function |
Explanation |
|---|---|
|
Partii |
Log of the day’s scans with details of the batch number and the time at which the batch setting was created. You can select a previous batch from the list, but the settings in the window will not change. |
|
Suund |
The type of scan to be performed. An option must be selected from this list in order to print the scan settings and create a QR code. |
|
Prindi tüüp |
Only available if you select Prindi from the Suund drop-down list, and then enter the document to be printed when the scan is complete. If Prindi has been selected as the direction, you have to select an option other than Mitte ühtegi from this drop-down list in order to print the scan settings and create a QR code. |
|
Terminal |
Filters the printer locations by terminal, so that only the printer locations available on that terminal are shown in the Printimise koht drop-down list below. It is mandatory to select a terminal in the drop-down list. |
|
Printimise koht |
The location on the terminal where the result of the scan will be printed if Prindi has been selected as the direction. There may be several printers in the same place, for example a label printer and a normal printer. The printer used depends on the document to be printed. |
|
Skannimise tüüp |
What is to be scanned, package labels or freight bills. |
|
Juht |
Select a driver if you want to assign packages at the departure scan. Only relevant if you select Väljumine from the Suund drop-down list. |
|
Sõiduk |
Select a vehicle if you want to assign packages at the departure scan. Only relevant if you select Väljumine from the Suund drop-down list. |
|
Kommenteeri |
Free text. You can display the comment in the printout by adding the tag Comment to the report. |
Marsruudid
|
Function |
Explanation |
|---|---|
|
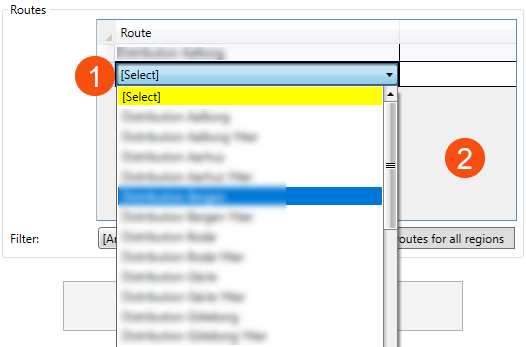
Marsruut |
Select the route the packages will take on departure from the terminal. A warning is displayed in Opter Terminal if the route on the shipment for the package/freight bill being scanned does not match the route(s) entered here. Click three times on the row to display a list of routes (1). Click in the grey field below the last row to add more routes (2).
|
|
Filter |
Filter the routes in the drop-down list by region. The drop-down list will then only show the routes for which a region has been entered in the Marsruudid window. [ükskõik milline]: All the routes in the system are displayed. |
|
Add the routes for all regions |
Add all routes that match the region filter immediately. If [ükskõik milline] is selected in the filter, all the routes in the system will be added. |
Prindi partii juhend
Prints the scan settings in plain text and as a QR code. You can either print them on paper or as a PDF file. The QR code with the settings can then be scanned with Opter Terminal.
You can control the appearance of the printout by selecting a report for Terminali partii juhend on the Aruanded tab in the office settings.
For more information about reports, see Aruanded (window).