The customer web
Last updated: 6 February 2026
In this article
The system administrator can configure how the web portal looks, what is displayed and which functions are available on the various pages. It is therefore possible that not all the menus and options described here will be visible. Contact your system administrator if you want to use any of the functions mentioned below but cannot see them, or if you don’t have your login credentials.
If you enter the wrong password five times when logging in, you will have to wait 15 minutes before you can try again. If you have forgotten your password, you can reset it yourself by clicking on Forgotten your password? Click here to reset it. on the login page.
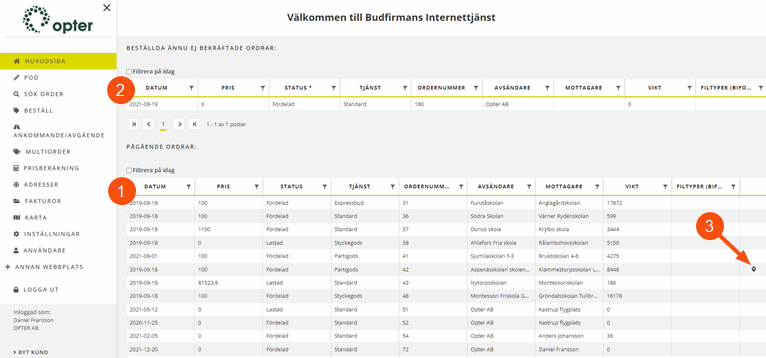
Main page
The main page shows an overview of current orders (1) and any orders that have been placed but not yet confirmed by the dispatcher (2). The columns to be displayed in the lists are defined by the system administrator. Click on an order to display details about the order (detail view). Click on the map pin to go to the map (3).
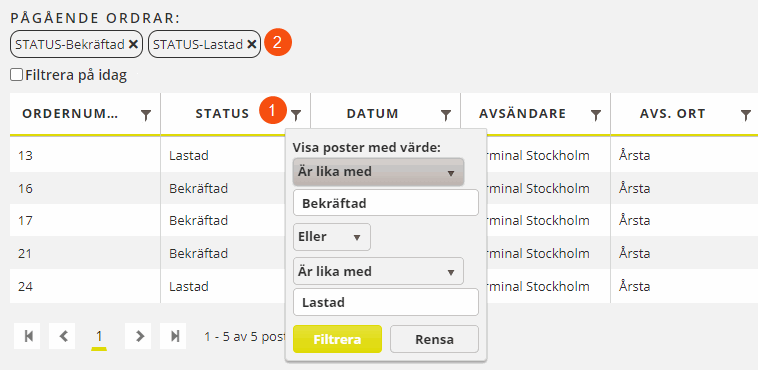
Column filter
The columns can be filtered by clicking on ![]() in the column headings (1). Multiple columns can be included in the filtering at the same time. After performing filtering, the filters can be removed one by one until the list shows all the shipments again (2).
in the column headings (1). Multiple columns can be included in the filtering at the same time. After performing filtering, the filters can be removed one by one until the list shows all the shipments again (2).
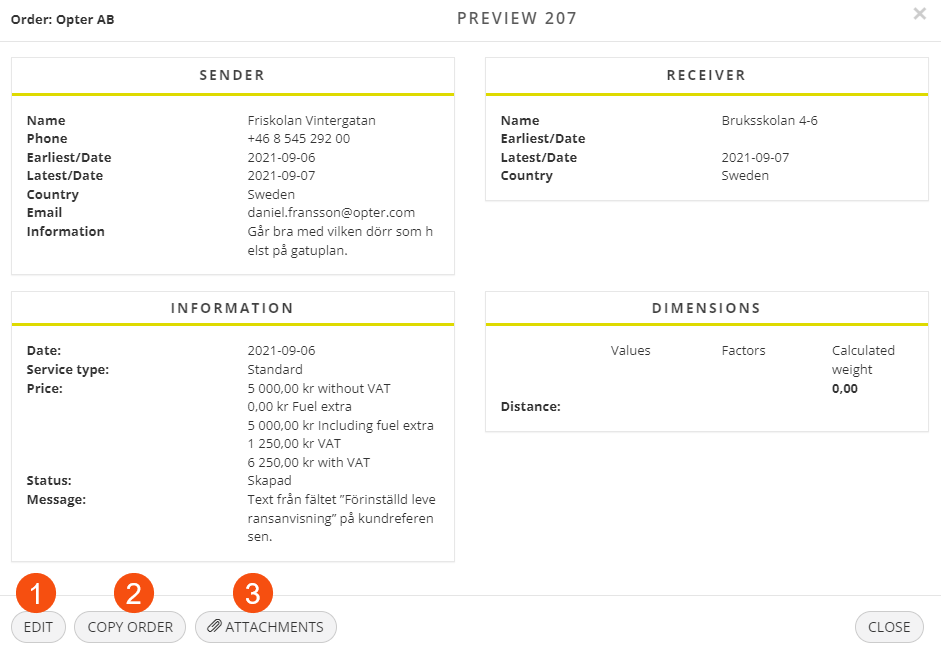
Detail view
Clicking on an order in one of the lists opens the detail view. The information and functions available depend on the system administrator’s settings:
-
Edit: The order page opens, in which the order can be edited.
-
Copy: The order page opens, where a new order can be created based on the existing one.
If similar orders are often created, order templates can be used instead of copying orders. For more information, see Creating order templates on the customer web.
-
Attached files: Attach files to the order in much the same way as in an email. For example, this could be a picture of the place where the goods are to be delivered if you are unable to take delivery.
Order
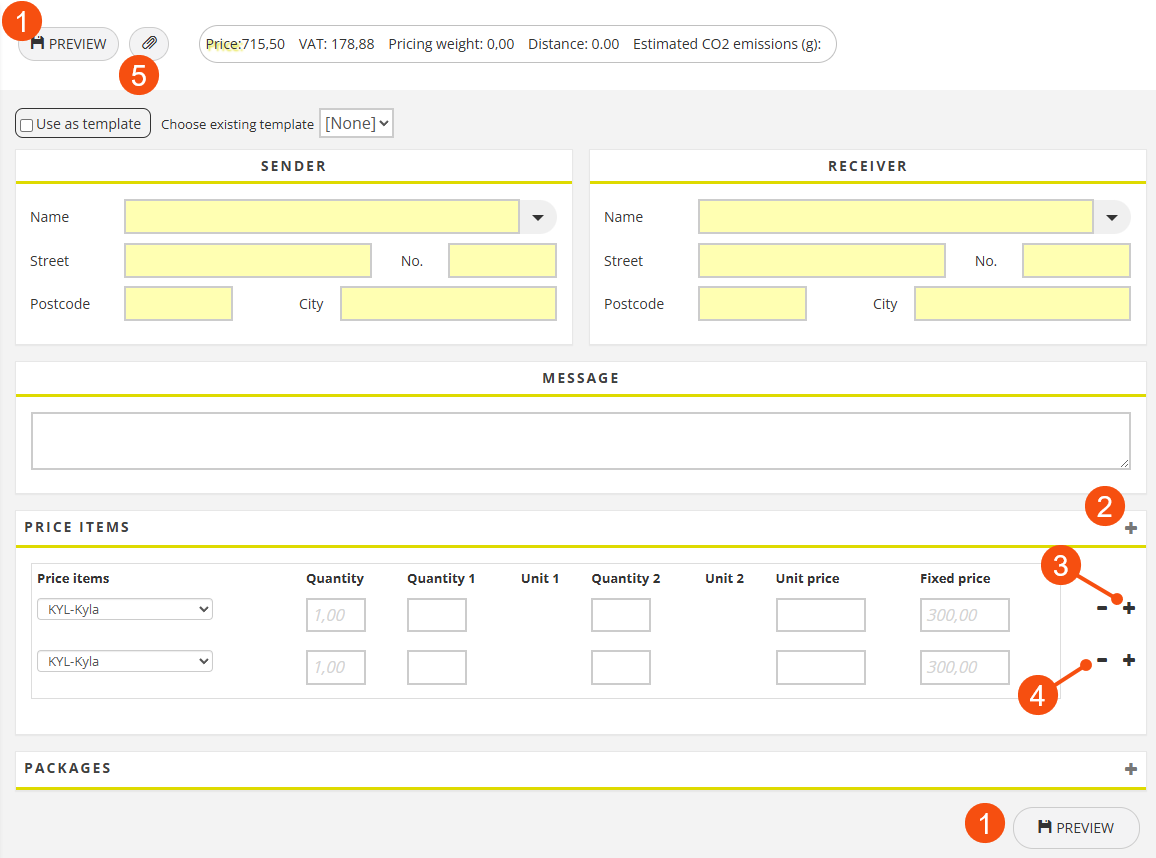
The order page can be used to order transport services. Fill in the form and click on Preview(1). Fields marked in yellow must be completed in order to proceed with the order. If everything looks correct, click Save in the preview to save the order. To change anything, click on Close to go back to the order form.
If you want to add information about price items and parcels, for example, click the plus sign on the block to add a row (2). The plus sign on the line itself copies that line (3). You delete a row using the minus sign (4).
Files can be attached to the order in much the same way as in an email. It can be useful if, for example, you want to show where the goods are to be delivered using a picture. Click on ![]() at the top of the page (5) and navigate to the file.
at the top of the page (5) and navigate to the file.
Delete incorrect addresses
Here’s how to remove incorrect addresses from the temporary address list that appears when you fill in the sender or recipient name field:
-
Enter the name of the sender or receiver in the Name field.
If one or more addresses match the name, they will be displayed in a list.
-
Use the arrow keys or the mouse to select the address you want to delete, then press the Delete key on your keyboard.
The incorrect address is deleted straight away, without any further prompt.
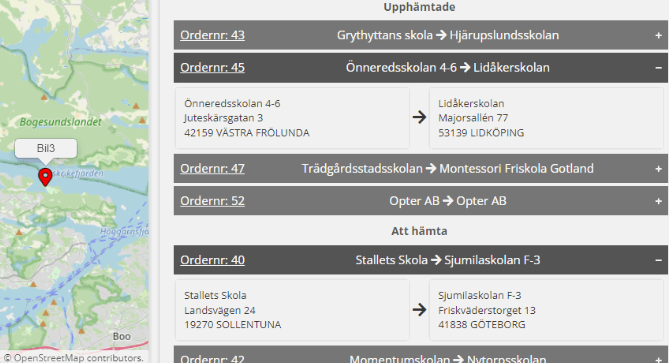
Map
The map shows the position of all the resources with ongoing orders. Resource positions are updated every 20 seconds. The resource’s call number is displayed above each map pin. Hovering over a map pin will also display the resource name and the Order numbers of loaded shipments and shipments to be picked up.
Next to the map, loaded and allocated orders are listed. The order number, sender’s and receiver’s names are displayed for each order. If you click on the plus sign on the far right, the sender and recipient addresses will also be displayed. To see more information about an order, click on the order number in the list to open the detail view.
Log off
You will be logged out immediately when you click on Log off. No additional questions will be asked.