Creating and setting up routes
Last updated: 11 March 2026
In this article
There are two types of routes: distribution routes and line haul (line haul routes). Distribution routes go to and from distribution areas while liner routes go between Terminals. For more information, see Routes and Auto dispatch, overview and Marsruudid (window).
In order to create routes, there must be terminals in the terminal register.
Creating a route
Examples of routes can be found in Examples of routes. Here's how to create a route:
-
Click Tellimus > Marsruudid and then Uus in the menu to create a new route.
-
Enter Nimi, Tüüp and any other information that applies to the route. For more information, see Marsruudid (window) and in the instructions below.
If some routes are often excessively full, the maximum number of shipments the route can handle per day can be entered in the Maximum number of stops on same day field. If the maximum capacity is reached, Opter will not place any more shipments on that route on that day. Instead, other routes that are suitable or a later date are used.
-
Click on Ajakava and select the days on which the route is to operate. For more information, see Ajakava, routes (window).
-
Configure the following settings, depending on the route’s type:
 Distribution
-
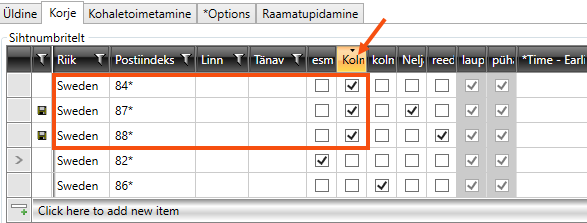
Go to the Korje tab. Under Sihtnumbritelt, enter the pick-up areas to be included in the route.
In columns esmaspäev–pühapäev, tick the day or days on which the collection area in that row is to be served. If the column for a particular day is greyed out, this means that the route does not operate on that day of the week according to the timetable (which you can access from the Üldine).
The following applies to vehicle access for collection in the area:
-
The timetable must be set so that the route is served on that day of the week.
-
The day of the week must be marked in the collection area.
In columns Time - Earliest and Time - Latest, enter the times for the earliest and latest collection times at the senders’ premises.
-
-
Under Terminalidele, enter the terminals where the collected goods are to be delivered.
In columns Time - Earliest and Time - Latest, specify the time range during which the goods are to be delivered to the terminal. You do not have to specify an earliest time. All you need to do is specify the latest time by which the goods must arrive at the terminal in order to be processed before the next departing leg of the route.
In column Pluss päevad, specify whether the delivery to the terminal takes place one or more days after collection. In other words, which date in relation to the pickup date.
Example: If you specify that collection is to take place between 07:00 and 08:00 every Monday, and if the shipments are to be delivered to the terminal between 16:00 and 19:00 on Tuesday, enter “1” in the column Pluss päevad. If, however, it is between 4 pm and 7 pm on Monday (the same day), leave it as “0”.
-
Go to the Kohaletoimetamine tab and do the same for the shipments that are to be sent from the terminals to the recipients. Under Terminalidest, enter the terminals from which the goods are to be collected. Usually the same terminals to which the goods are transported from the collection areas.
In columns Time - Earliest and Time - Latest, enter the earliest and latest times at which the goods will leave the terminal. Time - Latest is therefore the departure time from the terminal.
In column Tähtaeg, enter the time and any lead-time (in days) by which the goods must have arrived at the terminal in order for the transhipment to be completed.
Example: If you enter "8:00" in the Time - Latest column, and if the terminal needs 25 hours for transshipment, enter "7:00 -1d" in the Tähtaeg column. This means that the goods must have arrived at the terminal by 07:00 on the day before the delivery in order to be dispatched on schedule along the route. If the goods arrive after the deadline, the delivery will be rescheduled for the next available slot. The deadline function ensures that there is always enough time to handle the goods at the terminal.
-
Under Sihtnumbritele, enter the delivery areas to be covered by the route.
In columns esmaspäev–pühapäev, tick the day or days on which the delivery area in that row is to be served. If the column for a particular day is greyed out, this means that the route does not operate on that day of the week according to the timetable, which you can access from the tab Üldine.
The following applies to vehicles entering the area for delivery purposes:
-
The timetable must be set so that the route is served on that day of the week.
-
The day of the week must be marked in the collection area.
Enter the earliest and latest times that the shipments are to delivered in the Time - Earliest and Time - Latest columns. In column Pluss päevad, specify whether delivery takes place one or more days after the goods arrived at the terminal.
-
Line haul
-
Go to the Liinivedu tab. Under Terminalidest, enter the terminals where the goods are loaded.
In columns Time - Earliest and Time - Latest, specify the earliest and latest times by which the shipments must leave the terminal. You do not have to specify an earliest departure time. Time - Latest is, in practice, the time at which the vehicle departs from the terminal.
In column Tähtaeg, enter the time and any lead-time requirements for when the goods must have arrived at the terminal at the latest in order for the transhipment to be completed.
Example: If you enter "18:00" in the Time - Latest column, and if the terminal needs 25 hours for transshipment, enter "17:00 -1d" in the Tähtaeg column. This means that the goods must have arrived at the terminal by 17:00 on the day before the next leg of the journey departs. If the goods arrive after the deadline, the shipment will be scheduled for the next departure. The deadline function ensures that there is always enough time to handle the goods at the terminal.
-
Under Terminalidele, enter the terminals where the goods are unloaded.
In columns Time - Earliest and Time - Latest, specify the earliest and latest times by which the goods must arrive at the terminal.
In the Pluss päevad column, enter any plus days to adjust the date.
Example: If, under Terminalidest, you specified that the goods are departing from the terminal at 18:00, and if the shipments must have arrived at the terminal by 01:00 the following day under Terminalidele, enter “1” in the column Pluss päevad. If, on the other hand, it is 11.00 pm on the same day, leave it as “0”.
-
-
If you want the route to have a specific vehicle or status, you can set this. For more information, see Linking vehicles or drivers to routes.
-
Click on Salvesta to save all changes.
-
Check that the services you plan to use allow auto dispatch. See Auto dispatch.
In auto dispatch, shipments are matched with routes based on the route schedule, as well as the terminal’s processing time and opening hours. Please check that you have entered the opening hours for the terminals in the terminal register. For more information about opening hours, see Terminalid (window).
Testing that a route works
To test that a route works, open order reception and proceed as follows:
-
On an order, select a service that has the Luba automaatset veokorraldust checkbox selected.
-
Enter a sender address that is in the route’s pickup area (for a distribution route) or that matches a terminal (for a line haul route).
-
Enter a receiver address that is in the route’s delivery area (for a distribution route) or that matches a terminal (for a line haul route).
-
Go to the Saadetised box in order reception and make sure that the shipment is assigned to the route.
Working with routes
Sort by day
If you have many rows of postcode areas on a delivery route and want to see which ones are being visited on a particular day, you can sort by columns esmaspäev–pühapäev by clicking on the column header.
If you want the rows to be listed in their original order, click on the column header until the small arrow – which indicates that the list is sorted by that column – disappears.
Export to Excel
If you have many routes, it may be easier to export them to Excel, and work with them there instead of in Opter, and then import them back into Opter. For more information, see Exporting and importing routes to/from Excel.