Last updated: 2025-12-16
Log in with Microsoft Entra ID (formerly Azure Active Directory)
In this article
If you use Microsoft's Azure cloud service, you can let users log in to Opter with Entra ID (former Azure AD account). When the user enters the email address in the Opter login window, login.microsoftonline.com opens in a browser where they are asked to enter the password for their Entra ID. Logging in with Entra ID requires two-factor authentication via the Microsoft Authenticator app or SMS code.
It is not possible to log in with Entra ID if you use Internet Explorer as your default browser. We recommend changing to Chrome, Firefox or Edge, for example.
Step 1: Register Opter in Azure
For Opter and Azure to communicate, Opter must be registered in Azure. It is basically like creating a user account for the program. Proceed as follows:
-
Log in to portal.azure.com and search for “app registrations”.
-
Click on New registration in the top left-hand corner.
-
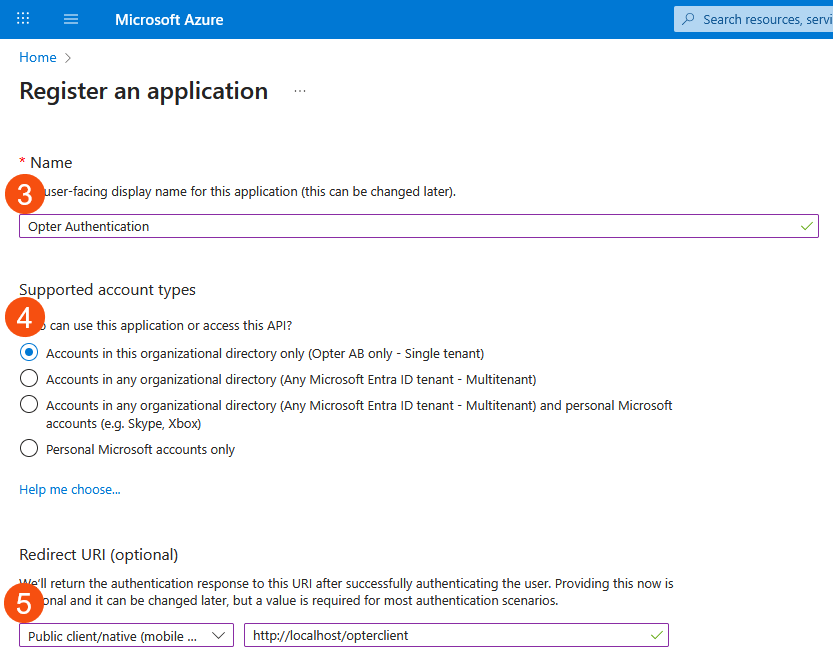
Type a descriptive name for the link under Name, for example "Opter Authentication".
-
Select the default option under Supported account types, which means that only user accounts that exist in your organisation can log in to Opter via Azure.
-
Select Public client/native (mobile & desktop) under Redirect URI (optional) and type "http://localhost/opterclient" in the field on the right.
It says that the redirect URI is optional in Azure, but to be able to log into Opter that field has to be filled in.
-
Click on Register at the bottom left.

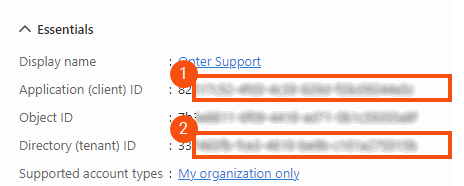
Opter is now registered in Azure. Keep the page open, you need the strings for Application (client) ID and Directory (tenant) ID in the next step.
Step 2: Activate Entra ID login in Opter
Click on Settings > System settings and select Microsoft Azure AD under Login. Fill in the following fields with the information from the app registration completed in step 1:
-
Application (client) ID (1)
-
Directory (tenant) ID (2)

Step 3: Adding the person as an employee
If the user is already listed as an employee, move on to step 4.
-
Click on Register > Employees.
-
Click on New and enter the first name and last name. These are the only fields that have to be filled in to create an employee, but additional information may need to be provided at a later stage depending on how the employee will use the system.
-
If the employee you are creating is not a driver, untick the checkbox Driver. Otherwise leave it selected.
Step 4: Configuring a user account for the employee
Click on Settings > Access rights. If you are a new user, create a new user account by clicking on New in the menu. To change an existing user, click on it in the list. Then proceed as follows:
-
Enter the username of the Entra ID account in the field Username. The username is the main name in Azure, which is an email address, such as “john.smith@courierservices.com” or “john.smith@courierservices.onmicrosoft.com”. You can find all usernames under Users on portal.azure.com.
-
Select Login with Azure AD.
-
Select which employee is to be connected to the user account in the Employee drop-down list. If the desired person is not listed as an employee, they can be added by clicking on
next to the drop-down list.
-
If you use Opter Cloud, select the Remote access checkbox. If it is not selected, the user cannot log into Opter.
-
GIF the user the authorisation they should have, either by double-clicking on any of the groups under Available groups to add it to Selected groups, or by right-clicking on individual functions in the tree structure on the right and selecting an authorisation. For more information about access rights, see Setting access rights for users.
-
When users open Opter, they have to choose how to log in. If you change all users to log in with Entra ID, you can uncheck Opter (username, password) in the system settings, and they will not have to choose the login method.
-
When users log in, they can choose to log in automatically the next time they open Opter. This option should not be used on computers shared by multiple users. Click on File > Log out to forget the saved login credentials.