Norwegian goods in transit (NVIT)
Last updated: 29 September 2026
In this article
Applies to Opter version 2026.06.94 and later.
Goods which have both their collection address and delivery address in Norway, but which pass through Sweden or Finland en route, are classified as Norwegian goods in transit (NVIT).
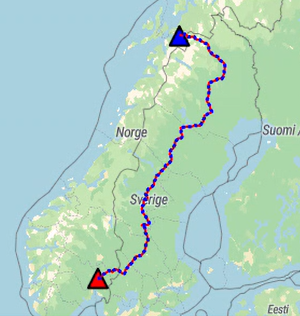
The map below shows an example of goods being transported from Oslo to Tromsø (in Norway) via Sweden.
NVIT is, therefore, Norwegian domestic freight in transit through Sweden or Finland. All NVIT-goods must be declared using a six-digit HS-code, product description, net weight, gross weight, value, etc. Further information is available at https://www.toll.no/no/bedrift/transport-og-tollager/norske-varer-i-transitt.
In Opter
In Opter, you can enter, view and store detailed information about the goods. You do that in group Goods items in the order reception department.

If you need to declare packages Text and Package type (and others) for the goods, enter Text and Package type for the package in group Packages in the order reception and link the goods line to the package in which the goods are physically contained by selecting the package number in column Package in the group Goods items.
Item lines (and package lines) can be imported and exported via EDI. If you use a customs agent to handle transit declarations, it is therefore possible to send the goods information from Opter to the customs agent via EDI. Please contact the EDI team (on ) and, if necessary, arrange an EDI connection between your Opter and the customs agent.
Two methods
There are two ways to do this:
-
Link the line item to a consignment (using the consignment number). The package must therefore be included in group Packages in the same order as the line item.
Use this method if, for example, you need to declare:
-
In which parcel (Package ID) are the goods?
-
Which Text parcel has it?
-
Which Package type parcel is it?
-
-
Do not link the item line to any consignment. The line item is then linked only to the order.
You can use this method if you wish to manage stock at order level. Perhaps you’d like to use one product line per Commodity code (HS).
Conditions
Load carrier
If you need to declare packages Text and Package type (and any others) for the goods, the following applies:
-
Please enter detailed information about the goods in group Goods items in the order reception.
-
You should enter details of the package containing the goods in group Packages, e.g. Text and Package type.
-
You link the line item to the consignment in which the goods are physically contained by selecting the consignment number in column Package in the group Goods items.
-
If you usually use what Opter refers to as “Packages” as Load carrier – for example, a pallet with a pallet collar or a load cage – you will need to switch to using Opter’s load carrier function instead. For more information, see Load carrier.
Package ID and Package id number series
If you need to declare packages Text and Package type (and so on) for the goods, the following applies:
-
Each item must be linked to the package in which it is physically contained. You can make the link by selecting the parcel number on the item line.
-
In order for the parcels to be assigned parcel numbers, you need to set up a parcel number series, if you haven’t already done so. The consignment number series is set on the Order Settings tab (under Package id) in the office settings.
-
A package ID number series for consignment orders can be set by clicking on Settings > Consignment types and selecting a package ID number series from the Package id number series drop-down list.
Package type
If you need to add more parcel types, you can do so in the window Products. (You can find it by clicking Register > Products/types of package. For more information, see Products.)
EDI connection
Item lines (and package lines) can be imported and exported via EDI. If you use a customs agent to handle transit declarations, you can therefore send the goods information to the customs agent via EDI. Please contact the EDI team (on ) and, if necessary, arrange an EDI connection between your Opter and the customs agent. You need to have an agreement with a customs agent.
Information that can be exchanged between the systems
If you use a customs agent to handle transit declarations, you can send the goods information to the customs agent via EDI.
-
You choose which information (e.g. item lines and package lines) and which documents/files you wish to send to the customs agent.
Please add the documents/files to be sent as part of the export as attachments to the order. Add them to the order reception in the group Attachments. Choose a File category, e.g. Freight bill, CMR, EDI or POD. For more information, see, Attachments (order reception) and Attaching files in order reception.
-
If the customs agent returns any documents or files, they will be added as attachments to the order (in the order reception, in the group Attachments).
The EDI team needs to know what information is to be exchanged between the systems. (See Step 3 (optional): Please contact Opter’s EDI team below.)
How to start exporting product information
If you wish to send goods information from Opter to a customs agent via EDI:
-
You enter the product details for the order in the order reception area in groups Goods items and Packages, and add any documents or files to the group Attachments. (Product information can also be added automatically to the order via EDI from a business partner.)
-
For example, the export of goods data from Opter to a customs agent can be initiated in Opter in the following ways:
-
You add options to the order in the order reception department or in the dispatch department. The export of product information begins when the order is saved with that option selected.
 More details
Here’s how it works:
-
Tick the box for the option ‘Customs agent (NVIT)’ (for example) on the order in the order reception area (or in dispatch).
-
You are saving the order.
-
The ‘Customs Agent (NVIT)’ option then creates an automatic price item, and that price item initiates the export of goods information to your customs agent.
-
Your customs agent will draw up a transit declaration. (The customs agent may then send the transit declaration to the transit system NCTS (New Computerised Transit System), depending on what you have agreed.)
-
Your customs agent may send the transit declaration and any other documents to your Opter.
-
This method makes it easier to manage changes if you ask the EDI team to set it up so that changes to the price item are sent to your customs agent automatically. For more information, see Update product information below.
-
-
The export of product information begins when the order reaches a certain status. You choose which status.
-
The export of product information begins when the order is assigned a specific proof of delivery type. You choose the proof of delivery type.
-
View Goods items in Opter
Goods items can be displayed:
-
In order reception.
-
On CMR freight bills.
Step 1: Show group Goods items in the order reception area
To add the group Goods items to the order reception, follow these steps:
-
Click on Settings > Order reception > Order settings.
-
Click on the setting you want to change in the list on the left.
-
Click on the Tab settings tab. Here you can choose which groups are to be displayed in the order reception area, on which tabs and in what order. (For more information, see Organising the groups in Order reception.)
-
Double-click on the tab (folder) you want to change. You will now see the numbers 1-6.
-
Drag and drop group Goods items from the Excluded list onto the tab. (One suggestion is to place group Goods items under the group Packages.)
-
If you do not already have the group Packages in the order reception system, please add it as well. (For more information, see Packages (order reception).)
-
Click on Save to save all changes.
Step 2: Add item lines to the order
There are two ways to do this:
-
Link the line item to a consignment (using the consignment number). The consignment must therefore appear in group Packages in the same order as the goods line.
-
Do not link the goods line to any consignment. The line item is then linked only to the order.
For more information, see Two methods above.
Link the line item to a consignment
If you want to link the line item to a consignment (using the consignment number), do the following:
-
In the order reception section, in group Dimensions, enter the number Packages.
-
Move the mouse pointer to another field. Click
 (the button to the right of the Packages field) to create a consignment note for each consignment in the group Packages.
 -
Enter details of the parcels in the parcel lines. (For example, parcels Text, Package type, Weight and so on.)
Enter only one parcel per parcel row; in other words, ensure that the figure ‘1’ appears in column Quantity of the group Packages. (An item can only be linked to one parcel(s).)
-
Add the items to the group Goods items as follows:
-
Quantity (1). State how many of each type of item are contained in the package.
-
Package (2). Specify the parcel in which the item is physically located by selecting the parcel number from the drop-down list.
-
Commodity code (HS) (3). Set HS-code, i.e. the product code as per HS-the standard. Enter at least six digits. For more information, see Goods items (order reception).
For example, product code ‘640399’ if they are shoes (of a certain type).
-
Description (4). Describe the item. For example, ‘Shoes, white’.
-
Net weight (5). Enter the total weight of the goods on the line in kilograms.
-
Gross weight (6). State the total weight, in kilograms, of the goods on line , including packaging.
-
Amount (7). Enter the value of the goods (to determine the guarantee and reference amounts). For example, if you enter “10” in column Quantity, then column Amount should contain the total value of all 10 items combined.
-
Currency (8). Please specify the currency in which the amount is denominated. For example, ‘NOK’ if the amount is in Norwegian kroner.
-
Country of origin (9). Enter the country code for the country of origin/country of manufacture of the goods (or the country where the goods were last processed). For example, ‘ID’ for Indonesia.
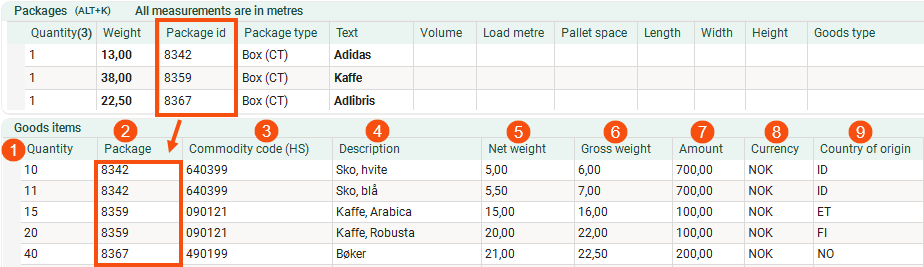
The fields in the columns of group Goods items perform no calculations. They store and display the information you have entered in the fields.
For more information, see Goods items (order reception).
-
-
Save your order when you’re ready.
Link the product line to the order only
If you do not wish to link the item line to a parcel, proceed as follows:
-
In the order reception screen, add the items to group Goods items, but leave column Package blank. The columns are described in Goods items (order reception).
-
Save your order when you’re ready.
Step 3 (optional): Contact Opter’s EDI team
If you would like product information to be included in import and export transactions, please contact the EDI team on regarding the following:
-
If the item lines are to be included in import and export transactions, the EDI team needs to add the element goodsItem in your exports/imports.
-
If changes to the order are received via EDI import, both item lines and package lines can be updated as required. The EDI team needs to adjust your imports.
-
If you wish to send goods information from Opter to a customs agent via EDI:
-
Order an EDI connection between your Opter account and your customs agent by contacting Opter’s EDI team.
The EDI team needs to know:
-
What triggers the export process, for example, the order status, a specific POD-type or specific options on the order.
-
What information and which documents/files you wish to send to the customs agent.
-
Which documents/files you need to have returned by the customs agent.
-
-
Once the EDI connection is set up, you and a member of Opter’s EDI team will test together to ensure that the connection to your customs agent is working.
-
Step 4 (optional): Select how the export of product information should be initiated
If you wish to send goods information from Opter to a customs agent via EDI, select (for example) one of the following:
-
You add options to the order in the order reception department or in the dispatch department. The export of product information begins when the order is saved with that option selected.
Follow the steps below to create a new option and a new price item, and link the option to the price item.
This method makes it easier to manage changes if you ask the EDI team to set it up so that changes to the price item are sent to your customs agent automatically. For more information, see Update product information below.
-
The export of customs data begins when the order reaches a certain status. You choose which status.
Please inform the EDI team of the status.
-
The export of customs information begins when the order is assigned a specific proof of delivery type. You choose the proof of delivery type.
Please inform the EDI team of the proof of delivery type.
Step 5 (optional): Create a new option
If you want the export of product information to start when you save an order that includes an option which creates an automatic price item (which the EDI team has linked to your customs agent), create a new option as follows:
-
Click Settings > Options (and on the tab General).
-
Create a new option by clicking
 New and giving the option a Code (e.g. “NVIT”) and a Name (e.g. “Customs agent (NVIT)”).
 -
Give the options a Description if you like.
-
Tick the box Available for orders so that the options are displayed and can be selected on orders in the order reception system.
-
Tick box Available in dispatch if you want the options to be available for selection in dispatch.
The option is displayed under Options when you right-click on a shipment in dispatch.
You can also set the colour for the options. For more information, seeOptions (window).
-
If you want product information to be exportable only for certain services, click on the tab Services. Move the services for which the ‘Customs representative (NVIT)’ option is not to be available to the Excluded list. For more information, see Options (window).
-
Click on Save to save all changes.
For more information, see Options.
Step 6 (optional): Create a new item and link the options to the item
If you want the export of product information to start when you save an order that contains an option which creates an automatic price item (which the EDI team has linked to your customs agent), create a new price item and link the option to the price item as follows:
-
Click on Economy > Price lists > Price lists and select the price list to work on from the list on the left.
-
Click on the Price items tab. Create a new article by clicking on Create a new price item (at the bottom) or
 to open the article index.
 -
Enter a Name (e.g. “Product information (NVIT)”) and a Code, and configure the following settings:
-
Select the Allow failure checkbox.
-
In drop-down list VAT rate, select 0%.
-
In the drop-down list Price percentage to resource, select No remuneration
-
Select the No fuel extra checkbox.
-
In the Method drop-down list, it is only possible to select Matrix price.
-
-
Click on Save to save all changes.
-
Go back to the Price lists window and the Price items tab to configure further settings for the price item.
-
Tick the box next to the price item ‘Product information (NVIT)’, and then configure the following settings:
-
In the Price item type drop-down list, select Options.
-
Select the Automatic cost checkbox.
-
-
Click on Save to save all changes.
-
Click on the Options tab. For the ‘Customs representative (NVIT)’ option, select the ‘Goods information (NVIT)’ price item from the drop-down list.
-
Click on Save to save all changes.
-
Please contact the EDI team on so that they can link the item to the export consignment to your customs agent.
Step 7 (optional): Show Goods items on the freight bill
Below are two code examples; the first is useful if you link the item lines to packages, whilst the second is useful if you do not link the item lines to packages:
If you link the item lines to the packages
To display the item lines on freight bills, you can add the following XML code (or similar) to the freight bill report/template:
-
Lines 189–256 retrieve parcel information from the parcel lines in the group Packages.
-
Lines 258–329 retrieve product information from the groups Goods items and Packages.
<?xml version="1.0" encoding="utf-8"?>
<template iterations="1" type="FreightBill">
<dataset x="19" y="127" width="180" height="110" fontname="Arial" fontsize="8">
<header x="19" y="10" source="object">
<!-- Draw lines -->
<border x="0" y="0" width="180" height="245" thickness="0.5" />
<line x="90" y="0" width="0" height="112" thickness="0.5" />
<!-- Header -->
<item name="Dette oppdraget utføres i samsvar med transportørens" x="1" y="1" width="89" fontbold="true" fontsize="7" />
<item name="til enhver tid gjeldende ansvarsbestemmelser." x="1" y="5" width="89" fontbold="true" fontsize="7" />
<item name="FRAKTBREV" x="91" y="0.5" width="45" fontbold="true" fontsize="11" />
<item name="TRANSPORTINSTRUKSJONER" x="91" y="4.5" width="45" fontsize="7"/>
<line x="135" y="0" width="0" height="3" thickness="0.2" />
<item name="Transportør" x="136" y="0.5" width="32" fontsize="7" />
<data name="OFF_Name" x="136" y="4.5" fontbold="true" width="33" />
<line x="168" y="0" width="0" height="3" thickness="0.2" />
<item name="Sidenr." x="169" y="0.5" width="11" fontsize="7" />
<pagenumber name="@page(@pages)" x="170" y="3.5" fontbold="true" width="10" />
<!-- Sender -->
<block x="0" y="10">
<line x="0" y="0" width="180" height="0" thickness="0.5" />
<item name="Avsender, postadresse" x="1" y="0.5" width="34" fontsize="7" />
<block x="0" y="3">
<data name="StartAddress.ADR_AddrLine1" x="1" y="0" fontbold="true" width="70" />
<data name="StartAddress.ADR_Company" positionbelow="true" condition="StartAddress.ADR_Company" x="1" y="0" fontbold="true" width="70" />
<data name="StartAddress.ADR_Street,' ',StartAddress.ADR_StreetNo" positionbelow="true" x="1" y="0" fontbold="true" width="70" />
<data name="StartAddress.ADR_ZipCode,' ',StartAddress.ADR_City" positionbelow="true" x="1" y="0" fontbold="true" width="70" />
</block>
<item name="GAN/Kundenummer" x="50" y="0.5" width="45" fontsize="7" />
<data name="StartAddress.CUS_CustomerCode,' / ',StartAddress.CUS_CustomerNumber" x="50" y="4" fontbold="true" width="40" condition="StartAddress.ADR_CUS_Id" />
<line x="0" y="17" width="180" height="0" thickness="0.2" />
<item name="Avsendersted/-stasjon (inkl. postnr)" x="1" y="17.5" width="45" fontsize="7" />
<data name="StartAddress.ADR_ZipCode,' ',StartAddress.ADR_City" x="1" y="21" fontbold="true" width="40" />
<line x="46" y="17" width="0" height="3" thickness="0.2" />
<item name="Avsenders telefonnummer" x="47" y="17.5" width="43" fontsize="7" />
<data name="StartAddress.ADR_Phone" x="47" y="21" fontbold="true" width="40" />
<!--Receiver-->
</block>
<block x="0" y="35">
<line x="0" y="0" width="180" height="0" thickness="0.5" />
<block x="0.5" y="0" height="26" width="90" backcolor="F6F6F6" />
<item name="Varemottaker, leveringsadresse" x="1" y="0.5" width="34" fontsize="7" />
<block x="0" y="4">
<data name="EndAddress.ADR_AddrLine1" positionbelow="true" x="1" y="0" fontbold="true" width="70" />
<data name="EndAddress.ADR_Company" condition="EndAddress.ADR_Company" positionbelow="true" x="1" y="0" fontbold="true" width="70" />
<data name="EndAddress.ADR_Street,' ',EndAddress.ADR_StreetNo" positionbelow="true" x="1" y="0" fontbold="true" width="70" />
<data name="EndAddress.ADR_ZipCode,' ',EndAddress.ADR_City" positionbelow="true" x="1" y="0" fontbold="true" width="70" />
</block>
<item name="GAN/Kundenummer" x="50" y="0.5" width="45" fontsize="7" />
<data name="EndAddress.CUS_CustomerCode,' / ',EndAddress.CUS_CustomerNumber" x="50" y="4" fontbold="true" width="40" condition="EndAddress.ADR_CUS_Id" />
</block>
<block x="0" y="60">
<border x="0" y="1" width="89.5" height="9" thickness="0.7" />
<item name="Destinasjon/-stasjon (inkl. postnr)" x="1" y="1.5" width="89" fontsize="7" />
<data name="EndAddress.ADR_ZipCode,' ',EndAddress.ADR_City" x="1" y="5" fontbold="true" width="90" />
<item name="Leveringsinstruksjoner (oppkrav osv)" x="1" y="10.5" width="89" multiline="true" fontsize="7" />
<block x="1" y="0">
<data name="EndAddress.ADR_Phone" x="63" y="11" fontbold="true" width="85" />
<data name="DEL_SenderInstruction" x="0" y="18" multiline="true" fontbold="true" width="88" height="18" />
</block>
<border x="46" y="10" width="5" height="4" thickness="0.2" />
<item name="Varsles," x="52" y="10" width="15" fontsize="7" />
<item name="telefonnummer" x="52" y="12.3" width="15" fontsize="7" />
<border x="46" y="14" width="5" height="4" thickness="0.2" />
<item name="Fax" x="52" y="15.3" width="15" fontsize="7" />
<line x="0" y="36" width="90" height="0" thickness="0.5" />
<item name="Antall godkjente europaller" x="1" y="36.5" width="23" fontbold="true" fontsize="6" />
<line x="24" y="36" width="0" height="8" thickness="0.2" />
<item name="Mottakers reg. nr" x="25" y="36.5" width="35" fontsize="7" />
<line x="56" y="36" width="0" height="8" thickness="0.2" />
<item name="Mottakers pallreg. nr" x="57" y="36.5" width="35" fontsize="7" />
<line x="0" y="44" width="90" height="0" thickness="0.2" />
<item name="Lasttilbehør" x="1" y="44.5" width="35" fontsize="7" />
<line x="0" y="52" width="180" height="0" thickness="0.5" />
</block>
<block x="90" y="10">
<item name="Utskrivingsdato" x="1" y="0.5" width="44" fontsize="7" />
<data name="DEL_OrderDate" x="1" y="4" fontbold="true" format="d" width="40" />
<data name="DEL_Id" x="2" y="4" textalignment="right" fontbold="true" width="40" />
<line x="45" y="0" width="0" height="9" thickness="0.5" />
<item name="Fraktbrev nr" x="46" y="0.5" width="44" fontsize="7" />
<data name="DEL_FreightBill" x="48" y="3.3" fontname="Verdana" format="d" fontsize="12" width="40" />
<line x="0" y="9" width="90" height="0" thickness="0.5" />
<item name="Avsenders referanser" x="1" y="9.5" width="89" fontsize="7" />
<data name="DEL_SenderReference" x="1" y="13" fontbold="true" width="40" />
<item name="Mottakers referanser" x="1" y="17.5" width="89" fontsize="7" />
<data name="DEL_ReceiverReference" x="1" y="21" fontbold="true" width="40" />
</block>
<block x="90" y="35">
<item name="Spesielle transportinstruksjoner (varme, kald, osv)" x="1" y="0.5" width="70" fontsize="7" />
<data name="DEL_GoodsType" x="1" y="4.5" textalignment="left" fontbold="true" width="69" />
<item name="Kod" x="71" y="0.5" width="19" fontsize="7" />
<block x="0" y="9" height="8" width="89.5" backcolor="F6F6F6" />
<border x="0" y="9" width="89.5" height="8" thickness="0.7" backcolor="Gray" />
<item name="Etterkrav, kr" x="1" y="9.5" width="22" fontsize="7" />
<data name="DEL_CodTotal" x="1" y="13" fontbold="true" width="20" align="right" format="# ##0.00" />
<line x="23" y="9" width="0" height="8" thickness="0.2" />
<item name="Bankkontonr" x="24" y="9.5" width="23" fontsize="7" />
<data name="DEL_CodBankAccountNumber" x="24" y="13" fontbold="true" width="24" />
<item name="Etterkrav, referanser" x="46" y="9.5" width="42" fontsize="7" />
<data name="DEL_CodPaymentReference" x="46" y="13" fontbold="true" width="45" />
<item name="Fraktbetalning" x="1" y="17.5" width="22" fontbold="true" fontsize="7" />
<border x="0" y="22" width="5" height="4" thickness="0.2" />
<item name="1" x="5.5" y="22.5" width="15" />
<item name="Avsenderen" x="8" y="20.5" width="15" fontsize="7" />
<item name="betaler" x="8" y="23" width="15" fontsize="7" />
<data name="'X'" x="1" y="22.5" fontbold="true" width="5" condition="DEL_PAY_Id=1" />
<line x="23" y="17" width="0" height="3" thickness="0.2" />
<item name="inkl. (kode)" x="24" y="17.5" width="22" fontsize="7" />
<line x="45" y="17" width="0" height="9" thickness="0.2" />
<item name="Transportavtale nr" x="46" y="17.5" width="45" fontsize="7" />
<!--<data name="DEL_Id" x="46" y="21" width="40" fontbold="true" />-->
</block>
<block x="90" y="60">
<border x="0" y="6" width="5" height="4" thickness="0.2" />
<item name="3" x="5.5" y="6.5" width="15" />
<line x="0" y="1" width="90" height="0" thickness="0.5" />
<item name="Mottakeren" x="8" y="4.5" width="15" fontsize="7" />
<item name="betaler" x="8" y="7" width="15" fontsize="7" />
<data name="'X'" x="1" y="6.5" fontbold="true" width="5" condition="DEL_PAY_Id=2" />
<line x="23" y="1" width="0" height="9" thickness="0.2" />
<border x="23" y="6" width="5" height="4" thickness="0.2" />
<item name="4" x="28.5" y="6.5" width="15" />
<line x="0" y="1" width="90" height="0" thickness="0.5" />
<item name="Annen" x="31" y="4.5" width="15" fontsize="7" />
<item name="fraktbetalare" x="31" y="7" width="15" fontsize="7" />
<data name="'X'" x="24" y="6.5" fontbold="true" width="5" condition="DEL_PAY_Id>2" />
<item name="GAN/Kundenummer" x="46" y="1.5" width="45" fontsize="7" />
<data name="CUS_CustomerCode,' / ',CUS_CustomerNumber" x="46" y="5" width="45" fontbold="true" />
<border x="0" y="10" width="89.5" height="16" thickness="0.7" />
<item name="Kodefelt" x="1" y="10.5" width="89" fontbold="true" fontsize="7" />
</block>
<block x="90" y="86">
<item name="Avsenders" x="1" y="0.5" width="30" fontsize="7" />
<item name="GAN/Kundenr" x="1" y="3" width="30" fontsize="7" />
<item name="(strekkode)" x="1" y="5.5" width="30" fontsize="7" />
<item name="Fraktbrev" x="1" y="15" width="30" fontsize="7" />
<item name="nummer" x="1" y="17.5" width="30" fontsize="7" />
<item name="(strekkode)" x="1" y="20" width="30" fontsize="7" />
<barcode x="18" y="13" name="DEL_FreightBill" height="11" width="68" />
</block>
<!--Packages-->
<block x="0" y="112">
<item name="Godsmerking" x="0.5" y="0.5" width="40" fontsize="7" />
<line x="40" y="0" width="0" height="4" thickness="0.5" />
<item name="Kolliantall" x="40.5" y="0.5" width="12" fontsize="7" />
<line x="56" y="0" width="0" height="4" thickness="0.5" />
<item name="Kollitype" x="56.5" y="0.5" width="12" fontsize="7" />
<line x="68" y="0" width="0" height="4" thickness="0.5" />
<item name="Godstype" x="68.5" y="0.5" width="50" fontsize="7" />
<line x="119" y="0" width="0" height="4" thickness="0.5" />
<item name="Kollinummer" x="119.5" y="0.5" width="16" fontsize="7" />
<!--<item name="(transport)" x="119.5" y="3" width="16" fontsize="7" />-->
<line x="135" y="0" width="0" height="4" thickness="0.5" />
<item name="Bruttovekt, kg" x="135.5" y="0.5" width="23" fontsize="7" />
<line x="155" y="0" width="0" height="4" thickness="0.5" />
<item name="Volum, m3" x="155.5" y="0.5" width="26" fontsize="7" />
<!--<item name="tainer/flak: godsvikt)" x="155.5" y="3" width="26" fontsize="7" />-->
</block>
</header>
<!-- Packages, if any -->
<dataitem x="0" y="0" source="object" dataaccess="relative" command="Packages.ActiveItems">
<block y="1" fontbold="true">
<block>
<data name="PAC_Text" x="1" y="0" width="40" />
</block>
<data name="PAC_Quantity" x="40" y="0" width="11" align="right" />
<data name="PAC_PackageType" x="56" y="0" width="14" />
<block x="69">
<data name="PAC_GoodsType" width="40" />
<block condition="PAC_Depth" positionbelow="true">
<block condition="PAC_Width">
<block condition="PAC_Height">
<data name="PAC_Depth,' m x ',PAC_Width,' m x ',PAC_Height,' m'" format="##0.##" width="40" textalignment="left" />
</block>
</block>
</block>
</block>
<data name="PAC_PackageId" x="120" y="0" width="40" />
<data name="PAC_Weight,' kg'" x="135" format="# ##0.##" y="0" width="18" align="right" />
<block x="155" y="0">
<data name="PAC_Volume" x="0" condition="PAC_Volume" format="# ##0.##" y="0" width="15" align="right" />
<item name="m3" x="15" condition="PAC_Volume" y="0" width="24" />
<block positionbelow="true" condition="PAC_LoadMeter">
<data name="PAC_LoadMeter" x="0" format="# ##0.##" width="15" align="right" />
<item name="flm" x="15" width="24" />
</block>
<block positionbelow="true" condition="PAC_Area">
<data name="PAC_Area" x="0" format="# ##0.##" fontbold="true" width="15" align="right" />
<item name="ppl" x="15" fontbold="true" width="24" />
</block>
</block>
<line x="2" y="1" width="175" thickness="0.1" color="D3D3D3" positionbelow="true">
</line>
</block>
</dataitem>
<!-- Goods Item Rows example -->
<dataitem source="object" command="Packages">
<!-- Item header -->
<dataitemheader x="0" y="10">
<item name="NVIT, varerader (Goods items rows)" x="1" y="0" />
<line x="0" y="5" width="180" height="0" thickness="0.5" />
<block y="2">
<block x="0" y="6">
<!-- Package details -->
<item name="Kolli" font="Arial" bold="True" x="1" y="0" size="7" width="20" align="left" />
<item name="Kollinr." font="Arial" x="1" y="4" size="7" width="20" align="left" />
<item name="Godsmerking" font="Arial" x="1" y="8" size="7" width="20" align="left" />
<item name="Kollitype" font="Arial" x="1" y="12" size="7" width="20" align="left" />
<item name="Antall" font="Arial" x="1" y="16" size="7" width="20" align="left" />
<!-- Goods item row header -->
<item name="Varekode (HS)" font="Arial" bold="True" x="21" y="0" size="7" width="20" align="left" />
<item name="Antall" font="Arial" bold="True" x="42" y="0" size="7" width="15" align="left" />
<item name="Nettovekt" font="Arial" bold="True" x="58" y="0" size="7" width="20" align="left" />
<item name="(kg)" font="Arial" bold="True" x="58" y="4" size="7" width="20" align="left" />
<item name="Bruttovekt" font="Arial" bold="True" x="79" y="0" size="7" width="20" align="left" />
<item name="(kg)" font="Arial" bold="True" x="79" y="4" size="7" width="20" align="left" />
<item name="Beløp" font="Arial" bold="True" x="100" y="0" size="7" width="20" align="left" />
<item name="Opprinn.-" font="Arial" bold="True" x="121" y="0" size="7" width="15" align="left" />
<item name="land" font="Arial" bold="True" x="121" y="4" size="7" width="15" align="left" />
<item name="Beskrivelse" font="Arial" bold="True" x="136" y="0" size="7" width="50" align="left" />
<line x="0" y="20" height="0" width="180" />
</block>
</block>
</dataitemheader>
<block x="0" y="0">
<!-- Package details -->
<data name="PAC_PackageId" font="Arial" x="1" y="2" size="7" width="20" format="" align="left" />
<data name="PAC_Text" font="Arial" x="1" y="6" size="7" width="20" format="" align="left" />
<data name="PAC_PackageType" font="Arial" x="1" y="10" size="7" width="20" format="" align="left" />
<data name="PAC_Quantity" font="Arial" x="1" y="14" size="7" width="20" format="" align="left" />
<!-- Goods item rows -->
<query command="GoodsItems" dataaccess="relative" source="object" >
<block x="0" y="0" width="46" height="9">
<data name="GOI_CommodityCode" y="4" x="21" fontbold="true" fontsize="9"/>
<data name="GOI_Quantity" y="4" x="42" fontbold="true" fontsize="9" format="# ##0"/>
<data name="GOI_NetWeight" y="4" x="58" fontbold="true" fontsize="9" format="# ##0.0##"/>
<data name="GOI_GrossWeight" y="4" x="79" fontbold="true" fontsize="9" format="# ##0.0##"/>
<data name="GOI_Amount,' ',GOI_Currency" y="4" x="100" fontbold="true" fontsize="9" format="# ##0.00##"/>
<data name="GOI_CountryOfOrigin" y="4" x="121" fontbold="true" fontsize="9"/>
<data name="GOI_Description" y="4" x="136" fontbold="true" fontsize="9"/>
</block>
</query>
<!-- Vertical Lines -->
<line x="20" y="0" height="15.8" width="0" color="D3D3D3" />
<line x="41" y="0" height="15.8" width="0" color="D3D3D3" />
<line x="58" y="0" height="15.8" width="0" color="D3D3D3" />
<line x="78" y="0" height="15.8" width="0" color="D3D3D3" />
<line x="99" y="0" height="15.8" width="0" color="D3D3D3" />
<line x="120" y="0" height="15.8" width="0" color="D3D3D3" />
<line x="135" y="0" height="15.8" width="0" color="D3D3D3" />
<!-- Last Line -->
<line x="0" y="0" positionbelow="true" width="180" height="0" />
</block>
</dataitem>
<!-- End of Goods items rows example -->
</dataset>
</template>
Example
This example shows what the freight bill will look like if you use the code example above.
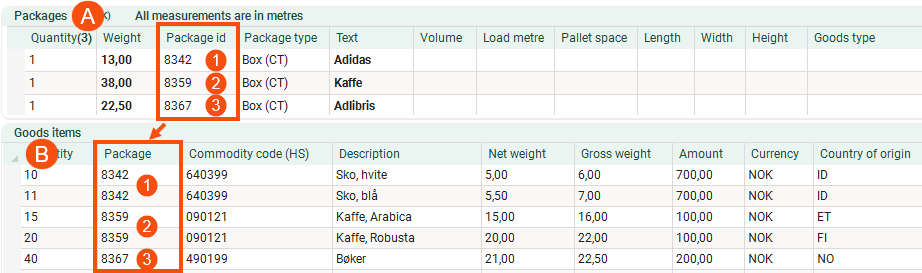
If the order looks like this in groups Packages (A) and Goods items (B) in the order reception:
The freight bill will look like this:
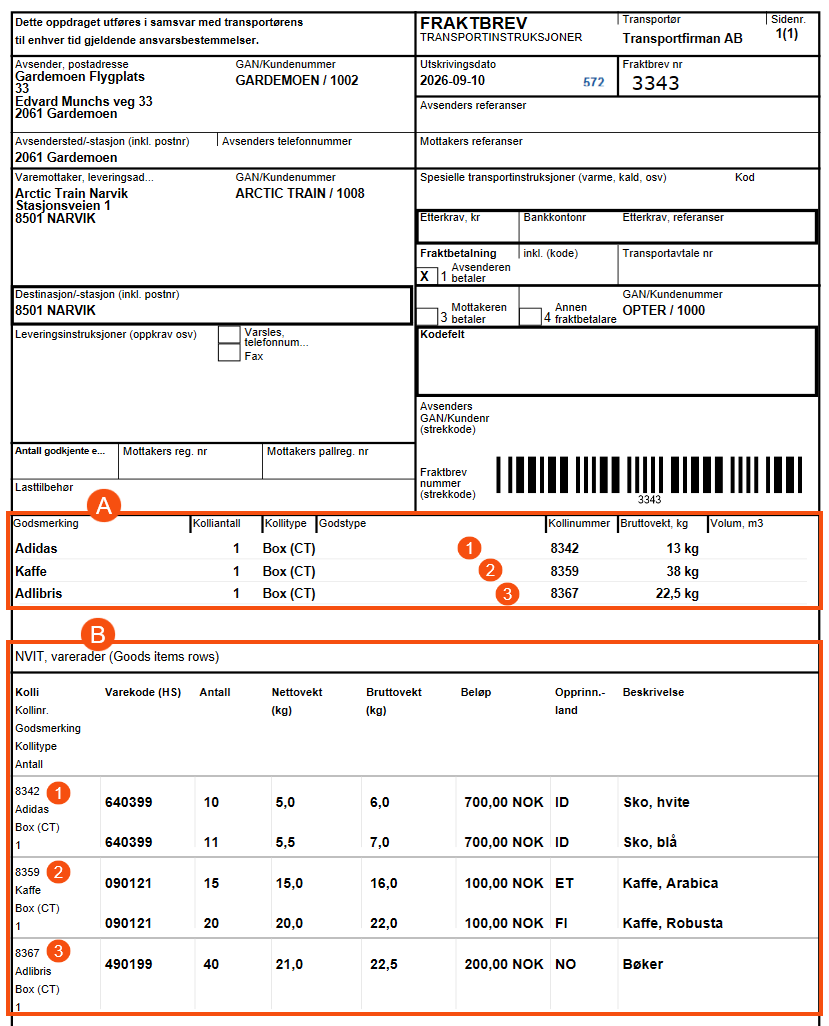
The letters in the image above show the following:
-
Parcel information retrieved from the parcel records in the group Packages. Corresponds to lines 189–256 in the code example above.
-
Product information retrieved from the groups Goods items and Packages. Corresponds to lines 258–329 in the code example above.
The figures in the images above show that:
-
Package ID 8342 is linked to two product lines.
-
Package ID 8359 is linked to two product lines.
-
Package ID 8367 is linked to a product line.
If you do not link the item lines to the packages
To display the item lines on freight bills, you can add the following XML code (or similar) to the freight bill report/template:
-
Lines 191–243 retrieve product information from the group Goods items.
XML
<?xml version="1.0" encoding="utf-8"?>
<template iterations="1" type="FreightBill">
<dataset x="19" y="127" width="180" height="110" fontname="Arial" fontsize="8">
<header x="19" y="10" source="object">
<!-- Draw lines -->
<border x="0" y="0" width="180" height="245" thickness="0.5" />
<line x="90" y="0" width="0" height="112" thickness="0.5" />
<!-- Header -->
<item name="Dette oppdraget utføres i samsvar med transportørens" x="1" y="1" width="89" fontbold="true" fontsize="7" />
<item name="til enhver tid gjeldende ansvarsbestemmelser." x="1" y="5" width="89" fontbold="true" fontsize="7" />
<item name="FRAKTBREV" x="91" y="0.5" width="45" fontbold="true" fontsize="11" />
<item name="TRANSPORTINSTRUKSJONER" x="91" y="4.5" width="45" fontsize="7"/>
<line x="135" y="0" width="0" height="3" thickness="0.2" />
<item name="Transportør" x="136" y="0.5" width="32" fontsize="7" />
<data name="OFF_Name" x="136" y="4.5" fontbold="true" width="33" />
<line x="168" y="0" width="0" height="3" thickness="0.2" />
<item name="Sidenr." x="169" y="0.5" width="11" fontsize="7" />
<pagenumber name="@page(@pages)" x="170" y="3.5" fontbold="true" width="10" />
<!-- Sender -->
<block x="0" y="10">
<line x="0" y="0" width="180" height="0" thickness="0.5" />
<item name="Avsender, postadresse" x="1" y="0.5" width="34" fontsize="7" />
<block x="0" y="3">
<data name="StartAddress.ADR_AddrLine1" x="1" y="0" fontbold="true" width="70" />
<data name="StartAddress.ADR_Company" positionbelow="true" condition="StartAddress.ADR_Company" x="1" y="0" fontbold="true" width="70" />
<data name="StartAddress.ADR_Street,' ',StartAddress.ADR_StreetNo" positionbelow="true" x="1" y="0" fontbold="true" width="70" />
<data name="StartAddress.ADR_ZipCode,' ',StartAddress.ADR_City" positionbelow="true" x="1" y="0" fontbold="true" width="70" />
</block>
<item name="GAN/Kundenummer" x="50" y="0.5" width="45" fontsize="7" />
<data name="StartAddress.CUS_CustomerCode,' / ',StartAddress.CUS_CustomerNumber" x="50" y="4" fontbold="true" width="40" condition="StartAddress.ADR_CUS_Id" />
<line x="0" y="17" width="180" height="0" thickness="0.2" />
<item name="Avsendersted/-stasjon (inkl. postnr)" x="1" y="17.5" width="45" fontsize="7" />
<data name="StartAddress.ADR_ZipCode,' ',StartAddress.ADR_City" x="1" y="21" fontbold="true" width="40" />
<line x="46" y="17" width="0" height="3" thickness="0.2" />
<item name="Avsenders telefonnummer" x="47" y="17.5" width="43" fontsize="7" />
<data name="StartAddress.ADR_Phone" x="47" y="21" fontbold="true" width="40" />
<!--Receiver-->
</block>
<block x="0" y="35">
<line x="0" y="0" width="180" height="0" thickness="0.5" />
<block x="0.5" y="0" height="26" width="90" backcolor="F6F6F6" />
<item name="Varemottaker, leveringsadresse" x="1" y="0.5" width="34" fontsize="7" />
<block x="0" y="4">
<data name="EndAddress.ADR_AddrLine1" positionbelow="true" x="1" y="0" fontbold="true" width="70" />
<data name="EndAddress.ADR_Company" condition="EndAddress.ADR_Company" positionbelow="true" x="1" y="0" fontbold="true" width="70" />
<data name="EndAddress.ADR_Street,' ',EndAddress.ADR_StreetNo" positionbelow="true" x="1" y="0" fontbold="true" width="70" />
<data name="EndAddress.ADR_ZipCode,' ',EndAddress.ADR_City" positionbelow="true" x="1" y="0" fontbold="true" width="70" />
</block>
<item name="GAN/Kundenummer" x="50" y="0.5" width="45" fontsize="7" />
<data name="EndAddress.CUS_CustomerCode,' / ',EndAddress.CUS_CustomerNumber" x="50" y="4" fontbold="true" width="40" condition="EndAddress.ADR_CUS_Id" />
</block>
<block x="0" y="60">
<border x="0" y="1" width="89.5" height="9" thickness="0.7" />
<item name="Destinasjon/-stasjon (inkl. postnr)" x="1" y="1.5" width="89" fontsize="7" />
<data name="EndAddress.ADR_ZipCode,' ',EndAddress.ADR_City" x="1" y="5" fontbold="true" width="90" />
<item name="Leveringsinstruksjoner (oppkrav osv)" x="1" y="10.5" width="89" multiline="true" fontsize="7" />
<block x="1" y="0">
<data name="EndAddress.ADR_Phone" x="63" y="11" fontbold="true" width="85" />
<data name="DEL_SenderInstruction" x="0" y="18" multiline="true" fontbold="true" width="88" height="18" />
</block>
<border x="46" y="10" width="5" height="4" thickness="0.2" />
<item name="Varsles," x="52" y="10" width="15" fontsize="7" />
<item name="telefonnummer" x="52" y="12.3" width="15" fontsize="7" />
<border x="46" y="14" width="5" height="4" thickness="0.2" />
<item name="Fax" x="52" y="15.3" width="15" fontsize="7" />
<line x="0" y="36" width="90" height="0" thickness="0.5" />
<item name="Antall godkjente europaller" x="1" y="36.5" width="23" fontbold="true" fontsize="6" />
<line x="24" y="36" width="0" height="8" thickness="0.2" />
<item name="Mottakers reg. nr" x="25" y="36.5" width="35" fontsize="7" />
<line x="56" y="36" width="0" height="8" thickness="0.2" />
<item name="Mottakers pallreg. nr" x="57" y="36.5" width="35" fontsize="7" />
<line x="0" y="44" width="90" height="0" thickness="0.2" />
<item name="Lasttilbehør" x="1" y="44.5" width="35" fontsize="7" />
<line x="0" y="52" width="180" height="0" thickness="0.5" />
</block>
<block x="90" y="10">
<item name="Utskrivingsdato" x="1" y="0.5" width="44" fontsize="7" />
<data name="DEL_OrderDate" x="1" y="4" fontbold="true" format="d" width="40" />
<data name="DEL_Id" x="2" y="4" textalignment="right" fontbold="true" width="40" />
<line x="45" y="0" width="0" height="9" thickness="0.5" />
<item name="Fraktbrev nr" x="46" y="0.5" width="44" fontsize="7" />
<data name="DEL_FreightBill" x="48" y="3.3" fontname="Verdana" format="d" fontsize="12" width="40" />
<line x="0" y="9" width="90" height="0" thickness="0.5" />
<item name="Avsenders referanser" x="1" y="9.5" width="89" fontsize="7" />
<data name="DEL_SenderReference" x="1" y="13" fontbold="true" width="40" />
<item name="Mottakers referanser" x="1" y="17.5" width="89" fontsize="7" />
<data name="DEL_ReceiverReference" x="1" y="21" fontbold="true" width="40" />
</block>
<block x="90" y="35">
<item name="Spesielle transportinstruksjoner (varme, kald, osv)" x="1" y="0.5" width="70" fontsize="7" />
<data name="DEL_GoodsType" x="1" y="4.5" textalignment="left" fontbold="true" width="69" />
<item name="Kod" x="71" y="0.5" width="19" fontsize="7" />
<block x="0" y="9" height="8" width="89.5" backcolor="F6F6F6" />
<border x="0" y="9" width="89.5" height="8" thickness="0.7" backcolor="Gray" />
<item name="Etterkrav, kr" x="1" y="9.5" width="22" fontsize="7" />
<data name="DEL_CodTotal" x="1" y="13" fontbold="true" width="20" align="right" format="# ##0.00" />
<line x="23" y="9" width="0" height="8" thickness="0.2" />
<item name="Bankkontonr" x="24" y="9.5" width="23" fontsize="7" />
<data name="DEL_CodBankAccountNumber" x="24" y="13" fontbold="true" width="24" />
<item name="Etterkrav, referanser" x="46" y="9.5" width="42" fontsize="7" />
<data name="DEL_CodPaymentReference" x="46" y="13" fontbold="true" width="45" />
<item name="Fraktbetalning" x="1" y="17.5" width="22" fontbold="true" fontsize="7" />
<border x="0" y="22" width="5" height="4" thickness="0.2" />
<item name="1" x="5.5" y="22.5" width="15" />
<item name="Avsenderen" x="8" y="20.5" width="15" fontsize="7" />
<item name="betaler" x="8" y="23" width="15" fontsize="7" />
<data name="'X'" x="1" y="22.5" fontbold="true" width="5" condition="DEL_PAY_Id=1" />
<line x="23" y="17" width="0" height="3" thickness="0.2" />
<item name="inkl. (kode)" x="24" y="17.5" width="22" fontsize="7" />
<line x="45" y="17" width="0" height="9" thickness="0.2" />
<item name="Transportavtale nr" x="46" y="17.5" width="45" fontsize="7" />
<!--<data name="DEL_Id" x="46" y="21" width="40" fontbold="true" />-->
</block>
<block x="90" y="60">
<border x="0" y="6" width="5" height="4" thickness="0.2" />
<item name="3" x="5.5" y="6.5" width="15" />
<line x="0" y="1" width="90" height="0" thickness="0.5" />
<item name="Mottakeren" x="8" y="4.5" width="15" fontsize="7" />
<item name="betaler" x="8" y="7" width="15" fontsize="7" />
<data name="'X'" x="1" y="6.5" fontbold="true" width="5" condition="DEL_PAY_Id=2" />
<line x="23" y="1" width="0" height="9" thickness="0.2" />
<border x="23" y="6" width="5" height="4" thickness="0.2" />
<item name="4" x="28.5" y="6.5" width="15" />
<line x="0" y="1" width="90" height="0" thickness="0.5" />
<item name="Annen" x="31" y="4.5" width="15" fontsize="7" />
<item name="fraktbetalare" x="31" y="7" width="15" fontsize="7" />
<data name="'X'" x="24" y="6.5" fontbold="true" width="5" condition="DEL_PAY_Id>2" />
<item name="GAN/Kundenummer" x="46" y="1.5" width="45" fontsize="7" />
<data name="CUS_CustomerCode,' / ',CUS_CustomerNumber" x="46" y="5" width="45" fontbold="true" />
<border x="0" y="10" width="89.5" height="16" thickness="0.7" />
<item name="Kodefelt" x="1" y="10.5" width="89" fontbold="true" fontsize="7" />
</block>
<block x="90" y="86">
<item name="Avsenders" x="1" y="0.5" width="30" fontsize="7" />
<item name="GAN/Kundenr" x="1" y="3" width="30" fontsize="7" />
<item name="(strekkode)" x="1" y="5.5" width="30" fontsize="7" />
<item name="Fraktbrev" x="1" y="15" width="30" fontsize="7" />
<item name="nummer" x="1" y="17.5" width="30" fontsize="7" />
<item name="(strekkode)" x="1" y="20" width="30" fontsize="7" />
<barcode x="18" y="13" name="DEL_FreightBill" height="11" width="68" />
</block>
</header>
<!-- Goods Item Rows example -->
<dataitem source="object" command="GoodsItems.ActiveItems">
<!-- Item header -->
<dataitemheader x="0" y="2">
<item name="Varerader (Goods items rows)" x="1" y="0" />
<line x="0" y="5" width="180" height="0" thickness="0.5" />
<block y="2">
<block x="0" y="4">
<!-- Goods item row header -->
<item name="Varekode (HS)" font="Arial" bold="True" x="2" y="0" size="7" width="20" align="left" />
<item name="Antall" font="Arial" bold="True" x="21" y="0" size="7" width="15" align="left" />
<item name="Nettovekt" font="Arial" bold="True" x="42" y="0" size="7" width="20" align="left" />
<item name="(kg)" font="Arial" bold="True" x="42" y="4" size="7" width="20" align="left" />
<item name="Bruttovekt" font="Arial" bold="True" x="59" y="0" size="7" width="20" align="left" />
<item name="(kg)" font="Arial" bold="True" x="59" y="4" size="7" width="20" align="left" />
<item name="Beløp" font="Arial" bold="True" x="79" y="0" size="7" width="20" align="left" />
<item name="Opprinn.-" font="Arial" bold="True" x="109" y="0" size="7" width="15" align="left" />
<item name="land" font="Arial" bold="True" x="109" y="4" size="7" width="15" align="left" />
<item name="Beskrivelse" font="Arial" bold="True" x="129" y="0" size="7" width="50" align="left" />
<line x="0" y="10" height="0" width="180" />
</block>
</block>
</dataitemheader>
<block x="0" y="0">
<!-- Goods item rows -->
<block x="0" y="0" width="46" height="4">
<data name="GOI_CommodityCode" y="3" x="2" fontbold="true" fontsize="9"/>
<data name="GOI_Quantity" y="3" x="21" fontbold="true" fontsize="9" format="# ##0"/>
<data name="GOI_NetWeight" y="3" x="42" fontbold="true" fontsize="9" format="# ##0.0##"/>
<data name="GOI_GrossWeight" y="3" x="59" fontbold="true" fontsize="9" format="# ##0.0##"/>
<data name="GOI_Amount,' ',GOI_Currency" y="3" x="79" fontbold="true" fontsize="9" format="# ##0.00##"/>
<data name="GOI_CountryOfOrigin" y="3" x="109" fontbold="true" fontsize="9"/>
<data name="GOI_Description" y="3" x="129" fontbold="true" fontsize="9"/>
</block>
<!-- Vertical Lines -->
<line x="20" y="0" height="15.8" width="0" color="D3D3D3" />
<line x="41" y="0" height="15.8" width="0" color="D3D3D3" />
<line x="58" y="0" height="15.8" width="0" color="D3D3D3" />
<line x="78" y="0" height="15.8" width="0" color="D3D3D3" />
<line x="108" y="0" height="15.8" width="0" color="D3D3D3" />
<line x="128" y="0" height="15.8" width="0" color="D3D3D3" />
<!-- Last Line -->
<line x="0" y="0" positionbelow="true" width="180" height="0" />
</block>
</dataitem>
<!-- End of Goods items rows example -->
</dataset>
</template>
Example
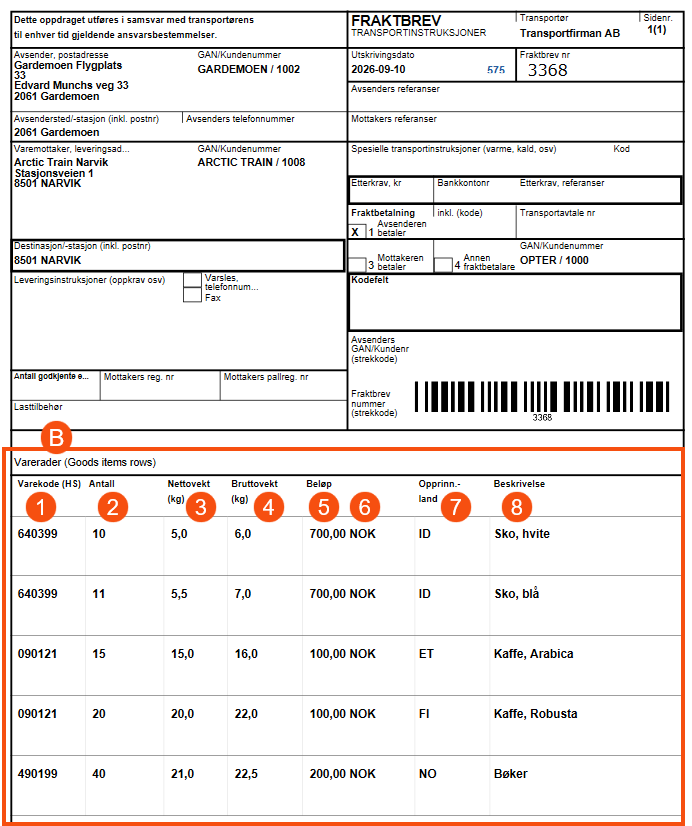
This example shows what the freight bill will look like if you use the code example above.
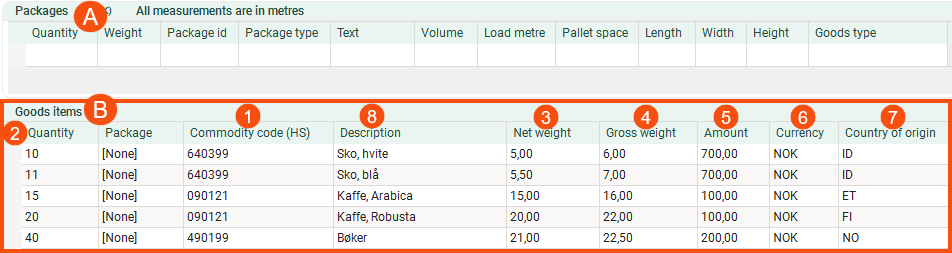
If the order looks like this in groups Packages (A) and Goods items (B) in the order reception system, i.e. the order only contains Goods items, with no line items:
The freight bill will look like this:
Remove items
If you want to delete a product line, do the following:
-
Open the order in order reception.
-
In group Goods items, click on the far left of the row and then press the Delete key.
If the goods information has already been sent to a customs agent via EDI, see Update product information below.
-
Click on Save to save all changes.
Update product information
If you wish to add details or amend details that have already been exported to the customs agent via EDI, please proceed as follows:
-
Amend the details for groups Goods items and Packages on the order in the order reception system.
-
In order for the goods information to be exported to the customs agent again, the following is required:
-
That you have asked the EDI team to enable changes to the price item to be exported to your customs agent automatically.
-
That you make a change to the price item (for the item ‘Product information (NVIT)’) and then save the order.
-
Consignments
In the case of consignments, the goods from the original orders are handled in the same way as the parcels from those orders.
Please bear the following in mind
-
An item can only be linked to one order.
-
If you choose to link the line item to a consignment (using the consignment number), the following applies:
-
Each consignment may contain one or more item lines.
-
The parcel must be in group Packages in the order reception area and must have a Package ID.
-
A line item can only be linked to one package; in other words, the item must be linked to the package in which it is actually contained. The item is linked to a parcel via the parcel number.
-
An item can only be linked to a parcel that is in the same order as the item.
-
Packages that have item lines linked to them cannot be deleted. (If you delete the item lines first, you can then delete the consignment.)
-
-
The fields in the columns of group Goods items perform no calculations. They store and display the information you have entered in the fields.
This means that you need to enter the totals for Amount, Net weight and Gross weight. In other words, in columns Net weight and Gross weight, you enter the total weight combined of the items on the row in kilograms, i.e. Opter performs no underlying calculations based on what you have entered in column Quantity, e.g. The same applies to column Amount. For more information, see Goods items (order reception).
The Gross weight of the item lines will not be totalled and displayed in column Weight on the linked consignment line. You must enter the parcel number Weight yourself on the parcel line in group Packages.(For more information, see Packages (order reception).)
-
The item lines cannot be displayed in any of the apps, nor on the web portals, invoices or supplier bills.
-
If you have a consignment comprising more than one parcel, it is not possible to link item lines to the parcels, as there are no unique parcel numbers associated with the parcels.
Example: many identical parcels
If you have an order comprising 10 parcels:
-
50 shirts in each parcel, i.e. the same Commodity code (HS) and the same Quantity in all 10 parcels. Also the same Net weight, Gross weight, Amount and Country of origin.
-
All 10 packages are cartons labelled with “The shirt factory”, i.e. the same Package type and the same Text.
In that case, you can do it like this in the order reception area; see the image below. Both the parcel row and the item row are linked to the order, but it is therefore not possible to link the item row to the parcels, as there are no unique parcel numbers associated with the parcels.

In the product row in the image above, we have worked out ourselves that 10 parcels, each containing 50 shirts, make a total of 500 shirts, and have then entered this figure in the column Quantity. We have also worked out Net weight, Gross weight and Amount ourselves, and entered them in the ‘Item’ column.
-
Troubleshooting
-
If the consignment rows not are assigned consignment numbers, you will need to set up a consignment number series. See Conditions above.

