Load carrier
Last updated: 8 October 2026
In this article
The load carrier function works with the Opter Driver app for iOS, the Opter Driver Labs app for Android and the Opter Terminal app.
The load-carrying function is not available in Opter Driver (classic) for Android. If a driver is using Opter Driver (classic) and scans a parcel that is part of a load carrier, the parcel is removed from the load carrier and the scan is recorded as a standard parcel scan.
A load carrier can be, for example, a pallet with a pallet collar or a cage. The purpose of load carriers is that not all the packages in the load carrier need to be scanned at each transhipment; instead only the load carrier has to be scanned. A package can only belong to one load carrier at a time.
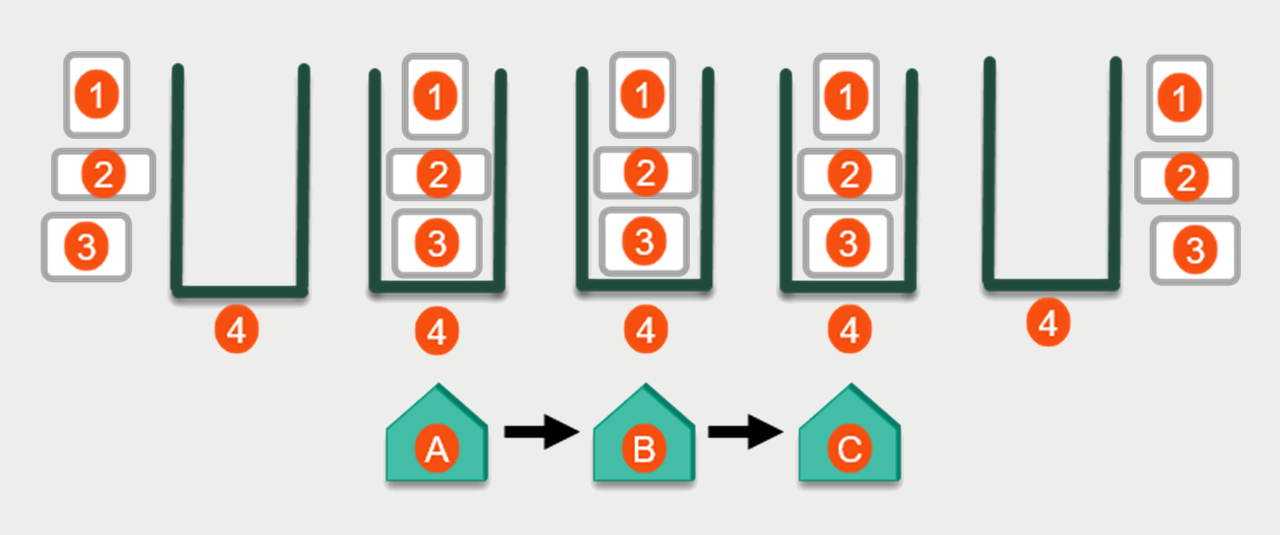
The picture above shows 3 packages (1, 2, 3), and one load carrier (4), and 3 terminals (A, B, C). For example, the flow in the image could be one of the following scenarios:
 The driver is filling the load carrier at the sender(s)
The driver can put packages in the load carrier when picking up packages from one or more senders, and then leave the load carrier at a terminal (A). The load carrier label is then scanned at each transhipment between terminals A, B and C. A driver then departure scans the load carrier at terminal C. The driver drives to one or more receivers, and scans each package individually (as usual). The packages thus leave the load carrier.
The flow is as follows:
-
The driver is at the sender. The driver taps Fill load carrier and scans the load carrier label. The driver scans one or more packages; the packages are then added to the load carrier in Opter. The driver puts the physical packages in the load cage (load carrier). The driver then pickup scans the load carrier. The pickup scan is registered on all the packages in the load carrier.
-
The driver drives to terminal A and arrival scans the load carrier there. The arrival scan is registered on all the packages in the load carrier.
-
A terminal employee arrival scans the load carrier at terminal A. The arrival scan is registered on all the packages in the load carrier. (It is sufficient for either the driver or the terminal employee to arrival scan the load carrier, but it is also acceptable that both of them arrival scan the load carrier. You can choose how you want to work in this regard).
-
A terminal employee scans the load carrier’s departure from terminal A. The departure scan is registered on all the packages in the load carrier. The load carrier then departs from terminal A.
-
The load carrier arrives at terminal B. A terminal employee arrival scans the load carrier. The arrival scan is registered on all the packages in the load carrier.
-
A terminal employee scans the load carrier’s departure from terminal B. The departure scan is registered on all the packages in the load carrier. The load carrier then departs from terminal B.
-
The load carrier arrives at terminal C. A terminal employee scans the load carrier upon arrival. The arrival scan is registered on all the packages in the load carrier.
-
A terminal employee scans the load carrier’s departure from terminal C. The departure scan is registered on all the packages in the load carrier.
-
A driver scans the load carrier’s departure from terminal C. The departure scan is registered on all the packages in the load carrier. The load carrier then departs from terminal C. (It is sufficient for either the driver or the terminal employee to departure scan the load carrier, but it is also acceptable that both of them departure scan the load carrier. You can choose how you want to work in this regard).
-
The driver then drives to one or more receivers, and scans each package individually (as usual). The packages thus leave the load carrier, which means that the packages are no longer affected by scans made on the load carrier to which they previously belonged. (The driver can also delivery scan the load carrier at the receiver. The delivery scan is then registered on all the packages in the load carrier).
For this scenario to work, the load carrier function must be enabled in both Opter Driver and Opter Terminal.
The terminal employee is filling the load carrier at terminal A
-
The terminal employee presses Fill load carrier, and scans the load carrier’s label. The terminal employee scans one or more packages, the packages are then added to the load carrier in Opter. The terminal employee then places the physical packages in the load cage (load carrier) at terminal A.
-
A terminal employee scans the load carrier’s departure from terminal A. The departure scan is registered for all the packages in the load carrier. The load carrier then departs from terminal A.
-
The load carrier arrives at terminal B. A terminal employee arrival scans the load carrier. The arrival scan is registered on all the packages in the load carrier.
-
A terminal employee scans the load carrier’s departure from terminal B. The departure scan is registered on all the packages in the load carrier. The load carrier then departs from terminal B.
-
The load carrier arrives at terminal C. A terminal employee scans the load carrier upon arrival. The arrival scan is registered for all the packages in the load carrier.
-
One or more terminal staff members can now remove parcels from the load carrier by scanning each parcel individually using one of the scanning modes: arrival, departures or floor check scans. The packages thus leave the load carrier, which means that the packages are no longer affected by scans made on the load carrier to which they previously belonged.
For this scenario to work, the feature must be enabled for Opter terminal.
It is possible to create a proof of delivery for a load carrier when making the scan. That proof of delivery is then registered on all the packages in the load carrier and on the orders to which the packages belong.
Further examples and instructions for terminal staff can be found in Handling load carriers in Opter Terminal.
Further examples and instructions for drivers can be found in Handling load carriers in Opter Driver.
Conditions
The load carrier function works in Opter Terminal, Opter Driver for iOS and Opter Driver Labs for Android, but not in Opter Driver (classic) for Android. We recommend that you use the latest versions of the apps.
The load-bearing function was improved in the Opter versions 2026.07.199, 2026.06.143 and 2025.12.426. For more information, see Load carriers are emptied automatically below.
The load carrier’s label
The load carrier's label can be a QR code, a barcode or a note stating the load carrier's ID. You can scan the label or enter the ID manually, for example “LB555”.
The load carrier function in Opter Driver and Opter Terminal
The table shows the which features are available in the apps.
|
Function |
Opter Driver |
Opter Terminal |
|---|---|---|
|
Filling load carriers, i.e. adding packages to a load carrier. |
Yes |
Yes |
|
Pickup scanning of load carriers at sender. |
Yes |
No |
|
Arrival scanning of load carriers at the terminal. Details
In Opter Driver, the driver taps Leave, selects the terminal, taps Package and scans the load carrier label. In Opter Terminal, the terminal employee selects Scan incoming. |
Yes |
Yes |
|
Floor-check scanning a load carrier |
No |
Yes |
|
Arrival scanning a load carrier at the terminal. Details
In Opter Driver, the driver taps Pick up, selects the terminal, taps Package and scans the load carrier label. In Opter Terminal, the terminal employee selects Scan outgoing. |
Yes |
Yes |
|
Emptying the load carrier. Details
The driver or terminal employee taps Fill load carrier and then Empty load carrier. |
Yes |
Yes |
|
Adding more packages to a load carrier that already contains packages. Details
The driver or terminal employee taps Fill load carrier, then Keep packages, and then scans the packages that are added to the load carrier. |
Yes |
Yes |
|
Removing packages from a load carrier. Details
For Opter Driver: The driver takes a package out of the actual load carrier and scans the package with any scan type except Fill load carrier. For Opter Terminal: The terminal employee takes a package out of the actual load carrier and arrival, departure or floor-check scans the package. |
Yes |
Yes |
|
Delivery scan the load carrier at the receiver. Details
At the receiver, it is possible to choose to delivery scan the load carrier or to delivery scan each package individually. |
Yes |
No |
|
Scanning each package individually at the receiver. |
Yes |
No |
Opter Terminal
The Fill load carrier scan type in Opter Terminal means that the terminal employee does one of the following:
-
Creates a new load carrier and then scans packages while adding them to the load carrier.
-
Uses an existing load carrier and scans packages while adding them to the load carrier.
-
Empties an existing load carrier and then scans packages while adding them to the load carrier.
When the terminal employee selects Fill load carrier in the main menu, the app asks for the load carrier ID. The terminal employee scans the load carrier's barcode or QR code, or enters the ID manually. The terminal employee then scans the packages that are to be added to the load carrier, and places the actual packages in the load cage (load carrier). For detailed instructions, see Handling load carriers in Opter Terminal.
When a carrier with packages arrives at or departs from a terminal, the terminal employee uses arrival or departure scanning (as usual) to scan the load carrier label. The arrival or departure scan is thereby applied to all the packages in the load carrier.
See Handling load carriers in Opter Terminal for examples of how load carriers are handled in Opter Terminal.
Opter Driver
The Fill load carrier scan type in Opter Driver means that the driver does one of the following:
-
Creates a new load carrier and then scans packages while adding them to the load carrier.
-
Uses an existing load carrier and scans packages while adding them to the load carrier.
-
Empties an existing load carrier and then scans packages while adding them to the load carrier.
When the driver taps Scanner at the bottom of the screen, and then selects Fill load carrier, the app asks for the load carrier ID. The driver scans the load carrier's barcode or QR code, or enters the ID manually. The driver then scans the packages that are to be added to the load carrier, and places the actual packages in the load cage (load carrier). Drivers choose whether or not to register a proof of delivery after they have filled the load carrier. For detailed instructions, see Handling load carriers in Opter Driver.
There are two different ways of working when filling and pickup scanning load carriers. One of them is for the driver to fill and pickup scan the load carrier at one sender.
The other way of working is that the driver fills a load carrier at several different senders, and thus pickup scans the load carrier at each sender. For some packages in the load carrier, the statistics and logs in Opter show that the package has been picked up several times, but it is the first pickup scan for the package that is of interest. For more information about the different ways of working, see .
When a carrier with packages arrives at or departs from a terminal, the driver uses arrival or departure scanning (as usual) to scan the load carrier label. The arrival or departure scan is thereby applied to all the packages in the load carrier. For detailed instructions, see Handling load carriers in Opter Driver.
When the driver delivery scans a package that is in a load carrier, the driver takes the actual package out of the load cage (load carrier) and delivery scans the package (as usual). In other words, the driver taps Leave, Leave at receiver, Package and then scans the package label. In Opter, the package is removed from the load carrier in conjunction with the scan, and the scan is registered as a normal parcel scan. For detailed instructions, see Handling load carriers in Opter Driver.
At the receiver, it is possible to choose to delivery scan the load carrier or to delivery scan each package individually.
See Handling load carriers in Opter Driver for examples of how load carriers are handled in Opter Driver.
Load carrier in the order reception area
Packing list
To check whether a parcel is part of a load carrier, and if so, which load carrier ID it has, add the column Load carrier. If you also want to see whether a proof of delivery has been registered for a parcel, add the column Status. Open the order settings, go to the Control tab and click  next to Packages under Control settings. For more information, see Package settings (window).
For more information, see Configure whether PODs can be created for load carriers in Opter Terminal below.
Order history
In the order log, you can see when the order’s parcels have been loaded onto a load carrier (with the scanning direction Fill load carrier). You can see the load carrier ID, the parcel numbers and the terminal where the scan was carried out. The same information is also displayed for the arrival and departure scans of the load carrier itself.
Load carriers in order check
You can search by load carrier ID in the order check section in the Load carrier field on the tab More search options. This is useful for checking, for example, which orders have packages in a specific load carrier.
In column Load carrier, you can see which load carriers an order’s parcels are in. Information on how to add columns can be found in Order check.
Statistics
You can create a statistics report if you want to know, for example:
-
Which packages are in a certain load carrier.
-
Which customers have packages in a certain load carrier.
-
Which load carriers are available (empty).
-
The scan direction of the most recent scan – for example, load carrier scanning, an arrival or departure scan – and the resource that carried it out.
When someone has added parcels to a load carrier using option Fill load carrier in Opter Terminal or Opter Driver, that scan is recorded as Load carrier scanning.
For more information, see Creating a statistical report about load carriers.
Load carriers are emptied automatically
From Opter versions 2026.07.199, 2026.06.143 and 2025.12.426 onwards, a load carrier is emptied after four days, rather than after two days as was previously the case.
Load carriers that do not appear to be in use are automatically emptied according to the following scenario:
-
The app user taps Fill load carrier (in Opter Driver or Opter Terminal), and either scans the load carrier’s label or enters the load carrier’s ID.
-
If there are already packages in the load carrier, Opter does the following:
-
Checks whether the most recent scan on the load carrier is more than four days old.
In that case, all parcels are detached from the load carrier (and displayed as standard parcels).
-
Checks whether the packages in the load carrier belong to any order currently being processed by the dispatch centre.
If none of the packages belong to an order in the dispatch system, all packages are detached from the load carrier (and displayed as standard packages).
In other words, the load carrier is automatically emptied if it does not appear to be in use.
Further details
If the most recent scan on the load carrier is more than four days old, the load carrier is therefore emptied, even if any of the parcels in the load carrier belong to an order in dispatch.
-
-
The load carrier is now either empty or already contains parcels.
-
The app user can now add parcels to the load carrier.
App users can choose to empty a load carrier themselves by tapping Empty the load carrier.
Consider the following
The load carrier function has the following intentional limitations:
-
Unidentified parcels cannot be placed in a load carrier.
-
It is not possible to record deviations on a load carrier. However, it is possible to record deviations relating to individual packages in the load carrier.
(For more information, see Handling load carriers in Opter Terminal).
-
It is not possible to carry out a scan of the type Fill load carrier.
(For more information, see Handling load carriers in Opter Terminal).
-
There is no separate registry of load carriers. Information about load carriers can be obtained from the statistics. For more information, see Creating a statistical report about load carriers.
-
Load carriers are not linked to the economy.
-
It is not possible to create QR codes with settings for scanning of the type Fill load carrier. (Batch scanning in Opter Terminal).
-
The load carriers created in your Opter system are not included if you send a shipment to a subcontractor via an EDI connection or OpterLink (which is also essentially an EDI connection).
Details
This means that if, for example, in your Opter system you have a load carrier with the label "LC555" (carrier ID) and you departure scan the load carrier's label, the departure scan is registered on all the packages in the load carrier. If one of your subcontractors takes over the shipment, and departure scans the load carrier (load cage) label "LC555", the subcontractor's system will not know that "LC555" is a load carrier. If the subcontractor also has Opter, the Opter system will look for a package that has "LC555" as the package ID. This can be solved by the subcontractor scanning all the packages in the load carrier (load cage), and if they have Opter with the load carrier function enabled they can scan the packages into a new load carrier in their Opter.
Activate the load carrier function for Opter Terminal
In order for terminal staff to be able to use the load carrier function in Opter Terminal, it must be activated. Proceed as follows:
-
Click on Settings > Mobile data > Settings mobile data.
-
Click on Edit, next to Terminal.Settings. If Terminal.Settings is not in the list, click on an empty line and add it.
-
If it does not already exist, add the following line within the <terminal> tag in Terminal.Settings, see the code example below. The scan type Fill load carrier is then displayed in the main menu in Opter Terminal.
Aktivera möjligheten att lägga kollin i lastbärare<loadcarrierscanning enabled="true"/><!-- enable/disable load carrier scanning true or false -->This is how it might look in Terminal.Settings, loadcarrierscanning is extras, see line 9:
Exempel på den delen av Terminal.settings som bestämmer valen huvudmenyn<?xml version="1.0" encoding="utf-8" ?>
<fleet101>
<k2>
<windowsce>
<terminal>
<arrivalscanning enabled="true"/><!-- enable/disable arrival scanning true or false -->
<departurescanning enabled="true"/><!-- enable/disble departure scanning true or false -->
<floorcheckscanning enabled="true"/><!-- enable/disable floorcheck scanning true or false -->
<loadcarrierscanning enabled="true"/><!-- enable/disable load carrier scanning true or false -->
<damages enabled="true"/><!-- enable/disable damage scanning true or false -->
<terminalpod enabled="true"/><!-- enable/disable POD scanning true or false -->
<printing enabled="true"/><!-- enable/disable print true or false -->
<qrscanning enabled="true"/> <!-- start scanning with QR code instead of choosing arrival/departure, resource etc. -->
A complete example of Terminal.Settings can be found in Customising the layout and features of Opter Terminal with Terminal.Settings.
-
When you are finished, close the Layout - apps window and click Save in the Mobile data settings window to save the changes in Terminal.Settings.
The next time users log in to Opter Terminal, they can add packages to a new or existing load carrier by selecting Fill load carrier in the main menu.
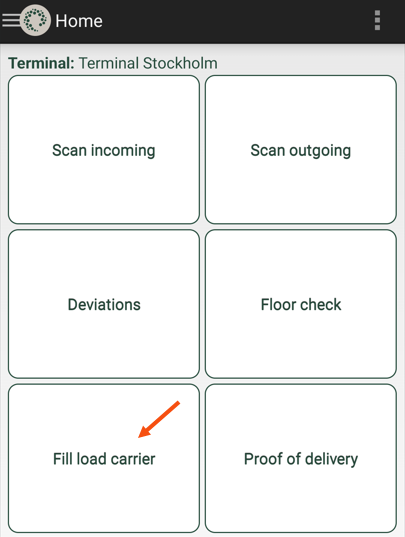
Show more details in the scan list in Opter Terminal
The amount of information to be displayed in the scan list can be defined for the following scans:
-
When the terminal employee taps Fill load carrier in the main menu and scans the label of an existing load carrier, Opter Terminal shows that it is a load carrier and how many packages the load carrier contains. The terminal employee can then choose to add packages to the load carrier by scanning the packages. The packages are displayed in the scan list.
-
When the terminal employee taps Scan incoming, Scan outgoing or Floor check and scans the label on an existing load carrier, the scan list shows the load carrier ID and the number of packages in the load carrier.
The package IDs are always shown in the scan list. You can choose to display more information by making settings on the onescanrow enabled="true" line in Terminal.Settings. For example, if you want to display the Terminal on which the collit was last scanned, set showhub="true". For more information, see The scan list for the scan type Fill load carrier, and in the Scan list for arrival, departure and floor-check scanning of load carriers below.
For load carriers, the scan list looks the same whether onescanrow enabled is set to "true" or "false"
The following applies:
-
When scanning the type Fill load carrier, the scan list looks the same, regardless of whether onescanrow enabled is set to "true" or "false". See the Scan list for the Fill load carrier scan type below.
-
During arrival scan, departure scan and inventory scan of load carriers, the scan list looks the same, regardless of whether onescanrow enabled is set to "true" or "false". See the Scan list for arrival, departure and floor-check scanning of load carriers below.
-
(During arrival scan, departure scan and inventory scan of parcels and Freight bills, the scan list will look different depending on whether onescanrow enabled is set to "true" or "false". For more information, see The scan list in Opter Terminal.)
This is how the scan list can look like for load carriers:
Scan list for scan type Fill load carrier
This is what the scan list might look like once Fill load carrier has been tapped and three packages that are now part of the load carrier ("LC555") have been scanned, see image.
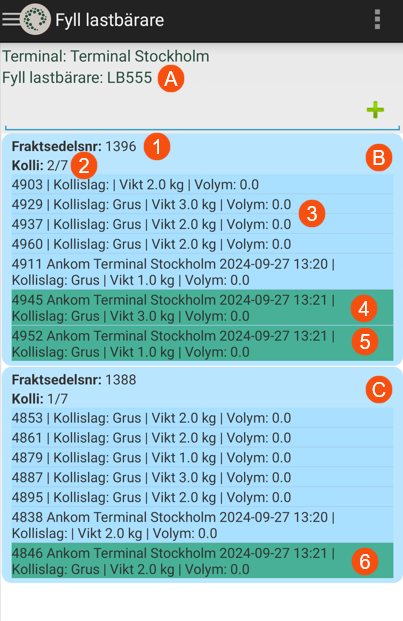
In the image above, the ID of the load carrier is "LC555" (A), and the freight bill number is also shown (1).
The packages are displayed grouped by shipment (B, C). For each shipment that has at least one package in the load carrier, all the shipment's package IDs and how many of the shipment's packages have been scanned and added to the load carrier are displayed, for example "2/7" (2).
The three packages that have been scanned and thus added to the carrier are shown in green (4, 5, 6), the rest are shown in blue (3) in the scan list. (In other words, the packages shown in blue belong to the shipment, but are not part of the load carrier. A package marked as blue can be added to the load carrier by scanning it using the Fill load carrier scan type. If the scan is successful, the package is shown in green in the scan list).
The package IDs, for example 4903, 4929 and 4937, are always displayed. In the example in the image above, the system administrator has made settings on the line onescanrow enabled="true" in Terminal.Settings so that the following information is also displayed for each column in the list
-
the last scan direction of the package, for example if it was arrival or departure scanned at another terminal. (See, for example, the packages numbered 4911, 4945 and 4952).
The information is displayed on showstatus="true" in Terminal.Settings on the line onescanrow enabled="true", see The scan list in Opter Terminal.
-
the terminal at which the package was last scanned.
The information is displayed on showhub="true".
-
The resource that last scanned the package. (Not shown in the image above).
The information is displayed on showresource="true".
-
the day (date) the package was last scanned.
The information is displayed on showdate="true".
-
the time the package was last scanned.
The information is displayed on showtime="true".
-
Package dimensions from the package row on the order. In the image above, the choice has been made to show the type of package, weight and volume.
The information is displayed on showdimensions="true" in Terminal.Settings on the line onescanrow enabled="true", see The scan list in Opter Terminal.
The package dimensions that are displayed are set via the PackageDimensionsString mobile data setting. For more information, seeMobile data settings (window).
-
The latest scan comment for the package.
The information is displayed on showcomment="true".
In the image above, the package with the ID number 4903 had not been scanned before, so no information is shown about the last scan direction, at which terminal the package was last scanned, or the date and time of the last scan.
Scan list for arrival, departure and floor-check scanning of load carriers
This is what the scan list may look like when a load carrier has been departure, arrival or floor-check scanned.
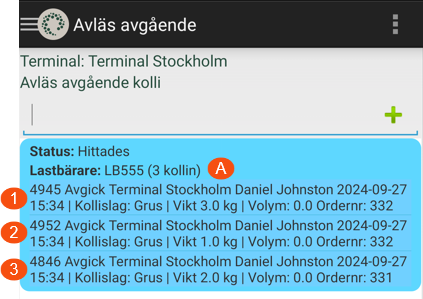
The example in the image shows that the terminal employee has clicked on Scan outgoing and scanned the load carrier label (or entered the load carrier ID). The load carrier has the ID "LC555" and contains three packages (A). The package numbers (4945, 4952, 4846) are always displayed for packages (1, 2, 3) in the list.
You can choose to display more information by making settings on the onescanrow enabled="true" line in Terminal.Settings. For example, if you want to display the Terminal on which the collit was last scanned, set showhub="true". For more information, see The Scan list for the Fill load carrier scan type above, and in The scan list in Opter Terminal.
Configure whether PODs can be created for load carriers in Opter Terminal
If a proof of delivery is created for a load carrier, the proof of delivery is registered on all the packages in the load carrier and on the orders to which the packages belong.
Load carriers can be scanned for arrival and departure in exactly the same way as individual packages and freight bills. Any proofs of delivery are then registered on all the packages in the load carrier.
It is also possible to choose whether it should be possible to register POD when packages are scanned with the load type Fill load carrier, i.e. when packages are added to a load carrier.
POD for arrival/departure scanning of load carriers
This is how to set up the possibility to register POD during the arrival and departure scanning of load carriers. The setting also applies for scanning individual packages and freight bills.
-
Click on Settings > Mobile data > Settings mobile data.
-
Click on Edit, next to Terminal.Settings. If Terminal.Settings is not in the list, click on an empty line and add it.
-
Put <pod enabled="true" under <arrival> (for arrival scan) and/or <departure> (for departure scan) in Terminal.Settings. See line 11 in the code example below.
Registrera POD vid ankomstskanning<arrival><!-- specific settings for arrival scanning-->
<shipment visible="true" /><!-- enable disable freightbill scanning-->
<package visible="true" /><!-- enable disable package scanning-->
<resource mandatory="false" skipVisible="false" /><!-- if mandatory="true" you must choose resource, if mandatory="false" and skipVisible="true" it's optional to choose resource -->
<secondaryresource selectable="true"/><!-- set to false to skip selection off secondary resource -->
<route visible="false" choice="false" /> <!-- visible="true" show route in scan result list, choice="true" you have to choose route before scanning-->
<nextroute visible="false"/> <!-- visible="true" next route is displayed in scan result list and scan details-->
<orderdate visible="false"/> <!-- visible="true" sets order date displayed in scan list -->
<autoprintsortlabel enabled="false" /> <!-- enabled="true" automatic printing of sort labels after every scan -->
<comment enabled="false" mandatory="false"/> <!-- enabled="true" let you add ScanComment, use mandadory true/false to make it mandatory/optional -->
<pod enabled="true"/> <!-- enabled="true" a POD dialog is displayed after finishing scanning to add ProofOfDelivery --> -
When you are finished, close the Layout - apps window and click Save in the Mobile data settings window to save the changes in Terminal.Settings.
If it should be mandatory to register a proof of delivery with the arrival scan, proceed as follows:
-
Put pod enabled="true" during <arrival> in Terminal.Settings. Save.
-
Click Register > Terminals and select the terminal for which you wish to configure the settings.
-
Click on the Mobile/web tab and select Mandatory POD on arrival. Save.
-
To make the setting for more terminals, repeat steps 2 and 3. For more information, see Request a POD on arrival at the terminal.
Users who are logged in to Opter Terminal when the changes are saved in Opter must log out and then log back in to the app to see the changes.
POD when scanning packages that are to be added to load carriers (scan type Fill load carrier)
If you want the POD to be registered when the user scans packages to add to a load carrier, put <pod "true"/> under <loadcarrier> in Terminal.Settings. At the end of scanning of type Fill load carrier, users have the possibility to create proofs of delivery for the scanned packages.
<loadcarrier> <!-- specific settings for loadcarrier scanning-->
<pod enabled="true"/> <!-- enabled="true" means that the user can add Proof Of Delivery (POD) after scanning packages onto a load carrier -->
</loadcarrier>The change will take effect the next time users log in to the app. The default setting is pod enabled=”false”.
In POD and scanning log
If you have the Status column in the parcel list in the order reception area, you can open POD and scanning log from there. For more information, see Load carrier in the order reception area above.
In POD and scanning log, information such as the package’s proof of delivery is shown. The Recieved by (POD) column shows who received the package when the proof of delivery was created.
Enable the load carrier function for Opter Driver
The load carrier function is available in Opter Driver for iOS and Opter Driver Labs for Android, but not in Opter Driver (classic) for Android.
This function is enabled by setting the mobile data setting LoadCarrierPermission to “true”. Information on how to add mobile data settings can be found in Mobile data settings (window).
If the driver scans a package that is in a load carrier, the package is removed from the load carrier in Opter in conjunction with the scan, and the scan is registered as a normal package scan.
(In Opter Driver, it cannot be seen that the package belonged to a load carrier before the scan).
Users who are logged in to the app when the changes are saved in Opter must log out and then log back in to the app to see the changes.
Set whether to automatically open the POD page in Opter Driver
In Opter Driver, drivers choose whether or not to register a proof of delivery after having filled the load carrier. If you want the POD view to open automatically when drivers finish scanning, set the mobile data setting FillLoadCarrierPOD to “true”. Information on how to add mobile data settings can be found in Mobile data settings (window).
Example
Different scenarios are described to increase understanding of how the load carrier function works, see:
Troubleshooting
If the load-bearing function is not working as it should:
-
Please ensure that you are using Opter Driver for iOS, Opter Driver Labs for Android and/or Opter Terminal. It does not work with Opter Driver (classic).
-
The changes in Terminal.Settings are displayed in Opter Terminal after the user has logged out and then logged back in.
-
The changes to App.OpterDriver.Design and in the mobile data settings are displayed in Opter Driver after the app user has logged out and then logged back in.
-
If the logs and statistics for load carriers show that a package has been pickup scanned several times, it is probably because the driver has added packages to a load carrier at several different senders, and therefore pickup scanned the load carrier at each sender. In such cases, it is the first pickup scan for packages that is of interest. Further information on the various working methods can be found in Handling load carriers in Opter Driver.

