Customising the layout and features of Opter Terminal with Terminal.Settings
Last updated: 10 August 2026
In this article
Terminal.Settings can be used to set what is displayed and what features are available in Opter Terminal. This article describes the basics and structure of Terminal.Settings.
To open Terminal.Settings in Opter’s internal editor, click on Settings > Mobile data > Settings mobile data, and then on Edit next to Terminal.Settings.
If Terminal.Settings does not appear in the list, click on an empty line in the Name column and select Terminal.Settings from the list.
All other windows in Opter are locked when Layout - apps is open, but you can switch between different windows that are already open. If you need to view information in other windows, you can open them before clicking on Edit.
In a clean installation of Opter, Terminal.Settings looks like this.
<?xml version="1.0" encoding="utf-8" ?>
<fleet101>
<k2>
<windowsce>
<terminal>
<arrivalscanning enabled="true"/><!-- enable/disable arrival scanning true or false -->
<departurescanning enabled="true"/><!-- enable/disble departure scanning true or false -->
<floorcheckscanning enabled="true"/><!-- enable/disable floorcheck scanning true or false -->
<loadcarrierscanning enabled="false"/><!-- enable/disable loadcarrier scanning true or false -->
<damages enabled="true"/><!-- enable/disable damage scanning true or false -->
<terminalpod enabled="true"/><!-- enable/disable POD scanning true or false -->
<printing enabled="false"/><!-- enable/disable print true or false -->
<picture selectfromgallery="true"/><!-- max width on the widest side of the image, enable/disable get photos from gallery -->
<qrscanning enabled="false"/> <!-- start scanning with QR code instead of choosing arrival/departure, resource etc. -->
<barcodeformats enabledformats="AZTEC,CODABAR,CODE_39,CODE_128,DATA_MATRIX,EAN_8,EAN_13,ITF,PDF_417,RSS_14,RSS_EXPANDED,UPC_A,UPC_E,UPC_EAN_EXTENSION,QR_CODE"/>
<onescanrow enabled="true" showhub="true" showdate="true" showtime="true" showresource="true" showstatus="true" showdimensions="true" showComment="true"/>
<arrival><!-- specific settings for arrival scanning-->
<shipment visible="true" /><!-- enable disable freightbill scanning-->
<package visible="true" /><!-- enable disable package scanning-->
<resource mandatory="false" skipVisible="false" /><!-- if mandatory="true" you must choose resource, if mandatory="false" and skipVisible="true" it's optional to choose resource -->
<secondaryresource selectable="true"/><!-- set to false to skip selection of secondary resource -->
<route visible="false" choice="false" /> <!-- visible="true" show route in scan result list, choice="true" you have to choose route before scanning-->
<nextroute visible="false"/> <!-- visible="true" next route is displayed in scan result list and scan details-->
<orderdate visible="false"/> <!-- visible="true" sets order date displayed in scan list -->
<autoprintsortlabel enabled="false" /> <!-- enabled="true" automatic printing of sort labels after every scan -->
<comment enabled="false" mandatory="false"/> <!-- enabled="true" let you add ScanComment, use mandadory true/false to make it mandatory/optional -->
<pod enabled="false"/> <!-- enabled="true" a POD dialog is displayed after finishing scanning to add ProofOfDelivery -->
<nextresource visible="false" /> <!-- visible="true" sets next resource visible in scan list (SHI_NextResource) -->
<nextorder visible="false" /> <!-- visible="true" sets next order visible in scan list (SHI_AddressIndexFrom) -->
<registerlater enabled="true" /> <!--- to disable registerlater function set to false, default is true -->
<editdimensions PAC_Depth="true" PAC_Width="true" PAC_Height="true" PAC_Weight="true" PAC_LoadMeter="true" PAC_Area="true" PAC_Volume="true" PAC_Quantity="true" />
<printquestion freightbill="true" assignmentlist="true" />
<!--pkgdimensions><![CDATA[ add text, html and variables here ]]></pkgdimensions-->
<!-- define own text in scan result list with simple html and variables: "PACKAGEWEIGHT", "PACKAGELOADMETER", "PACKAGEDEPTH", "PACKAGEWIDTH", "PACKAGEHEIGHT", "PACKAGEVOLUME", "PACKAGEQUANTITY", "PACKAGEAREA" -->
<!--fbdimensions><![CDATA[ add text, html and variables here ]]></fbdimensions-->
<!-- define own text in scan result list with simple html and variables: "DEL_CalculatedVolume", "DEL_CalculatedArea", "DEL_CalculatedLoadMeter", "DEL_CalculatedLength", "DEL_CalculatedWidth", "DEL_CalculatedWeight" -->
<!--listdesign><![CDATA[ add text, html and variables here ]]></listdesign-->
<!-- define own text in scan result list with simple html and variables: "ADR_AddrLine1From", "ADR_StreetFrom", "ADR_StreetNoFrom", "ADR_ZipCodeFrom", "ADR_CityFrom", "ADR_EntreCodeFrom", "ADR_PhoneFrom", "ADR_AddrLine1To", "ADR_StreetTo", "ADR_StreetNoTo", "ADR_ZipCodeTo", "ADR_CityTo", "ADR_EntreCodeTo", "ADR_PhoneTo", "PST_Name", "SHI_NextStatus", "SHI_NextResource", "NextRouteName", "ROU_Name", "SHI_AddressIndexFrom", "SHI_EarliestPickupDate", "SHI_EarliestPickupTime", "SHI_LatestDeliveryDate", "SHI_LatestDeliveryTime", "DEL_Id" -->
<!--detailsdesign><![CDATA[ add text, html and variables here ]]></detailsdesign-->
<!-- define own text in scan details with simple html and variables: "ADR_AddrLine1From", "ADR_StreetFrom", "ADR_StreetNoFrom", "ADR_ZipCodeFrom", "ADR_CityFrom", "ADR_EntreCodeFrom", "ADR_PhoneFrom", "ADR_AddrLine1To", "ADR_StreetTo", "ADR_StreetNoTo", "ADR_ZipCodeTo", "ADR_CityTo", "ADR_EntreCodeTo", "ADR_PhoneTo", "DEL_CalculatedVolume", "DEL_CalculatedArea", "DEL_CalculatedLoadMeter", "DEL_CalculatedLength", "DEL_CalculatedWidth", "DEL_CalculatedWeight", "PST_Name", "SHI_NextStatus", "SHI_NextResource", "NextRouteName", "ROU_Name", "SHI_AddressIndexFrom", "SHI_EarliestPickupDate", "SHI_EarliestPickupTime", "SHI_LatestDeliveryDate", "SHI_LatestDeliveryTime", "DEL_Id" -->
</arrival>
<departure> <!-- specific settings for departure scanning-->
<shipment visible="true" />
<package visible="true" />
<resource mandatory="false" skipVisible="true" />
<secondaryresource selectable="true"/>
<route visible="false" choice="false" />
<nextroute visible="false"/>
<orderdate visible="false"/>
<autoprintsortlabel enabled="false" />
<comment enabled="false" mandatory="false"/>
<pod enabled="false"/>
<nextresource visible="false" />
<nextorder visible="false" />
<registerlater enabled="true" /><!--- to disable registerlater function set to false, default is true -->
<editdimensions PAC_Depth="true" PAC_Width="true" PAC_Height="true" PAC_Weight="true" PAC_LoadMeter="true" PAC_Area="true" PAC_Volume="true" PAC_Quantity="true" />
<printquestion freightbill="true" assignmentlist="true" />
<!--pkgdimensions><![CDATA[ add text, html and variables here ]]></pkgdimensions-->
<!--fbdimensions><![CDATA[ add text, html and variables here ]]></fbdimensions-->
<!--listdesign><![CDATA[ add text, html and variables here ]]></listdesign-->
<!--detailsdesign><![CDATA[ add text, html and variables here ]]></detailsdesign-->
</departure>
<floorcheck><!-- specific settings for floorcheck scanning-->
<shipment visible="true" />
<package visible="true" />
<resource mandatory="false" skipVisible="true" />
<secondaryresource selectable="true"/>
<route visible="false" choice="false" />
<nextroute visible="false"/>
<orderdate visible="false"/>
<autoprintsortlabel enabled="false" />
<comment enabled="false" mandatory="false"/>
<nextresource visible="false" />
<nextorder visible="false" />
<registerlater enabled="true" /> <!--- to disable registerlater function set to false, default is true -->
<editdimensions PAC_Depth="true" PAC_Width="true" PAC_Height="true" PAC_Weight="true" PAC_LoadMeter="true" PAC_Area="true" PAC_Volume="true" PAC_Quantity="true" />
<printquestion freightbill="true" assignmentlist="true" />
<!--pkgdimensions><![CDATA[ add text, html and variables here ]]></pkgdimensions-->
<!--fbdimensions><![CDATA[ add text, html and variables here ]]></fbdimensions-->
<!--listdesign><![CDATA[ add text, html and variables here ]]></listdesign-->
<!--detailsdesign><![CDATA[ add text, html and variables here ]]></detailsdesign-->
</floorcheck>
<damage><!-- specific settings for damage scanning-->
<shipment visible="true" />
<package visible="true" />
<resource mandatory="false" skipVisible="true" />
<secondaryresource selectable="true"/>
<route visible="false"/>
<nextroute visible="false"/>
<orderdate visible="false"/>
<nextresource visible="false" />
<nextorder visible="false" />
<registerlater enabled="true" /><!--- to disable registerlater function set to false, default is true -->
<editdimensions PAC_Depth="true" PAC_Width="true" PAC_Height="true" PAC_Weight="true" PAC_LoadMeter="true" PAC_Area="true" PAC_Volume="true" PAC_Quantity="true" />
<!--pkgdimensions><![CDATA[ add text, html and variables here ]]></pkgdimensions-->
<!--fbdimensions><![CDATA[ add text, html and variables here ]]></fbdimensions-->
<!--listdesign><![CDATA[ add text, html and variables here ]]></listdesign-->
<!--detailsdesign><![CDATA[ add text, html and variables here ]]></detailsdesign-->
</damage>
<loadcarrier> <!-- specific settings for loadcarrier scanning-->
<pod enabled="false"/> <!-- enabled="true" a POD dialog is displayed after finishing scanning to add ProofOfDelivery -->
</loadcarrier>
<pod><!-- specific settings for pod scanning-->
<shipment visible="true" />
<package visible="true" />
<resource mandatory="false" skipVisible="true" />
<secondaryresource selectable="true"/>
<route visible="false"/>
<nextroute visible="false"/>
<orderdate visible="false"/>
<nextresource visible="false" />
<nextorder visible="false" />
<registerlater enabled="true" /><!--- to disable registerlater function set to false, default is true -->
<editdimensions PAC_Depth="true" PAC_Width="true" PAC_Height="true" PAC_Weight="true" PAC_LoadMeter="true" PAC_Area="true" PAC_Volume="true" PAC_Quantity="true" />
<!--pkgdimensions><![CDATA[ add text, html and variables here ]]></pkgdimensions-->
<!--fbdimensions><![CDATA[ add text, html and variables here ]]></fbdimensions-->
<!--listdesign><![CDATA[ add text, html and variables here ]]></listdesign-->
<!--detailsdesign><![CDATA[ add text, html and variables here ]]></detailsdesign-->
</pod>
<print>
<shipment visible="true" />
<package visible="true" />
<orderdate visible="false"/>
<route visible="false"/>
<nextroute visible="false"/>
<nextresource visible="false"/>
<nextorder visible="false"/>
<editdimensions PAC_Depth="true" PAC_Width="true" PAC_Height="true" PAC_Weight="true" PAC_LoadMeter="true" PAC_Area="true" PAC_Volume="true" PAC_Quantity="true" />
</print>
</terminal>
</windowsce>
</k2>
</fleet101>The sections of Terminal.Settings
Each part of Opter Terminal corresponds to a section of Terminal.Settings. The sections can be minimised and maximised by using  and
and  in the editor. If one of the sections, or a line, is not in your Terminal.Settings, a standard view is used.
If a section or a line is missing, you can copy it from the factory settings above and use that as a starting point, rather than building the section from scratch.
Changes made in Terminal.Settings are saved when you click Save in the Mobile data settings window, and will be visible in the app once users have logged out and back in again.
Basic settings
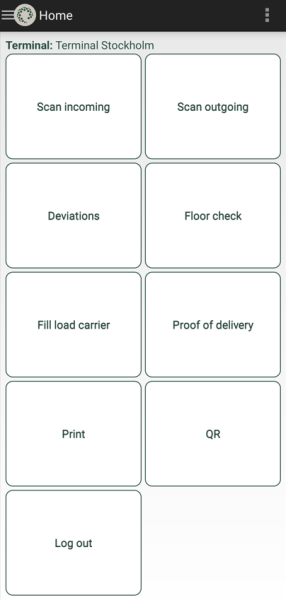
In section <terminal>, you can configure what is displayed on the app’s main menu, as well as certain other basic functions, by setting the options to ‘true’ or ‘false’. The Log out option is always displayed and cannot be disabled.
|
Setting |
Description |
|---|---|
|
arrivalscanning |
Show/hide option Scan incoming on the main menu. Used for scanning goods arriving at the terminal. |
|
departurescanning |
Show/hide option Scan outgoing on the main menu. Used for scanning goods leaving the terminal. |
|
floorcheckscanning |
Show/hide the Floor check option on the main menu. Used for scanning goods already at the terminal. |
|
loadcarrierscanning |
Show/hide the Fill load carrier option on the main menu. Used to scan the load carrier’s label and then scan the parcels to be added to the load carrier. It is not possible to scan freight bills with this option. For more information, see Load carrier and Handling load carriers in Opter Terminal. |
|
damages |
Show/hide option Deviations on the main menu. Used for scanning goods for which deviations are to be registered. For more information, see Registering deviations in Opter Terminal. |
|
terminalpod |
Show/hide option Proof of delivery on the main menu. Used for scanning goods picked up by the receiver directly at the terminal. For more information, see Closing orders with Proof of delivery scanning in Opter Terminal. |
|
printing |
Show/hide option Print on the main menu. Used to print parcel labels, freight bills, sorting labels or task lists for the goods being scanned. For more information, see Configuring printout scanning in Opter Terminal. |
|
picture |
Controls whether to select picture from the photo gallery when, for example, deviation scanning. |
|
qrscanning |
Show/hide option on the main menu. Used to scan a QR code with scan settings created in Opter. For more information, see QR code scanning of batch settings in Opter terminal. |
|
barcodeformats |
Controls which barcode formats can be scanned with the app. The supported formats are not visible in the app. |
|
onescanrow |
Specify whether parcel scans for the same shipment should be displayed in a single block (enabled="true") or as separate blocks (enabled="false") in the scan list. If “true” is specified, it is possible to select which information is displayed in the block. The information is also displayed for the packages that the user does not scan on the shipment.
For more information on how to customise the scan list, see The scan list in Opter Terminal. |
Settings for specific scan directions
In these sections, the way each scan will work can be defined once they have been selected in the main menu. For example, if the user has to choose whether packages or freight bills are to be scanned and what should be displayed and happen after the scan. The same settings can be configured for all scan directions, with some exceptions. They can be set by specifying “true” or “false” for the different parameters.
Scanning directions:
-
<arrival>: Scan incoming
-
<departure>: Scan outgoing
-
<floorcheck>: Floor check
-
<damage>: Deviations
-
<loadcarrier>: Fill load carrier (has only one setting, pod)
-
<pod>: Proof of delivery
-
<print>: Print
|
Setting |
Description |
|---|---|
|
shipment |
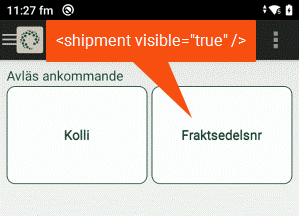
visible="true/false": shows/hides the Freight bill number option after a scan direction has been selected. If “false” is entered, the user cannot scan freight bills, but goes directly to the package scan. If you enter "false" for both shipment and package, both options will be displayed.
|
|
package |
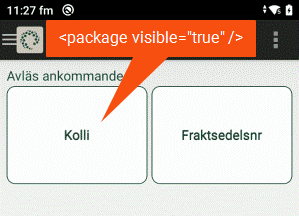
visible="true/false": shows/hides the Package option after a scan direction has been selected. If “false” is entered, the user cannot scan packages, but goes directly to the freight bill scan. If you enter "false" for both shipment and package, both options will be displayed.
|
|
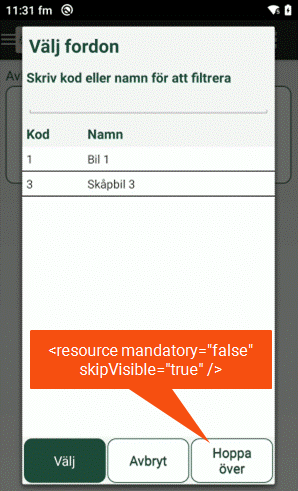
resource |
Combinations of settings:
Can be used with an arrival scan, if goods that have not been scanned before are left at the terminal, and with a departure scan, if the goods being loaded are scanned by the terminal staff instead of the driver.
|
|
secondaryresource |
Not applicable <print>. selectable="true/false": shows/hides the option to select the secondary resource after the primary resource has been selected (vehicle or driver depending on what you log into the app as). The default is “true”. The setting is set to “false” so that the user does not have to select the secondary resource after selecting the primary resource. This setting works in conjunction with resource (see above). If choosing a primary resource is optional, choosing a secondary resource becomes optional. If choosing a primary resource is mandatory, choosing a secondary resource becomes mandatory. |
|
route |
|
|
nextroute |
visible="true/false": shows/hides the route by which the goods will leave in the scan list and the detail view. |
|
orderdate |
visible="true/false": shows/hides the order date in the scan list. |
|
autoprintsortlabel |
Only <arrival> and <departure>. enabled="true/false": a sequence label is printed automatically after scanning using one of the two scan directions above. A printer and report are selected in the Terminal printing window. |
|
comment |
Only <arrival>, <departure> and <floorcheck>.
For more information, see QR code scanning of batch settings in Opter terminal.
|
|
pod |
Only <arrival>, <departure> and <loadcarrier>. pod enabled="true/false": The user can record a proof of delivery when performing an arrival scan on parcels, freight bills and load carriers, and when a load carrier is loaded with parcels. When a load carrier is scanned, the proof of delivery is recorded for all packages contained within the load carrier. For more information, see Load carrier and Request a POD on arrival at the terminal.
|
|
nextresource |
visible: shows/hides the resource that will transport the goods on the next shipment in the scan list. Used with the arrival scan to sort the goods at the terminal to make loading easier when the drivers arrive. |
|
nextorder |
visible: shows/hides the packing order from the route optimisation in the scan list. Used with the departure scan for optimum packing of the vehicle. The packing order is affected by the Reverse route sequence for pickups from the same address setting in the Route optimisation settings window, which allows the vehicle to be packed so that the package to be delivered first is packed last (outermost). |
|
registerlater |
Not <print> (Print) enabled="true/false": enables/disables the feature to display a list of scanned packages that cannot be linked to any orders. The list can be used for the subsequent manual registration of packages in Opter. If this setting is not available in your Terminal.Settings, it will be treated as “true”. |
|
editdimensions |
Possible/not possible to edit the dimensions of the scanned packages in the detail view. If this row is not available in your Terminal.Settings, all dimensions can be edited.
|
|
printquestion |
Only <arrival>, <departure> and <floorcheck>.
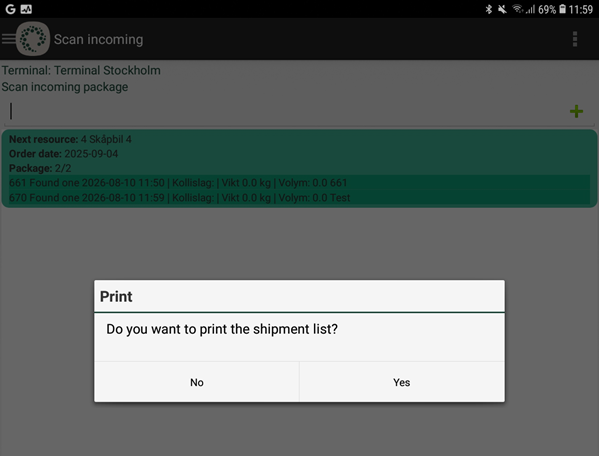
For more information, see Printing a job list after scanning (Opter Terminal). If this line is not present in Terminal.Settings, both questions will be displayed (both settings are treated as “true”).
|
Comments
Any text between <!-- and --> in the XML file will only appear in Terminal.Settings and will not affect the layout or functionality of the app. Comments are displayed in green text in the editor. In the example below, the comment <!-- enable/disable arrivalscanning true or false --> is for info only.
If you want to restore the default settings for a section, you can comment it out by putting it between <!-- and --> instead of deleting your changes. This allows them to be enabled again at a later date.
Separate Opter Terminal settings for a specific terminal
Settings can be configured that apply to a scan at a specific terminal by creating a configuration file in the same format as Terminal.Settings in the terminal registry. Copy the contents of Terminal.Settings and change the settings so that they are different for that particular terminal. For more information, see Separate Opter Terminal settings for individual terminals.

