Customs information
Last updated: 29 September 2026
In this article
Applies from Opter version 2026.06.00.
Customs information in Opter refers to the information required for the transport of goods between countries, or, for example, between the EU and Norway.
The main purpose of this function is to enable the storage, sending and receiving of customs information.
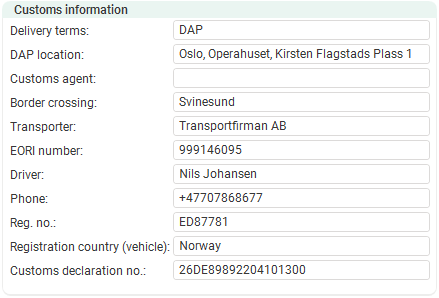

The photographs show groups Customs information, Consignor and Consignee in the order reception area. You can store customs information in them.
To make it easier to manage customs information, you can, with the help of the EDI team, integrate Opter with systems that handle customs information (such as customs declarations and supporting documents). Once Opter and the customs information management system are linked, customs information can be sent automatically between the systems.
Conditions
If you want customs information to be sent automatically between Opter and a customs information management system, you will need to:
-
Have an agreement with a customs information management system.
-
Please contact the EDI team (on ) to arrange an EDI connection between your Opter system and the customs information management system.
Information that can be exchanged between the systems
If you wish to have customs information sent from Opter to a customs information management system via EDI:
-
You choose which fields (i.e. what information) and which documents/files you wish to send to the customs information management system.
Please add the documents/files to be sent as part of the export as attachments to the order. Add them to the order reception in the group Attachments. Choose a File category, e.g. Freight bill, CMR, EDI or POD. For more information, see Attachments (order reception) and Attaching files in order reception.
-
If the customs information management system returns documents or files, these are added as attachments to the order (in the order reception, in the group Attachments).
The EDI team needs to know what information is to be sent between the systems. (See Step 3 (optional): Please contact Opter’s EDI team below.)
How to start exporting customs data
If you wish to send customs data from Opter to a customs data management system via EDI:
-
Enter the customs details for the order in the order reception system in the fields in groups Customs information, Consignor and Consignee, and attach any documents or files to the group Attachments.
-
The export of customs data from Opter to a customs data management system can, for example, be initiated in Opter in the following ways:
-
You add options to the order in the order reception department or in the dispatch department. The export of customs information begins when the order is saved with that option selected.
 More details
Here’s how it works:
-
Tick the box for the ‘Customs system’ option (for example) on the order in the order reception area (or in the dispatch centre).
-
You are saving the order.
-
The ‘Customs System’ option then creates an automatic price item, and that price item initiates the export of customs information to your customs information management system.
-
Your customs information management system creates a customs declaration and assigns it a unique number (known as the declaration number).
-
Your customs information management system sends the declaration number (also known as the ‘customs number’), the customs declaration and any other documents to your Opter.
-
This method makes it easier to manage changes if you ask the EDI team to enable the system so that changes to the price item are sent to your customs information management system automatically. For more information, see Update customs information below.
-
-
The export of customs data begins when the order reaches a certain status. You choose which status.
-
The export of customs information begins when the order is assigned a specific proof of delivery type. You choose the proof of delivery type.
-
View customs information in Opter
Customs information can be displayed:
-
In order reception.
-
On CMR freight bills (but not included in any standard report).
At present, customs information is not displayed in the following places:
-
Order check.
-
In dispatch.
-
On invoices.
This feature may be further developed in response to requests.
Fields in order reception
In the order reception section, you can add the following groups:
-
Customs information. Contains information such as delivery terms, customs agent, declaration number, border crossing point, the carrier’s company name and EORI number, the registration number and country of registration of the vehicle transporting the goods across the border, and the driver’s name and telephone number. The fields in group Customs information are described in Customs information (order reception).
-
Consignor. The name and address of the company or person selling the goods. The fields in group Consignor are described in Consignor/Consignee (order reception).
-
Consignee. Name and address of the company or individual purchasing the goods. The fields in group Consignee are described in Consignor/Consignee (order reception).
Consignor may be the same company or individual as Sender, but they may also be different.
Consignee may be the same company or individual as Receiver, but they may also be different.
Customs requires information on who is selling/exporting the goods and who is buying/importing them; therefore, the groups Consignor and Consignee. Groups Sender and Receiver contain the start and end addresses for the transport itself.
The fields in groups Consignor and Consignee are used solely to store customs information; in other words, these fields do not govern prices, distances, zones, routes or route optimisation, unlike the fields in groups Sender and Receiver.
-
Attachments. Here you can add files to orders and manage files that have already been attached. For more information, see Attachments (order reception) and Attaching files in order reception.
Step 1: Add the groups to the order reception
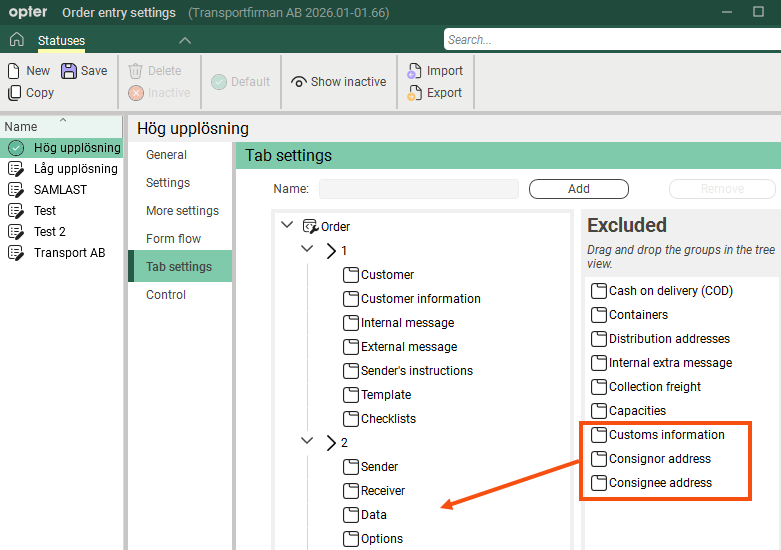
To add or amend customs information for orders in the order reception system, you need to add the groups Customs information, Consignor and Consignee.
Proceed as follows:
-
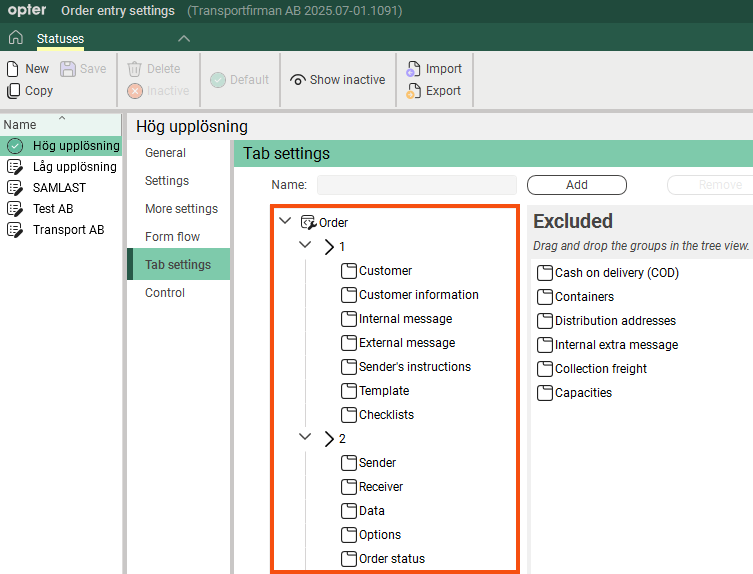
Click Settings > Order reception > Order settings, and the tab Tab settings. Click on the setting you want to change in the list on the left.
-
Double-click on the tab (folder) you want to change. You will now see the numbers 1-6.
-
Drag and drop the groups you want to display in the order reception area from the Excluded list onto the tab. (More detailed instructions can be found in Organising the groups in Order reception.)
-
Click on the Form flow tab and check that the tick box in the Visible column is ticked for Consignor (group) and Consignee (group).
-
Click on Save to save all changes.
Groups Customs information, Consignor and Consignee are now displayed in the order reception area.
-
If you do not already have the group Attachments in the order reception system, you can add it as well. For more information, see Attachments (order reception).
Step 2: Selecting which fields should be visible, mandatory and essential
The groups Consignor and Consignee contain address elements.
To select which fields should be visible, mandatory, essential, and which fields should be included in searches, do the following:
-
Click Settings > Order reception > Order settings, and the tab Control. Click on the setting you want to change in the list on the left.
-
Select a setting from the drop-down list for Address setting consignor and Address setting consignee.
-
If you want to change something or create a new address setting, click
 next to the drop-down list. The Address settings window opens. For more information, see Address settings (window) and Consignor/Consignee (order reception).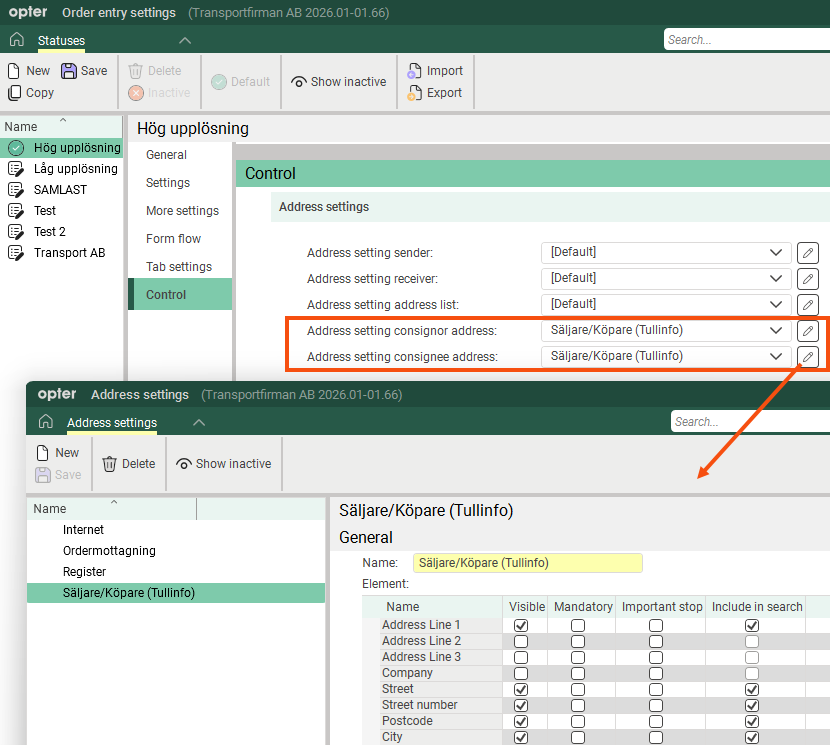
-
Click on Save to save all changes.
All fields are displayed in group Customs information. You cannot choose which stops should be visible, mandatory or important. None of the fields in the group are mandatory or essential stops.
Step 3 (optional): Contact Opter’s EDI team
If you would like customs information to be included with imports and exports, please contact the EDI team on regarding the following:
-
If the information in the fields in group Customs information is to be included during import and export, the EDI team will need to add the element customsInformation in your exports/imports.
-
If the information in the fields in groups Consignor and Consignee is to be included in imports and exports, the EDI team will need to add the element orderAddress/address for Consignor and Consignee in your exports/imports.
-
If you wish to send customs information from Opter to a customs information management system via EDI:
-
Order an EDI connection between your Opter and the customs information management system by contacting the EDI team at .
The EDI team needs to know:
-
What triggers the export process, for example, the order status, a specific POD-type or specific options on the order.
-
Which fields (i.e. what information) and which documents/files you wish to send to the customs information management system.
-
What information and which documents/files you need to retrieve from the customs information management system.
-
-
Once the EDI connection is set up, you and a member of Opter’s EDI team will test together to ensure that the connection to your customs information management system is working.
-
Step 4 (optional): Select how to start the export of customs information
If you wish to send goods information from Opter to a customs agent via EDI, select (for example) one of the following:
-
You add options to the order in the order reception department or in the dispatch department. The export of customs information begins when the order is saved with that option selected.
Follow the steps below to create a new option and a new price item, and link the option to the price item.
This method makes it easier to manage changes if you ask the EDI team to enable the system so that changes to the price item are sent to your customs information management system automatically. For more information, see Update customs information below.
-
The export of customs data begins when the order reaches a certain status. You choose which status.
Please inform the EDI team of the status.
-
The export of customs information begins when the order is assigned a specific proof of delivery type. You choose the proof of delivery type.
Please inform the EDI team of the proof of delivery type.
Step 5 (optional): Create a new option
The export of customs data begins when you save an order that includes an option which creates an automatic price item (which the EDI team has linked to your customs data management system).
-
Click Settings > Options (and on the tab General).
-
Create a new option by clicking
 New and give the option a Code (e.g. “T”) and a Name (e.g. “Customs system”).
 -
Give the options a Description if you wish.
-
Tick the box Available for orders so that the options are displayed and can be selected on orders in the order reception system.
-
Tick the box Available in dispatch if you want the options to be available for selection in dispatch.
The option is displayed under Options when you right-click on a shipment in dispatch.
You can also set the colour for the options. For more information, see Options (window).
-
If you want customs information to be exported only for certain services, click on the tab Services. Move the services for which the ‘Customs System’ option is not to be available to the Excluded list. For more information, see Options (window).
-
Click on Save to save all changes.
For more information, see Options.
Step 6 (optional): Create a new item and link the options to the item
-
Click on Economy > Price lists > Price lists and select the price list to work on from the list on the left.
-
Click on the Price items tab. Create a new article by clicking Create a new price item (at the bottom) or
 to open the article directory.
 -
Enter a Name (e.g. “Customs info”) and a Code, and configure the following settings:
-
Select the Allow failure checkbox.
-
In drop-down list VAT rate, select 0%.
-
In the drop-down list Price percentage to resource, select No remuneration
-
Select the No fuel extra checkbox.
-
In the Method drop-down list, it is only possible to select Matrix price.
-
-
Click on Save to save all changes.
-
Go back to window Price lists and tab Price items to configure further settings for the price item.
-
Tick the box next to the ‘Customs Info’ price item, and then configure the following settings:
-
In the Price item type drop-down list, select Options.
-
Select the Automatic cost checkbox.
-
-
Click on Save to save all changes.
-
Click on the Options tab. For the ‘Customs system’ option, select the ‘Customs info’ price item from the drop-down list.
-
Click on Save to save all changes.
-
Please contact the EDI team on so that they can link the price item to the export to your customs information management system.
Step 7 (optional): Display customs information on the freight bill
To display the order’s customs information on freight bills, you can add the following to the freight bill report/template; see the code example below. The example provides text in Norwegian, but you can change the text in your file if you wish.
<!-- Customs information -->
<block x="0" y="115">
<item name="Tollinformasjon (Customs information)" x="1" y="0.5" width="50" fontsize="7" />
<item name="Leveringsvilkår:" positionbelow="true" x="1" y="0" width="40" fontbold="true" fontsize="7" />
<item name="DAP-sted:" positionbelow="true" x="1" y="0" width="40" fontbold="true" fontsize="7" />
<item name="Tullrepresentant:" positionbelow="true" x="1" y="0" width="40" fontbold="true" fontsize="7" />
<item name="Grenseovergang:" positionbelow="true" x="1" y="0" width="40" fontbold="true" fontsize="7" />
<item name="Transportør:" positionbelow="true" x="1" y="0" width="40" fontbold="true" fontsize="7" />
<item name="EORI-nummer:" positionbelow="true" x="1" y="0" width="40" fontbold="true" fontsize="7" />
<item name="Sjåfør:" positionbelow="true" x="1" y="0" width="40" fontbold="true" fontsize="7" />
<item name="Telefon:" positionbelow="true" x="1" y="0" width="40" fontbold="true" fontsize="7" />
<item name="Reg.nr.:" positionbelow="true" x="1" y="0" width="40" fontbold="true" fontsize="7" />
<item name="Registreringsland (bil):" positionbelow="true" x="1" y="0" width="40" fontbold="true" fontsize="7" />
<item name="Deklarasjonsnr.:" positionbelow="true" x="1" y="0" width="40" fontbold="true" fontsize="7" />
</block>
<block x="22" y="115">
<item name=" " x="1" y="0.5" width="50" fontsize="7" />
<data name="CustomsInformation.DCI_Terms" positionbelow="true" x="23" y="0" fontbold="true" fontsize="7" width="40" />
<data name="CustomsInformation.DCI_City" positionbelow="true" x="23" y="0" fontbold="true" fontsize="7" width="40" />
<data name="CustomsInformation.DCI_Agent" positionbelow="true" x="23" y="0" fontbold="true" fontsize="7" width="40" />
<data name="CustomsInformation.DCI_Passage" positionbelow="true" x="23" y="0" fontbold="true" fontsize="7" width="40" />
<data name="CustomsInformation.DCI_Transporter" positionbelow="true" x="23" y="0" fontbold="true" fontsize="7" width="40" />
<data name="CustomsInformation.DCI_EORI" positionbelow="true" x="23" y="0" fontbold="true" fontsize="7" width="40" />
<data name="CustomsInformation.DCI_DriverName" positionbelow="true" x="23" y="0" fontbold="true" fontsize="7" width="40" />
<data name="CustomsInformation.DCI_Phone" positionbelow="true" x="23" y="0" fontbold="true" fontsize="7" width="40" />
<data name="CustomsInformation.DCI_RegNo" positionbelow="true" x="23" y="0" fontbold="true" fontsize="7" width="40" />
<data name="CustomsInformation.DCI_Nationality" positionbelow="true" x="23" y="0" fontbold="true" fontsize="7" width="40" />
<data name="CustomsInformation.DCI_CustomsNumber" positionbelow="true" x="23" y="0" fontbold="true" fontsize="7" width="40" />
</block>
<!--Consignor (Customs information)-->
<block x="0" y="160">
<item name="Selger (Consignor)" x="1" y="0.5" width="40" fontsize="7" />
<data name="ConsignorAddress.CUS_CustomerCode,' / ',ConsignorAddress.CUS_CustomerNumber" condition="ConsignorAddress.ADR_CUS_Id" positionbelow="true" x="1" y="0" fontbold="true" width="40" />
<data name="ConsignorAddress.ADR_AddrLine1" positionbelow="true" x="1" y="0" fontbold="true" width="40" />
<data name="ConsignorAddress.ADR_Company" condition="ConsignorAddress.ADR_Company" positionbelow="true" x="1" y="0" fontbold="true" width="40" />
<data name="ConsignorAddress.ADR_Street,' ',ConsignorAddress.ADR_StreetNo" positionbelow="true" x="1" y="0" fontbold="true" width="40" />
<data name="ConsignorAddress.ADR_ZipCode,' ',ConsignorAddress.ADR_City" positionbelow="true" x="1" y="0" fontbold="true" width="40" />
<data name="ConsignorAddress.COU_Name" positionbelow="true" x="1" y="0" fontbold="true" width="40" />
<data name="ConsignorAddress.ADR_EmailAddress" positionbelow="true" x="1" y="0" fontbold="true" width="40" />
<data name="ConsignorAddress.ADR_Phone" positionbelow="true" x="1" y="0" fontbold="true" width="40" />
</block>
<!--Consignee (Customs information)-->
<block x="22" y="160">
<item name="Kjøper (Consignee)" x="23" y="0.5" width="70" fontsize="7" />
<data name="ConsigneeAddress.CUS_CustomerCode,' / ',ConsigneeAddress.CUS_CustomerNumber" condition="ConsigneeAddress.ADR_CUS_Id" positionbelow="true" x="23" y="0.5" fontbold="true" width="40" />
<data name="ConsigneeAddress.ADR_AddrLine1" positionbelow="true" x="23" y="0" fontbold="true" width="40" />
<data name="ConsigneeAddress.ADR_Company" condition="ConsigneeAddress.ADR_Company" positionbelow="true" x="23" y="0" fontbold="true" width="40" />
<data name="ConsigneeAddress.ADR_Street,' ',ConsigneeAddress.ADR_StreetNo" positionbelow="true" x="23" y="0" fontbold="true" width="40" />
<data name="ConsigneeAddress.ADR_ZipCode,' ',ConsigneeAddress.ADR_City" positionbelow="true" x="23" y="0" fontbold="true" width="40" />
<data name="ConsigneeAddress.COU_Name" positionbelow="true" x="23" y="0" fontbold="true" width="40" />
<data name="ConsigneeAddress.ADR_EmailAddress" positionbelow="true" x="23" y="0" fontbold="true" width="40" />
<data name="ConsigneeAddress.ADR_Phone" positionbelow="true" x="23" y="0" fontbold="true" width="40" />
</block>
If you use the code example above, the customs information will be displayed as shown in the image below. The information is therefore retrieved from groups Customs information, Consignor and Consignee in the order of receipt of the orders at the order reception and is shown on the freight bill.
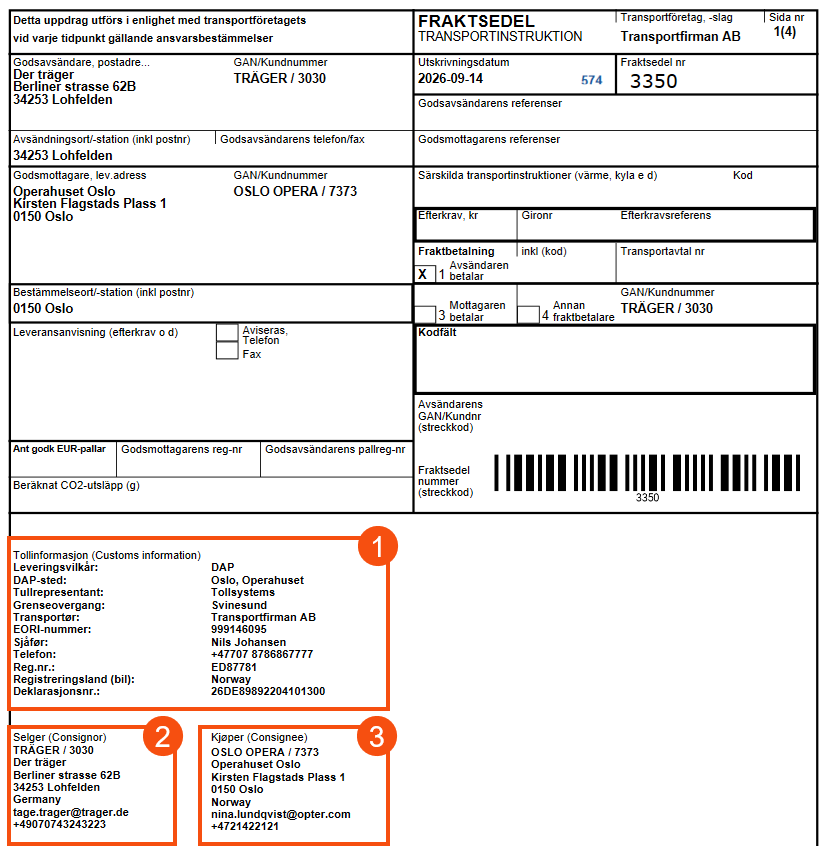
The figures in the image show which group within the order reception department the information has been taken from:
-
Customs information.
-
Consignor.
-
Consignee.
For more information, see Reports (window) and Report editor (window).
Update customs information
If you wish to add or amend data that has already been exported to the customs information management system, follow these steps:
-
Amend the details in the fields in groups Customs information, Consignor and/or Consignee on the order in the order reception.
-
In order for the customs information to be exported to the customs information management system again, the following is required:
-
That you have asked the EDI team to enable the feature so that changes to the price item are automatically exported to your customs information management system.
-
That you make a change to the price item (for the item ‘Customs info’) and then save the order.
-

