Organising the groups in Order reception
Last updated: 16 March 2026
In this article
To help you work as efficiently as possible in order reception, you can choose which information to display and in what order. You can set the following:
-
Which groups are displayed.
-
Which groups are displayed on which tabs.
-
The order in which the groups appear on each tab and the order in which the tabs are arranged.
-
Which groups should be placed next to each other and which groups should occupy the full width of the window.
It is also possible to choose which fields, drop-down lists and checkboxes are to be visible, important stops, mandatory to complete (required) and which are to be displayed in capital letters. For instructions, see Fields and checkboxes in Order reception and Tellimuse sisestamise seaded (window).
The image above shows group Klient, which in this example is displayed on tab Tellimus in the order reception area.
You can add settings or choose to use one of the default settings Suur ekraan or Madal eraldusvõime. Suur ekraan has fewer tabs but more groups on each tab compared to Madal eraldusvõime. If so desired, you can start from the default setting Suur ekraan and then adapt it to your needs.
Add a tab to the order reception
Proceed as follows to add tabs in order reception:
-
Click on Seaded > Tellimused& vastuvõtt > Tellimuse sisestamise seaded.
-
Click on the setting you want to change in the list on the left, for example Suur ekraan or a setting you have created yourself. To create a new custom setting, click on
 and give the new order setting a name in the Nimi field.
 -
Click on the Vahekaardi seaded tab. Each tab in order reception is shown here as a folder.
-
Click on Lisa. A new folder is created for the new tab.
-
Give the tab a name in the Nimi field.
-
To move the tab, drag and drop it to the desired location in the tree view.
The tab (folder) at the top of the tree view will appear on the far left, and the tab at the bottom will appear on the far right in order reception.
For instructions on how to organise the groups on the tabs, see Organising groups in the order reception below. -
Click on Salvesta to save all changes.
Changes made on the Vahekaardi seaded tab will become visible in order reception when the setting is saved.
Organise the groups in the order reception area
Here’s how to organise the groups on the tabs in the order reception section:
-
Click on Seaded > Tellimused& vastuvõtt > Tellimuse sisestamise seaded.
-
Click on the setting you want to change in the list on the left, for example Suur ekraan or a setting you have created yourself. To create a new custom setting, click on
and give the new order setting a name in the Nimi field. -
Click on the Vahekaardi seaded tab. Here you can choose which groups to display in the order reception area, on which tabs and in what order. Each tab in order reception is shown here as a folder. If you want to add a new tab, see Adding a tab in order reception above.
-
Double-click on the tab (folder) you want to change. You will now see the numbers 1-6.
-
Drag and drop the groups you want to see in the order reception from the Välistatud list onto the tab. Place groups under 1 if you want them to appear at the top of the order reception window. Place groups under 6 if you want them at the bottom of the window. Place two or more groups under the same number if you want the groups to appear next to each other in the order reception window.
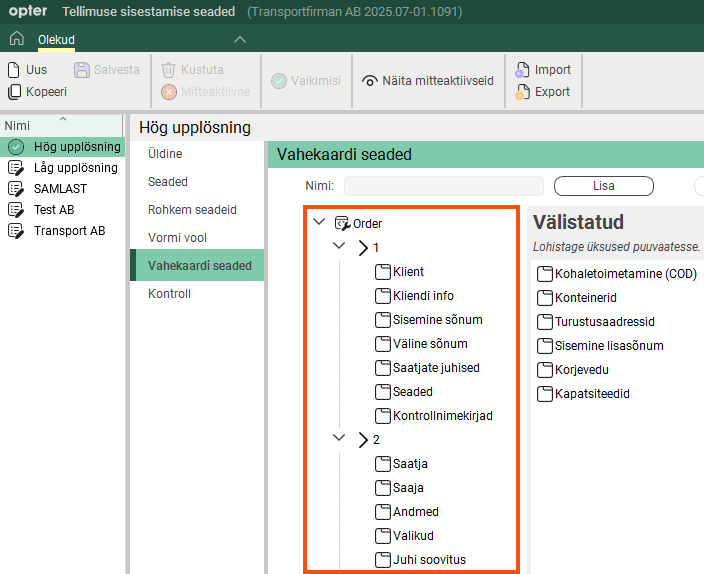
The image above shows that a tab labelled Tellimus has been selected in the order reception window, and that clicking on the Tellimus tab displays the Klient group at the top left of the order reception window. To the right of group Klient is group Kliendi info, followed by groups Sisemine sõnum and Väline sõnum. At the far right, at the top of the window, is the group Check listid. Below these groups are the groups Saatja, Saaja, Andmed, Valikud and Juhi soovitus.
The image above shows the order in which the groups appear in the order reception area after the selections for tab Tellimus have been made as described above.
The image above shows that a tab labelled Saadetised has been selected in the order reception window, and that clicking on the Saadetised tab displays group Saadetised at the top of the window and group Aadressid below it. Both groups Saadetised and Aadressid span the full width of the window, as they appear on their own beneath their respective numbers.
-
Click on Salvesta to save all changes.
Changes made on the Vahekaardi seaded tab will become visible in order reception when the setting is saved.
Changing the order of tabs in order reception
-
Click on Seaded > Tellimused& vastuvõtt > Tellimuse sisestamise seaded.
-
Click on the setting you want to change in the list on the left.
-
Click on the Vahekaardi seaded tab.
-
Select the tab (folder) you want to move and drag and drop it where you want it in the tree view.
The tab (folder) at the top will be displayed on the far left, and the tab at the bottom will be displayed on the far right of order reception.
-
Click on Salvesta to save all changes.
Changes made on the Vahekaardi seaded tab will become visible in order reception when the setting is saved.
Remove a tab or group in the order reception
-
Click on Seaded > Tellimused& vastuvõtt > Tellimuse sisestamise seaded.
-
Click on the setting you want to change in the list on the left.
-
Click on the Vahekaardi seaded tab.
-
Select the tab (folder) or group you wish to remove from the order reception. Click on Eemalda.
Groups that you delete are simply moved to the Välistatud list on the right.
-
Click on Salvesta to save all changes.
Changes made on the Vahekaardi seaded tab will become visible in order reception when the setting is saved.
Notification of hidden fields in order reception
This feature is only available if you are using the new Opter design; it is not available in the classic design. The new design is available from version 2025.12.00 onwards.
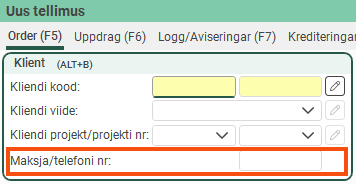
If there are fields that are not displayed in a group in the order reception, Opter indicates this by displaying three small dots in the frame.
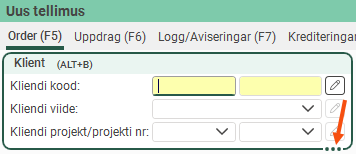
If you want to see all the fields, drag the frame. The bullet points disappear when all fields are displayed.
Size adjustments made at the order reception are saved per user and per computer
This feature has been improved, and as described here, it is only available if you are using the new version of Opter. The new design is available from version 2025.12.00 onwards. (For example, the Reset my heights and widths and Make my settings the default buttons are not available in the classic design.)
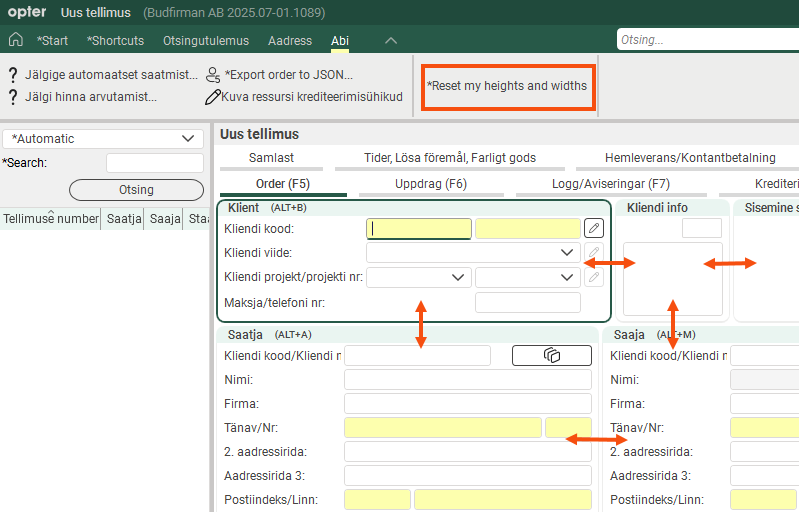
In the order reception section, each individual user can adjust the size (height/width) of the groups by dragging the group borders. (See the image below.) Opter saves group sizes by order settings, user and computer.
In other words, if you adjust the group sizes in the order reception screen, Opter will automatically save your changes (for the current order settings), so that the order reception screen will look the same the next time you open it. If you work on different computers (with, for example, different resolutions or screen sizes), Opter will save your settings for each computer.
If you have adjusted the group sizes and later wish to revert to the default setting, click the Reset my heights and widths button (in the order reception area under Abi). The size of the groups in your order reception will then be reset to the default values saved for the current order settings. If you wish to save new standard dimensions for an order configuration, click the Make my settings the default button on the Vahekaardi seaded tab in the window Tellimuse sisestamise seaded.
Create a new default setting for size adjustments in order reception
The button and its function are only available if you are using the new version of Opter; it is not available in the classic version. The new design is available from version 2025.12.00 onwards.
In window Tellimuse sisestamise seaded on the Vahekaardi seaded tab, you will find the button Make my settings the default.
If you click the Make my settings the default button, the following will happen for the order setting highlighted in the list on the left:
-
The dimensions (height/width) of the groups in the order reception area that you currently have will be set as the new default for all users who have not made their own adjustments.
-
Users who have made their own size adjustments will retain them, but if they click the Reset my heights and widths button (in the order reception under Abi), your current size adjustments will take precedence. (If they subsequently make their own adjustments, Opter will automatically save those adjustments for each order setting, user and computer.)
Once one of you has clicked the Make my settings the default button, you cannot remove the new default setting (for your Opter), but you can always adjust the sizes in the order reception again and then save them as the default by clicking the Make my settings the default button once more.
For more information, see Tellimuse sisestamise seaded (window).