Opter Driver and Opter Terminal
Last updated: 5 October 2026
In this article
Some features of Opter Driver and Opter Terminal may require a specific version of Opter.
Opter Driver is available for iOS and Android. For Android, the app is available in two variants, Opter Driver (classic) and Opter Driver Labs. All new features below apply to the iOS app and Opter Driver Labs unless otherwise stated. Opter Driver for iOS and Opter Driver Labs for Android have the same version number.
Opter Terminal is only available for Android.
We recommend that you always use the latest version of the apps.
Support for Zebra TC201 (Opter Driver Labs 2.4.178, Opter Driver (classic) 2.1.12, Opter Terminal 92.0)
The Zebra TC201 scanner is compatible with:
-
Opter Terminal version 92.0 and later.
-
Opter Driver Labs (for Android) version 2.4.178 and later.
-
Opter Driver (classic) version 2.1.12 and later.
More information:
New setting for status change (2.4.168)
As a driver/app user, you can now choose how you want status changes (by swiping right) on shipments on the shipment page to work:
-
Default:
When you drag the shipment to the right (1), the next status in the life cycle (e.g. Picked up) appears on a button (2) next to the shipment. Press the button to change the status.
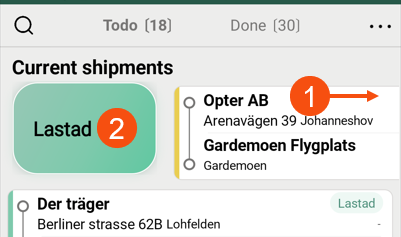
If you happen to swipe a shipment to the right but don’t want to change its status, just wait a few seconds and the button will disappear. The status of the shipment has therefore not changed.
-
The quickest way:
When you drag the shipment to the right, the next status in the life cycle (e.g. Picked up) appears next to the shipment, and when you release it, the shipment’s status changes.
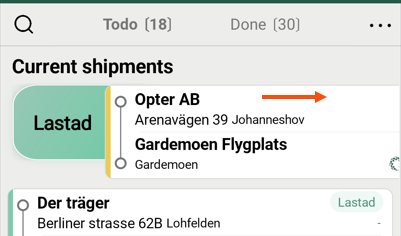
If you happen to drag a shipment to the right but don’t want to change its status, simply drag the shipment back before letting go of it. The status of the shipment has therefore not changed.
You can configure this setting in Opter Driver, on the Settings page, by ticking or unticking the tick box Status change in shipment list.
More information:
Opter Terminal: order number in the scan list (84.0)
It is now possible to display the order number in the scan list by using the tag DEL_Id in <listdesign> or <detailsdesign>.
More information:
Multiple POD images (2.4.136)
Requires Opter version 2026.06.00 or later.
You can now add as many photos as you like to proofs of delivery in the app. (Previously, it was only possible to add one image to the proof of delivery.)
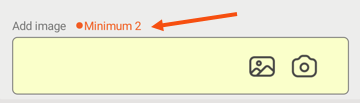
If the Add image field is yellow, this means you must add at least one image. For example, if the text “Minimum 2” appears, you must add at least two images.
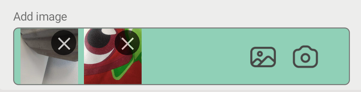
If the field is green, it means you’ve done everything you need to, but you can add more images if you like.
More information:
Certificates for Android (Opter Driver Labs 2.4.136, Opter Driver (classic) 2.1.5, Opter Terminal 85.0)
From the app versions listed above onwards, the Connection is not secure pop-up window may appear in the Android apps when you try to log in.
A pop-up window appears stating that the certificate could not be verified, and asks whether you trust the certificate and still wish to log in to the app.
If the pop-up window appears:
-
Please inform your system administrator, IT manager or network administrator of the following:
-
If you are using Opter Cloud, please contact Opter support and ask them to arrange a certificate that works with Android clients.
-
If you have your own server environment (on-prem), you will need to arrange a certificate yourself that works for Android clients. Further information for the IT manager can be found in Check whether your certificate works with Opter Driver for Android.
-
-
If you want to start using the app straight away, you’ll need to click the Trust it and continue button in the pop-up window Connection is not secure.
More information:
-
Check whether your certificate works with Opter Driver for Android
-
Check whether your certificate works with Opter Driver (classic)
Filter the map (2.4.94)
Using the new buttons Pick up and Leave, you can choose to display only collection addresses or delivery addresses on the map.
Open the map by tapping Map at the bottom of the screen. If you only want to display collection addresses, tap Pick up.
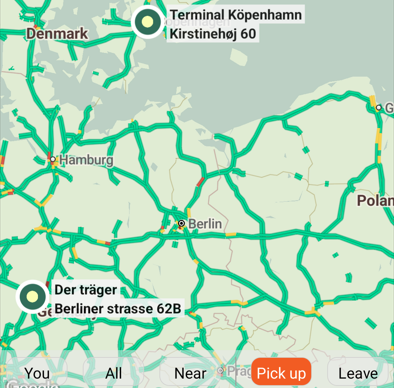
If you want to remove the filter, do one of the following:
-
Press the Pick up button (again). The map will then return to showing both collection addresses and delivery addresses.
-
Press button Leave to remove the filter for collection addresses; only delivery addresses will then be displayed.
Any filtering you apply to this map does not apply to the map in the detail view.
More information:
Show/hide the Remark field in the POD view (2.4.63)
It is now possible to hide the Remark field in the POD view by setting the mobile data setting PodRemarkEnabled to “false”.
More information:
Opter Terminal: Scan QR codes/barcodes using the built-in scanner (83.0)
It is now possible to create a scan batch/comment by scanning a QR code or barcode using the built-in scanner on devices that have one, such as Zebra and Honeywell. The content of the QR code/barcode is used as the name/comment for the scan batch.
More information:
Smart locks (2.4.27)
Smart locks can now be managed in Opter Driver. Click on Unlock {0} in the POD view to open the smart lock app.
On iPhone, Qlocx must be opened manually, as Qlocx does not support opening automatically from other apps on iOS.
If you want to start using smart locks in Opter, you will need to set up an EDI connection that downloads information about the lock to the order. Contact for more information.
Extra dimensions 1–5 and extra-IDs 1–5 (2.4.27)
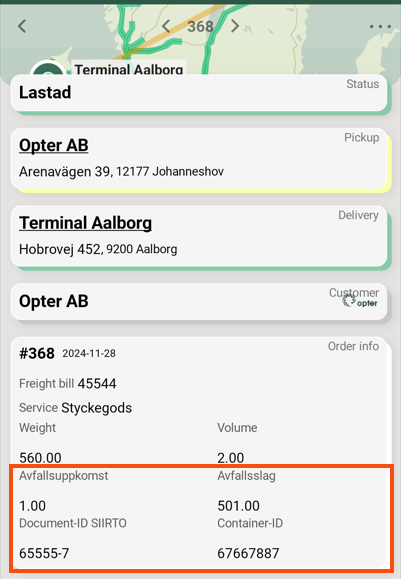
You can use the Mobile data settings SHI_ExtraDimension1Name-SHI_ExtraDimension5Name and SHI_ExtraId1Name-SHI_ExtraId5Name to name the fields Extra dimension 1-Extra dimension 5 and Extra ID 1-Extra ID 5 in Opter Driver.
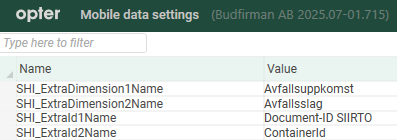
Previously, the names you gave them were only shown in the Changes view, now they are also shown with the correct name in the task list and detail view.
More information:

