Scan using Opter Driver
Last updated: 14 October 2026
Applies to Opter Driver for iOS and Opter Driver Labs for Android.
In this article
You can scan freight bills and parcel labels to update the status of shipments and, for example, add deviations. You can scan in the following ways:
-
Using the mobile’s built-in camera.
-
Using a standalone Bluetooth scanner (rather than the mobile’s built-in camera). For more information, see Settings in Opter Driver.
-
With an Android-based scanner, such as a Zebra. (In that case, install the Opter Driver Labs app for Android directly onto the scanner.)
You can also enter the parcel or waybill number manually in the scanning view.
Step 1: Select scan direction
Press Scanner at the bottom to activate the scanner.

Then press Pick up or Leave. If you have scanned before, there are buttons that remember your most recent selections, (1) and (2), unless the system administrator has hidden them. If you make new selections, the buttons will update to always show what you scanned most recently. The buttons make it easier to repeat the same type of scan.
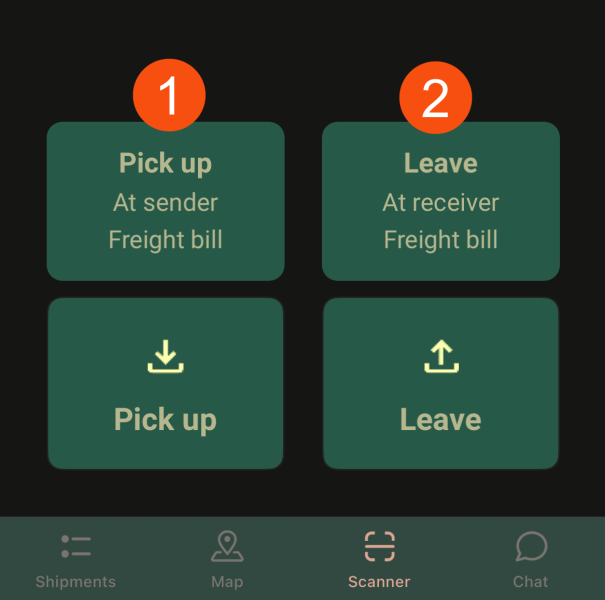
Example
Press (1) if you wish to repeat your last collection – which involved collecting the parcel from the sender and scanning the freight bill – without having to make the three selections again. You can then start scanning the goods straight away.
Press (2) if you wish to repeat your last delivery, which involved delivering to the recipient and scanning the freight bill.
Step 2: Please enter your location
Once you have selected Pick up or Leave, a list of collection or delivery points will appear, depending on whether you are collecting or dropping off goods. Select whether you wish to collect from or deliver to the sender or recipient (1) or at a terminal (2). You can also search for the terminal name in the search box at the top (3).
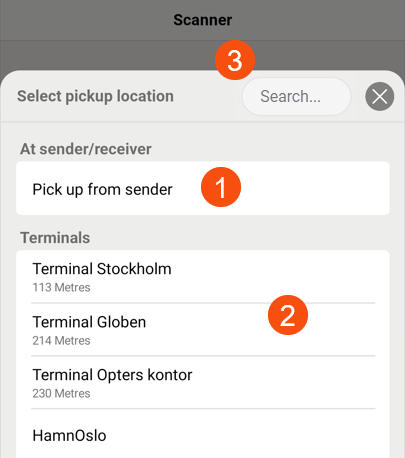
Step 3: Choose what you want to scan
Tap Freight bill or Package, depending on what you are scanning.
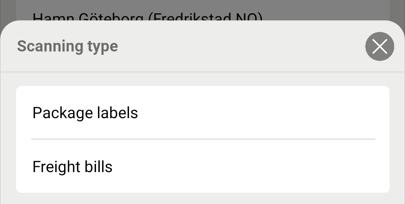
Your system administrator may have configured the system so that you must enter a scan comment. A scan comment may be a text field that needs to be filled in, but it may also be a QR code or a barcode – for example, one on the wall inside a cold store – that you need to scan. The reason for doing this is to ensure that the driver leaves the goods inside the cold store and not outside it.
Do in one of the following ways:
-
Enter the scan comment in the empty field (1). Then press Save and start scanning (3).
-
Press SCAN (1) and scan the barcode or QR code.
The button turns green (2) once it has scanned a QR code or barcode. Once you are happy with the comment, press Save and start scanning (3) to start scanning the parcels or freight bills.
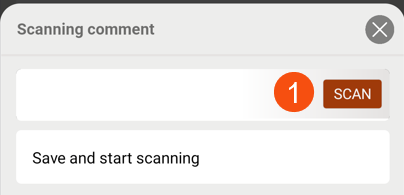
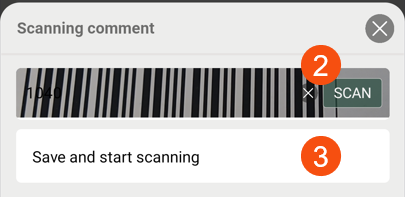
The scan comment will be added to all parcels and freight bills you scan until you tap End.
Step 4: Scan the goods
Scan the freight bills or parcel labels as usual. You can also enter the consignment note number or parcel number manually and then tap the search icon. Tap End when finished.
To switch on the torch, tap the lightning bolt icon ( ). Yellow icon = torch on. Grey icon = torch off.
If you have scanned a freight bill, or all parcels in the shipment, the scanning view will close and the scans will be saved.
If you did not scan all the parcels for the shipment, the menu will appear Unscanned packages. If you want to scan the rest of the parcels, close the menu using  and continue scanning. If any parcels are missing, you may be able to add a deviation for them (1).
If you do not wish to continue scanning, press End (2). The scanning view closes and the scans are saved.
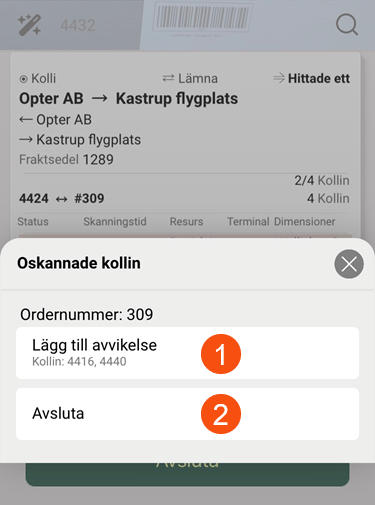
Om du leveransskannar hos mottagaren måste du fylla i ett leveransbevis innan du kan göra något annat i appen. Det behövs inte när du ankomstskannar på en terminal.
For more information, see Proof of Delivery (POD) in Opter Driver.
Deviations for unscanned parcels
Depending on the settings configured by the system administrator, you may be able to add deviations to the shipment if you have not scanned all the parcels. Press Add deviation on the menu Unscanned packages.
Packages that have not been scanned are highlighted when the page opens, but you are free to choose which packages the deviation relates to (1).
Fill in the fields and click Save in the top right-hand corner to report the deviation.
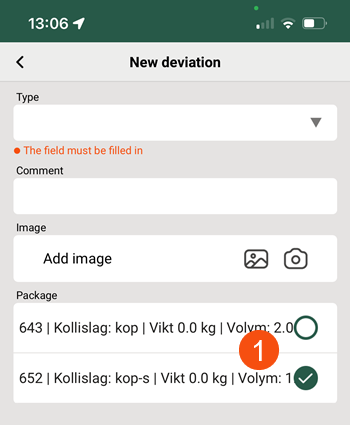
Once you have saved it, you will no longer be able to change the deviation in the app.
If you add an image, it will appear at the bottom of the shipment’s detail view, under Attached files. For more information, see Adding images to Opter Driver.
Special notices during scanning
 Stop! This shipment is assigned to a different resource.
-
It is not possible to take over the shipment. You must not load these parcels.
-
The status of the shipment will not change, and the driver/vehicle assigned to the shipment will not change.
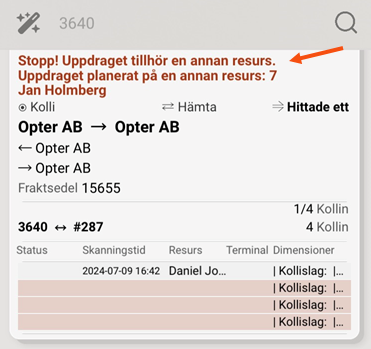
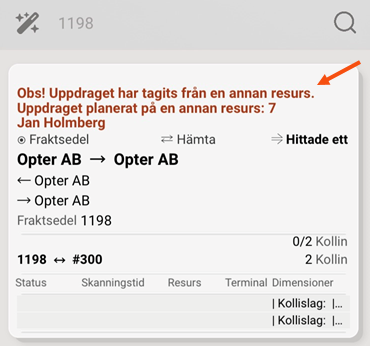
Note! This shipment has been transferred from a different resource.
-
You have taken over the shipment from another driver. You can also see who you took it over from.
-
The status of the shipment will change and the shipment will be assigned to you.
-
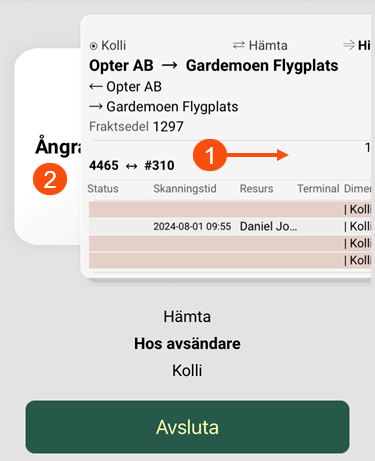
If you’ve scanned the wrong item, you can undo the scan by swiping right (1) and releasing when Undo appears (2).
The original resource is not restored, and the status of the shipment is reset to Created. Undoing an action does not, therefore, mean reverting to the state prior to the scan. Let the air traffic controller know that you accidentally scanned the wrong thing.
Earliest pickup time is {0}.
If you arrange for a collection from the sender before the earliest collection time, you may receive a warning. You can close the warning by pressing . You can then either carry on, even though it’s too early to download, or cancel the scan by swiping right.
If you cancel the scan, the original resource will not be restored, and the status of the shipment will be reset to Created. Undoing an action does not, therefore, mean reverting to the state prior to the scan. Let the air traffic controller know that you accidentally scanned the wrong thing.
Alert message
If there is an alert message for a parcel, the parcel number will be displayed in a pop-up window when you scan it. An alert message is a free-text message that someone has entered specifically for the parcel you are scanning, for example, ‘Please note! "A very important parcel." Press OK to confirm that you have read it.
Scan list
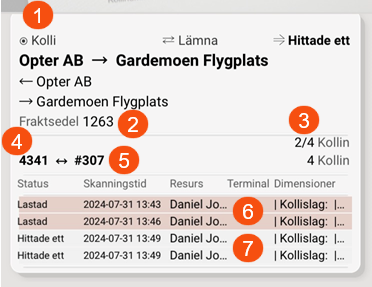
Once you have finished scanning, a list of the shipments that have been scanned – the scan list – will be displayed. There you can see all the parcels you have scanned, and the parcels that have not been scanned for those shipments.
-
This is a parcel label that has been scanned.
-
Freight bill number.
-
Two out of four parcels have been scanned.
-
The most recently scanned parcel number/waybill number.
-
Order number.
-
Parcels that have not been scanned have a different background colour.
-
Scanned parcels.
The following colours are used to display the scan results.
|
Frame colour |
Description |
|---|---|
|
Grey |
The freight bill was found in the system and the scan has been logged in the system. |
|
Purple |
There are several parcels with the same parcel number in the system, or several shipments with the same waybill number. Select the parcel or shipment you are scanning. |
|
White |
The freight bill is in the system, but is for an address that does not appear on the order. For example, if you scan a parcel at Malmö Terminal, but none of the addresses on the order is Malmö Terminal. Kolit has therefore been misdirected and should be dealt with in accordance with your procedures for such cases. |
|
Orange |
Orange may either mean that something went wrong with the scan, preventing the system from being accessed, or that the parcel/freight bill is not in the system. Nothing is recorded in the system. Please try again. You can delete the scan from the app by swiping right and releasing when Remove appears. |
Open the view Scanning details
Tap the scan in the scan list to open a detail view. The system administrator determines which information is displayed in the detail view.
Open the menu
Drag the scan to the left to open a menu where you can record PODs and deviations for the shipment, or make changes to individual parcels.
Undo scan
If you want to undo the scanning of all parcels in a shipment, drag the shipment to the right (1) and release it when the text Undo appears (2).
If you cancel the scan, the original resource will not be restored, and the status of the shipment will be reset to Created. Undoing an action does not, therefore, mean reverting to the state prior to the scan. Let the air traffic controller know that you accidentally scanned the wrong thing.
Discard scan
If you have scanned a barcode that is not in the system, or if there is some other error, you can delete it by dragging the shipment to the right and releasing it when the text Remove appears.
Example, video
In the video, we enter the consignment note number manually instead of scanning it with the camera.
|
Time |
Contents |
|---|---|
|
00:00 |
Departure scan at the terminal. |
|
00:48 |
Cancel the scan. |
|
01:04 |
Arrival scan at the terminal. |
|
01:23 |
The freight bill is not in the system. Delete the scan. |
|
02:00 |
The correct freight bill is scanned on arrival. |
|
02:23 |
Report a deviation. |

