Create a new order using AI
Last updated: 12 October 2026
In this article
Applies from Opter version 2026.06.00 and 2026.01.538. This feature is an additional service, and you must use the new version of Opter.
 Latest news about the feature
-
New Outlook:
If you are using the new Outlook, you can drag and drop emails directly into the Read-in order with AI window or directly onto the AI button from Opter version 2026.06.146 and 2026.07.202.
(Previously, you could simply drag and drop emails directly into the window Read-in order with AI or directly onto the AI button from classic Outlook.)
The feature is still under development.
If you would like to try out the AI feature now, please note the following:
-
The AI feature is currently under development. This means that it is constantly being revised and improved.
-
The AI feature is an additional service, so there will be a charge for it in future.
During this trial period, there is no charge for the AI add-on service. (It is unclear how long the trial period is.)
-
To test the AI feature, your Opter needs to be updated to the latest CI/CD version, or to 2026.06.00. Please contact Opter support at .
-
You must use Opter in New design. You can choose this when you log in. For more information, see New design.
-
AI can make mistakes. We recommend that you review the AI’s suggestions before saving the order.
If the AI add-on is enabled in Opter, you can let the AI create a new order from one or more files that you provide to the AI.
The AI can create new orders in the order reception system based on the content of:
-
Emails.
-
Free text.
-
PDF files (e.g. consignment notes in PDF format).
-
MSG, EML and TXT files.
-
Images in PNG and JPG file formats. For example, you can take a picture (a photo) of a freight bill or parcel label and let the AI create an order.
The AI therefore creates one new order at a time, from one or more files that you provide to the AI. There is no limit to the number of files you can provide to the AI, so you can, for example, give it an email, two images and a PDF file. However, if you provide the AI with a large number of files or large files, the analysis will take longer.
Two methods
There are two ways to do this in the order reception department:
-
Drag and drop files directly onto the AI button. (The quickest way.)
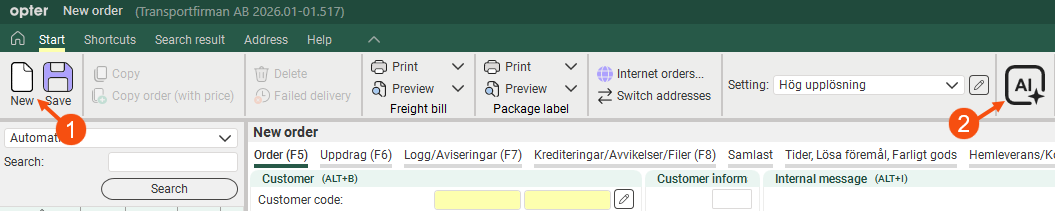
Drag and drop emails and other files onto the AI button (2). The AI analyses the information and fills in the fields on the new order in the order reception system. You review and, if necessary, adjust the AI’s suggestion, and then click Save to create the order.
-
Using the Read-in order with AI window. (Gives you more control.)
You drag and drop, or copy and paste, emails and other files into the Read-in order with AI window in the order reception area; the AI analyses the information and then displays a suggestion as to which information it wishes to enter and in which fields, for example "Weight: "333".
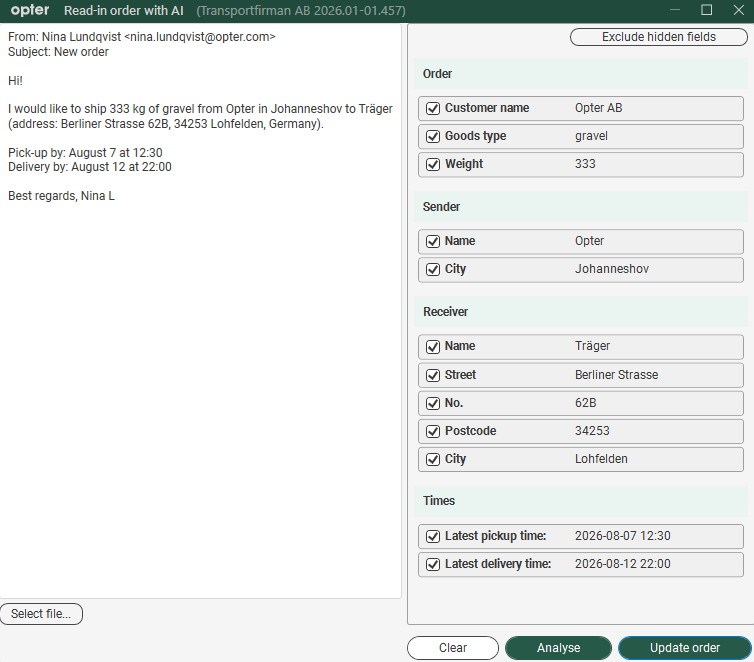
You review the AI’s suggestions and make any necessary adjustments. When you’re ready, click the button Update order. The AI fills in the fields on the new order in the order reception system, and then you click Save to create the order.
If you usually enter certain information in fields other than those specified by the Opter standard, the AI will be able to learn which information should go in which field. (Further information can be found in AI can learn below.)
Provide emails and other files to the AI
You can submit emails and other files to the AI in the order reception department as follows:
-
From New Outlook and Classic Outlook, you can drag and drop emails directly into the Read-in order with AI window or directly onto the AI button.
If the email contains attachments, such as a freight bill, these will be automatically added to the new order.
If you are using the new Outlook and Opter in any version earlier than 2026.06.146 and 2026.07.202
It is not possible to drag and drop emails directly into the window Read-in order with AI or directly onto the AI button. Update Opter to version 2026.06.146 or 2026.07.202 or later, or do the following:
First, save the email as an .eml file on your computer; you can then drag and drop the .eml file into the Read-in order with AI window or directly onto the AI button. If the email contains attachments, these will be automatically added to the new order. -
Copy and paste emails into the window Read-in order with AI.
Any attachments are not added automatically to the new order, but you can add them manually to the Attachments group in the order reception section.
(It is not possible to paste emails directly onto the AI button.)
-
Drag and drop files in the following formats: EML, MSG, PDF, TXT, JPG and PNG into the Read-in order with AI window or directly onto the AI button. (You can drag and drop files from the Desktop, File Explorer and other locations.)
-
In the Read-in order with AI window, you can click the Select file button if you want to provide the AI with one or more files that you have on your computer.
You can also enter free-form text in the window Read-in order with AI. For example, you could write "333 kg of potatoes, to be collected by 7 August at 12.30, to be delivered by 12 August at "22:00".
The files you provide to the AI are automatically added as attachments to the new order (in group Attachments in the order reception).
We recommend that you check the setting for tick box Include with invoice for the files in group Attachments, so that the correct files are attached to the invoice when the order is invoiced. For more information, see Attachments (order reception).
Conditions
Enable AI in Opter
For the feature that allows AI to create new orders to work, you will need to contact Opter Support () and ask them to activate the AI add-on service in Opter. So there is an additional cost.
When the add-on service is activated, the AI button (2) appears on the Start menu tab in the order reception area. If it doesn’t appear, close Opter and then restart it. When you log in, you must select to use Opter in the New Design. (For more information, see New design.) In the order reception section, click  New (1) to create a new order; the AI (2) button should then appear.
Current email addresses
To help the AI identify the correct customer and customer reference (reference), please ensure that all customers and customer references have up-to-date email addresses in Opter.
Click on Register > Customers. Select a customer from the list on the left.
-
For customers: See the Email address field on the tab General.
-
For customer references (clients): Click on Reference at the top of the menu in the customer register. The Reference window opens. Select a reference from the list on the left. The Email field is located on the tab General.
Choosing a method
You can create a new order using AI in two different ways in the order reception area:
-
Drag and drop files directly onto the AI button.
Useful for:
-
You want to work faster, as this method involves fewer mouse clicks.
-
You’re usually happy with what the AI suggests.
Limitations:
-
It is not possible to copy and paste emails, for example.
-
You can only drag and drop once onto the AI button per new order. However, you can select several files and drag and drop them at the same time.
-
-
Using the Read-in order with AI window.
Useful if you want to:
-
Be able to check and adjust the AI’s suggestions before the AI fills in the fields on the new order in the order reception system.
-
Provide the AI with information from various files stored in different locations.
-
Be able to copy and paste emails, for example
-
Be able to enter data, e.g. "200 kg of gravel, collect today at 15–18, to be delivered by "19 tomorrow".
-
Troubleshoot.
-
We recommend the following:
-
If you’re going to start using AI to create orders, you can use the window Read-in order with AI. In the window, you can see what the AI suggests, and you can adjust its suggestions before asking it to fill in the fields on the order in the order reception system.
-
If you have been using the Read-in order with AI window for a while and are generally happy with the AI’s suggestions, you can work more quickly by instead dragging and dropping files directly onto the AI button.
Drop files directly onto the AI button}
To create a new order using AI by dragging and dropping files directly onto the AI button, do the following:
-
In the order reception section, click
New (1) to create a new order.
-
Provide information to the AI by dragging and dropping one or more files simultaneously onto the AI button (2).
The following works:
-
You can drag and drop files in the following formats: EML, MSG, PDF, TXT, JPG and PNG.
-
In New Outlook and Classic Outlook, you can drag and drop emails.
If you are using the new Outlook and Opter in any version earlier than 2026.06.146 and 2026.07.202
It is not possible to drag and drop emails directly into the window Read-in order with AI or directly onto the AI button. Update Opter to version 2026.06.146 or 2026.07.202 or later, or do the following:
First, save the email as an .eml file on your computer; you can then drag and drop the .eml file into the Read-in order with AI window or directly onto the AI button. If the email contains attachments, these will be automatically added to the new order.
With the AI button, you can only drag and drop once per new order. However, you can select several files and drag and drop them at the same time.
-
-
As soon as you have dragged the files onto the AI button, the AI will start analysing the information. The following happens:
-
A charging icon indicates that the AI and Opter are working.

-
Once the AI has finished its analysis, it populates the relevant fields on the new order in the order reception system with the information from the files.
-
In your order reception, you probably do not display all the fields that can be displayed. If the AI finds information that would fit into a field that you are not displaying, it will ignore that information.
-
If you used drag-and-drop on an email from Outlook (or via an .eml file) and the email has attachments, the attachments will automatically be added to the new order (in the group Attachments).
-
-
Please check that the information is entered in the correct fields.
Correct any errors by moving the information to the correct field, e.g.
-
In the order reception section, click Save to create the order.
-
You can manually attach files by first saving them to your computer and then going to the Attachments group in the order reception section. Click New, browse to the file you want to attach, and click Open. The file is added to the order. Click on Save to save all changes.For more information, see Attaching files in order reception and Attachments (order reception).
We recommend that you check the setting for the tick box Include with invoice for the files in group Attachments, so that the correct files are attached to the invoice when the order is invoiced. (Select the file to view the setting for tick box Include with invoice.) For more information, see Attachments (order reception).
Using the window Read-in order with AI
To create a new order using AI via window Read-in order with AI, proceed as follows:
-
In the order reception section, click
New (1) to create a new order.
-
Click the AI button (2). The Read-in order with AI window opens.
-
Enter information into the AI in the left-hand section of the window Read-in order with AI in one or more of the following ways:
-
In New Outlook and Classic Outlook, you can drag and drop emails.
If you are using the new Outlook and Opter in any version earlier than 2026.06.146 and 2026.07.202
It is not possible to drag and drop emails directly into the window Read-in order with AI or directly onto the AI button. Update Opter to version 2026.06.146 or 2026.07.202 or later, or do the following:
First, save the email as an .eml file on your computer; you can then drag and drop the .eml file into the Read-in order with AI window or directly onto the AI button. If the email contains attachments, these will be automatically added to the new order. -
Copy and paste emails.
-
Drag and drop files in the following formats: EML, MSG, PDF, TXT, JPG and PNG.
-
Click the Select file button and select the files you have on your computer. You can provide the AI with files in the following formats: EML, MSG, PDF, TXT, JPG and PNG.
-
Enter details, for example "333 kg, to be collected by 7 August at 12.30, to be delivered by 12 August at "22:00" or "200 kg of gravel, collect today at 15–18, to be delivered by "19 tomorrow".
For example, you can provide the AI with an email, two images and a PDF file.
-
-
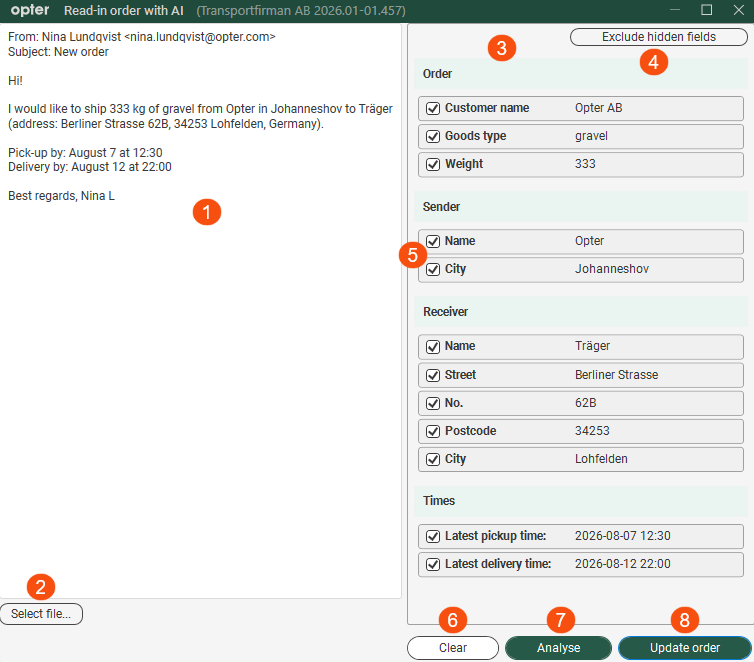
In the left-hand section of the window (1), you can edit the email or file if, for example, you want to remove any irrelevant text.
-
Click the Analyse (7) button if the AI has not already started analysing.
The AI analyses the information on the left-hand side of the window (1), and then displays a suggestion (3) as to what information it wishes to enter and in which fields, for example "Weight: "333".
-
Review the AI’s suggestion and adjust it to suit your preferences:
-
Use the tick box (5) next to each field to choose whether or not the AI should include the information in the new order.
Untick the boxes next to the fields that you do not want the AI to fill in when creating the new order.
-
In your order reception, you probably do not display all the fields that can be displayed. The AI may suggest adding information to a field that you are not displaying, in which case you will see the warning text Hidden in the order window beneath the field name (in the window Read-in order with AI).
If you do not want the AI to add information to fields that you are not displaying, you can click the Exclude hidden fields button (4) or untick the boxes next to those fields.
-
-
Once you have finished editing the proposal, click on button Update order (8).
The Read-in order with AI window closes and the AI fills in the fields on the new order in the order reception system.
If you used drag-and-drop on an email from Outlook (or via an .eml file) and the email has attachments, the attachments will automatically be added to the new order (in the group Attachments).
-
In the order reception area, click Save to create the order.
-
If you copied and pasted the email, any attachments will not be added automatically.
You can manually attach files by first saving them to your computer and then going to the Attachments group in the order reception area. Click New, browse to the file you want to attach, and click Open. The file is added to the order. Click on Save to save all changes. For more information, see Attaching files in order reception and Attachments (order reception).
We recommend that you check the setting for the tick box Include with invoice for the files in group Attachments, so that the correct files are attached to the invoice when the order is invoiced. (Select the file to view the setting for tick box Include with invoice.) For more information, see Attachments (order reception).
Information extracted
Opter and the AI extract the following information from the emails and files and populate the fields on the new order in the order reception system:
-
Customer, (Customer code, Customer name, Reference).
There is a well-known shortcoming here
If the email you provide to the AI has a sender address on your own company’s domain, the AI often selects the wrong customer, even if the correct customer is specified further down in the email. This happens, for example, when a colleague has forwarded the email, or when it comes from the company’s own online form. The plan is to rectify this known issue; in the meantime, please see Current email addresses above.
-
Sender's ref.
-
Receiver's ref
-
Return address
-
Recipient’s address
-
Internal message
-
Collection date and time (earliest/latest).
-
Delivery date and time (earliest/latest).
-
Delivery instructions
-
Manual price
-
Freight bill (i.e. consignment note number).
-
Goods type
-
Weight
-
Volume
-
Load metre
-
Packages (i.e. number of parcels).
Per parcel:
-
Dimensions (Length, Width, Height, Weight, Volume and Load metre).
-
Package type
-
Goods type
-
Package id
-
The AI overwrites manually entered information
If you manually enter information into one or more fields on the new order in the order reception system and thereafter provide files to the AI, the information you have entered manually will be given lower priority than any information the AI may wish to enter into those fields.
We recommend that you first upload files to the AI, and once the AI has finished, you can adjust its suggestions and, for example, add information to the order manually.
Clear
-
If you wish to delete all the information in window Read-in order with AI, click the Clear button (6) at the bottom of the window.
-
If, for example, you accidentally gave the AI the wrong file, you can clear the fields in the order reception by:
-
Click on
(New). -
Answer No to the question Do you want to save the changes before continuing?
-
Cancel
As the feature currently stands, there is no button to cancel the AI’s analysis task. If the analysis takes too long, you can close window Read-in order with AI or close the order reception window to cancel the AI’s analysis task.
AI can learn
The AI’s learning capability is currently under development and is not yet of any use to the user, but the plan for how it will work is described below.
To begin with, the AI fills in the fields on the new order in the order reception system in accordance with the Opter standard. If you usually enter certain information in fields other than those specified by the Opter standard, the AI will be able to learn which information belongs in which field.
To help the AI learn, follow these steps:
-
Create new orders using AI by following the instructions above.
-
Every time the AI has filled in the fields on a new order in the order reception system, you move the information from the wrong field to the correct one (from your perspective).
If there is a field that you want to be empty, simply clear that field.
-
Save the order.
If you are consistent, the AI will learn which fields you want to fill in with which information, and which fields should be left blank.
In order for the AI to learn, it is therefore important that you adjust the AI’s suggestions before you save the order.
The AI needs to process a number of orders before it can identify a pattern in the changes you make, and thus learn which information you want in which fields. If you are consistent when moving information from the wrong field to the right one (from your perspective), you will help the AI to learn as quickly as possible.
Bear the following in mind
-
The AI creates one new order at a time, from one or more files that you provide to the AI. There is no limit on the number of files you can provide to the AI, so you can, for example, give it an email, two images and a PDF file. However, if you provide the AI with a large number of files or large files, the analysis will take longer.
-
You can copy and paste emails into window Read-in order with AI, but you cannot paste emails directly onto the AI button.
-
If you want to provide the AI with more than one file:
-
In the Read-in order with AI window, you can provide the AI with several files, for example by dragging and dropping one file at a time, or by selecting several files and dragging and dropping them all at once.
-
With the AI button, you can only drag and drop once per new order. However, you can select several files and drag and drop them at the same time.
-
-
In your order reception, you probably do not display all the fields that can be displayed. If the AI finds information that would be suitable for a field that you are not displaying, the following happens:
-
If you have dragged and dropped files directly onto the AI button, the AI will ignore that information.
-
If you use the Read-in order with AI window, a warning message, Hidden in the order window, appears below the field name in the window Read-in order with AI.
-
-
The files you provide to the AI are automatically added as attachments to the new order (in the group Attachments).
If you used drag-and-drop on an email from Outlook (or via an .eml file) and the email has attachments, the attachments will automatically be added to the new order (in the group Attachments).
We recommend that you check the setting for the tick box Include with invoice for the files in group Attachments, so that the correct files are attached to the invoice when the order is invoiced. (Select the file to view the setting for tick box Include with invoice.) For more information, see Attachments (order reception).
-
The AI chooses the wrong customer
If the email you provide to the AI has a sender address on your own company’s domain, the AI often selects the wrong customer, even if the correct customer is specified further down in the email. This happens, for example, when a colleague has forwarded the email, or when it comes from the company’s own online form. The plan is to rectify this known shortcoming, and until then, see Current email addresses above.
-
The AI selects the wrong country
In versions 2026.01.518 – 2026.01.537, the AI cannot recognise that an address may be in a country other than Sweden. For example, if the recipient’s address is in Germany, the AI enters the German address in the correct field on the order, but fails to select Country: Germany. It always turns out to be Country: Sweden. The issue has been resolved; the correct country is selected from version 2026.01.538 onwards and in version 2026.06.00.
-
New Outlook
If you are using new Outlook and Opter in any version prior to 2026.06.146 and 2026.07.202 so it is not possible to drag and drop emails directly into the window Read-in order with AI or directly onto the AI button.
Update Opter to version 2026.06.146 or 2026.07.202 or later, or do the following:
First, save the email as an .eml file on your computer; you can then drag and drop the .eml file into the Read-in order with AI window or directly onto the AI button. If the email contains attachments, these will be automatically added to the new order.
Troubleshooting
-
If the AI button is not displayed, click
(New) in the menu in the order reception area.If the AI button still does not appear, check that you are using Opter in New Design. You can choose this when you log in. For more information, see New design.
If the AI button still does not appear, see Conditions above.
-
If you want to troubleshoot, the Read-in order with AI window is useful, as it shows you what information the AI has received and what information it wants to fill in, and in which fields.

