Read-in order with AI (window)
Last updated: 17 August 2026
 Order > Order reception > menu tab Start > button AI
In this article
Applies from Opter versions 2026.06.00 and 2026.01.518 onwards.
The feature is still under development. For more information, see Create a new order using AI.
In the Read-in order with AI window, you can let the AI create new orders from:
-
Emails.
-
Free text.
-
PDF files (e.g. consignment notes in PDF format).
-
MSG, EML and TXT files.
-
Images in PNG and JPG file formats. For example, you can take a picture (a photo) of a freight bill or parcel label and let the AI create an order.
The AI therefore creates one new order at a time, from one or more files that you provide to the AI. There is no limit to the number of files you can provide to the AI, so you can, for example, give it an email, two images and a PDF file.
The Read-in order with AI window opens when you click the AI button in the order reception area. The AI button appears once you have clicked  (New) in the order reception menu, provided that the AI add-on service is enabled in your Opter. For more information, see Create a new order using AI.
If you want to work more quickly, you can drag and drop files directly onto the AI button. For more information, see Create a new order using AI.
The image below shows what the window Read-in order with AI might look like after dragging and dropping an email into the left-hand section (1) of the window Read-in order with AI; the AI has analysed the information and is displaying a suggestion (3) as to which details it wishes to populate and in which fields on the new order.
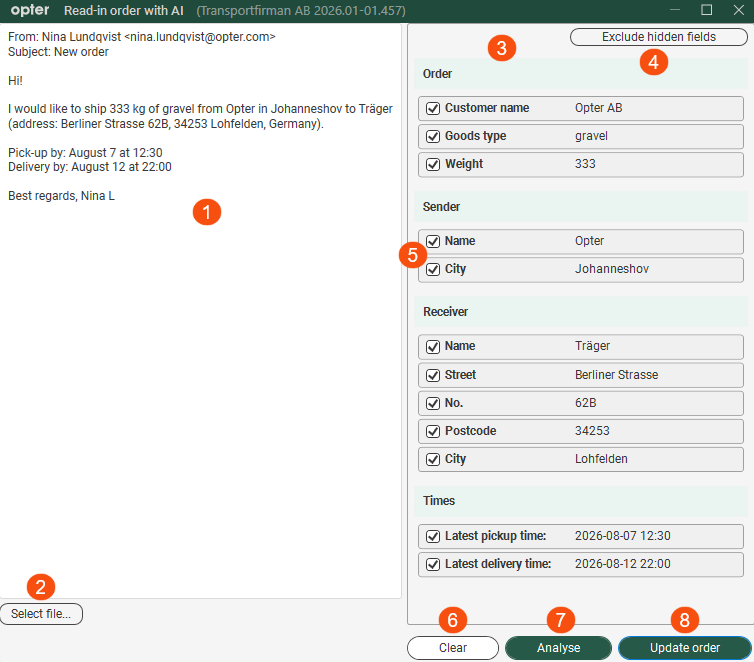
Window components and buttons
|
Function |
Description |
|---|---|
|
The left-hand side of the window (1) |
Here, you can upload files, email messages and/or enter details about the new order to be created. For more information, see Create a new order using AI. |
|
Select file (2) |
Click the Select file button if you want to provide the AI with one or more files that you have on your computer. You can provide the AI with files in the following formats: EML, MSG, PDF, TXT, JPG and PNG. |
|
The right-hand side of the window (3) |
Here, the AI displays its suggestion, and you can review and edit it (by unchecking the boxes next to the fields where you do not want the AI to add information). |
|
Exclude hidden fields (4) |
In your order reception, you probably do not display all the fields that can be displayed. The AI may suggest adding information to a field that you are not displaying, in which case you will see the warning text Hidden in the order window beneath the field’s name in the window Read-in order with AI. If you do not want the AI to add information to fields that you are not displaying, you can click the Exclude hidden fields button (4) or untick the tick boxes next to those fields (5). |
|
The tick boxes (5) |
Each field has a tick box. If you do not want the AI to add the information to the field on the new order, simply untick the box for that field. |
|
Clear (6) |
If you wish to delete all the information in window Read-in order with AI, click the button Clear. |
|
Analyse (7) |
For example, if you drag and drop an email into the window, the AI will start analysing it straight away. For example, if you’re typing text in the window, click the Analyse button when you’re finished. The AI then begins to analyse the information. |
|
Update order (8) |
Once you have finished editing the AI’s suggestions, click the button Update order. The Read-in order with AI window will then close and the AI will fill in the fields on the new order in the order reception system. If you are happy with the order, press Save in the order reception screen; this will create the new order. |

