Auto dispatch
Last updated: 12 October 2026
In this article
Auto dispatch means that an order is split into several shipments based on routes. Auto dispatch can be carried out manually in order reception and dispatch, or automatically through a setting on the service.
For auto dispatch, the pickup and delivery times on the routes are entered as the latest pickup and delivery times on the order.
When an order is matched with a route, you can assign a resource and the status Assigned to the shipments. Hence the term ‘auto dispatch’. The shipments that are created are allocated automatically.
Enabling the auto dispatch function
To use auto dispatch, switch on the function for the services. Orders with those services can then be auto dispatched manually or automatically. Proceed as follows:
-
Click on Economy > Price lists > Services and select a service from the list on the left.
-
Go to the Dispatch tab and select Allow automatic dispatching under Auto dispatch. Stops at intermediate terminals on the route can also be skipped by selecting Allow direct connections (one leg). This means that the times from the matching distribution route are entered as the last pickup and delivery times on the order, but the transport can go directly from sender to receiver without stopping at the terminal.
Automatic auto dispatch
Select Allow automatic dispatching on the Dispatch tab for the service. Auto dispatch takes place when an order with that service is created, and when one of the following is changed on the order:
-
sender
-
receiver
-
customer
-
service
-
order date
-
options.
If copied orders are to be auto dispatched automatically, select Perform auto dispatch after copying order in the order settings (Settings tab).
Manual auto dispatching in order reception
Click on Auto dispatch under Shipments and save the order. To cancel an auto dispatch, click on Single shipment, save the order and it will be reset to consist of only one shipment. The new shipments that are created will be assigned new trails based on the new addresses.
If the service allows direct transport, the order will perhaps not be split into several shipments, but the times from the distribution route that is used are added to the order.
If an attempt is made to auto dispatch an order with a service for which the function is not enabled, no error message is displayed. If nothing happens when clicking on Auto dispatch, check whether the function is enabled for the service selected on the order (see above).
Manual Auto dispatch in the dispatch centre
When Auto dispatching in the dispatch system, the system uses today's date to select the new routes. Only shipments that have not yet started can be assigned new routes. Orders that have been started, i.e. orders with a status after Created, will not receive new routes and times.
In the Routes panel, you can see how many shipments there are on the various routes.
Auto dispatching
Select the shipments you want to allocate and click on the menu tab Other > Auto dispatch. If you want to cancel the Auto dispatch, click on Other > Single shipment and the orders will be reset to one shipment only.
If you use auto dispatching in this way, any trails on the shipments will not be updated to reflect the new addresses.
Split by terminal and use auto dispatching
Right-click on one or more orders, select Split and then which Terminal the transport should go through. The Split shipment window opens. Select Auto dispatch order after split at the bottom left and click on Ok. The new shipments that are created will be allocated resources and status based on the routes, as well as new trails based on the new addresses.
You can undo the auto dispatch by selecting the orders again and clicking Other > Single shipment, or by opening individual orders in the order reception and selecting Single shipment there.
Allow the route to assign resources and status to shipments
If you have drivers, vehicles and subcontractors who always operate on the same route, you can link those resources to that route. The resource is then allocated to the shipment created when an order is matched with the route. You can then assign a status to that shipment, for example Assigned. In this way, the shipments are automatically allocated to the resources when the order is matched with the route. That is what is known as ‘auto dispatch’.
You set the resources and status on the General tab in the route register.
Limiting the selection of routes based on order options
The order options can be allowed to control which routes can be used for auto dispatching. Proceed as follows:
-
Click on Order > Routes and select a route from the list on the left.
-
Go to the Options tab and select Only combine with selected options.
-
Specify which options the routes should be able to handle by adding them to the Included list.
The Excluded list contains the options available in the system and which the route cannot handle. The Included list contains the options the route can handle. To move the options from one list to the other one, double-click on them. In the text fields above the lists,it is possible to search for the names of the options.
If there are many options, you can select all of them and drag and drop into the Included list. Then exclude the options that the route should not be able to handle.
-
Click on Save to save all changes.
-
Repeat steps 2–5 for each route where the options on the route and the order must match to enable the order to be auto dispatched on that route. When an order with options is auto dispatched, it is only matched with routes where those options are included in the Included list, and routes for which Only combine with selected options is deselected.
Limitations and special cases
-
Routes with Only combine with selected options selected, but no options in the Included list, are not used for the auto dispatching of orders with options.
-
Routes with all options added to the Included list are not affected by this feature –until new options are created. When new options are created, they are added to the Excluded list.
-
If an order has no options at all, all the routes can be used for that order, regardless of whether or not this function is enabled. This function only applies to orders with at least one option.
-
All options on an order must be in the Included list for the order to be auto dispatched on that route.
-
Routes with the Only combine with selected options checkbox deselected are not affected by this feature.
Example
If dangerous goods should not take a certain route, define the route as follows:
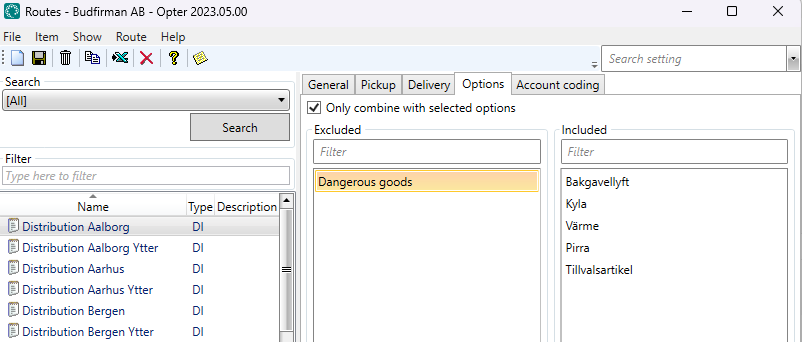
If dangerous goods must take a specific route, exclude that option on all routes except the route that is to be used.

