Invoice export to Visma Business NXT (API)
Last updated: 16 September 2026
In this article
Applies from Opter version 2026.06.00 onwards.
Opter integrates with several different Visma systems, each of which has different functions. Check which system you are using:
-
Visma.net, see Exporting sales ledgers to Visma.net.
-
Visma e-conomic, see Exporting invoices to Visma e-conomic and Supplier bill export to Visma e-conomic.
-
Spiris, see Accounting data export to Spiris (formerly eEkonomi).
-
Visma Business NXT, see Invoice export to Visma Business NXT (API) and Settlement export to Visma Business NXT (API).
You can connect (integrate) Opter with Visma Business NXT. You can then do the following:
-
Export invoices from Opter to Visma Business NXT. For instructions, see below.
-
Export supplier bills from Opter to Visma Business NXT. For more information, see Settlement export to Visma Business NXT (API).
The export can be further customised to suit your needs by adding a transform. In that case, please contact the EDI team at .
(missing or bad snippet) Please contact the EDI team at .
Further information about Visma Business NXT is available at businessnxt.se (in Swedish) and vismasoftware.no/erp/business-nxt (in Norwegian).
Data sent from Opter to Visma Business NXT
When you export invoices from Opter to Visma Business NXT, the following happens:
-
The invoices are exported:
-
The information in the invoice header, i.e. the invoice number, invoice date, due date, payment terms, total invoice amount and so on.
-
The invoice’s summary account coding (i.e. amount, currency, VAT rate, accounting account, economic unit, department, etc.).
-
The exchange rate is included by default if you do not use a transform. If you use a transform, the exchange rate will be sent along if the transform specifies that it should be included.
-
-
Customer information is exported and updated in Visma Business NXT.
During Register > Customers, information is retrieved from the following fields:
-
On the General: Name, Sales ledger number tab (corresponds to ‘customer number’ (‘customerNo”) in Visma Business NXT), Corporate ID number, Phone, Phone 2, Email address.
-
On the Details tab: VAT registration number.
-
On the Invoice information tab: Reference, Currency and the billing address (under Information).
-
On the tab Account coding: Account coding rules for trade receivables.
The integration handles database updates on the assumption that everything in Opter is correct. If the information exported from Opter does not match the information in Visma Business NXT, the integration will, by default, either update the information in Visma Business NXT automatically or display an error message. If you do not want customer information in Visma Business NXT to be updated automatically, you can configure this in Step 2 below.
-
-
If you wish, the Opter invoice with all the details can be attached as a PDF file. (You can configure this in Step 2 below.)
Conditions
Company ID with Visma
To configure invoice export (and settlement export), you will need to know your company ID (and, if applicable, your department ID) with Visma. Please contact Visma Business NXT support if you need help.
Invoice number and invoice number series
Visma Business NXT accepts invoice numbers from Opter. We recommend that you ensure that the numbers on invoices created in Opter do not clash with the numbers on any invoices created directly in Visma Business NXT. You can resolve this by using different invoice number series in Opter and Visma Business NXT.
Currencies and exchange rates
Visma Business NXT and Opter use the same currency codes. Ensure that the currencies used on invoices and supplier bills in Opter are also available in Visma Business NXT.
In Opter, you can click on Register > Customers and then on the Invoice information tab to check that customers have the correct Currency.
Currencies and exchange rates are sent to Visma Business NXT during invoice export and settlement export. If a currency is missing in Visma Business NXT, the following error message is displayed The currency {0} does not exist in Visma NXT.
We recommend that you ensure you always have up-to-date exchange rates in Opter. Click on Economy > Currencies, and the Currency rates tab. For more information, see Currencies (window) and Currencies.
If you use a transform, the exchange rate will be sent along if the transform specifies that it should be included.
The customer’s VAT registration number
We recommend that you check that all customers have a VAT registration number in Opter by clicking on Register > Customers and the tab Details.
Account numbers and VAT rates
Account numbers and VAT rates are sent to Visma Business NXT when invoices and settlement data are exported. The accounts and VAT rates covered by Opter’s account coding must be available in Visma Business NXT for the export to take place.
For more information, see Account coding, overview, Registering VAT rates and VAT rates (window).
Regions
Please check that the tick box Use order region for account coding (both invoicing and supplier billing) is set as you wish. You’ll find it on the Economy tab in the Office settings. For more information, see Account coding by region.
Economic units and departments
Ensure that the economic units and underlying departments that exist in Opter are also present in Visma Business NXT. Please also ensure that the various departments are assigned to the correct economic unit in Opter and Visma Business NXT.
In Opter, all the economic units are available under Settings > Offices, on the Economy tab. If the economic units used in Opter are not available in Visma Business NXT, the following error message will be displayed The organisational unit {0} does not exist in Visma NXT.
In Opter, you can view the codes (values) for the various departments within an economic unit by clicking Economy > Economic units and selecting the economic unit. If the codes (values) used for the various departments within an economic unit in Opter are not present in Visma Business NXT, the integration will attempt to create them in Visma Business NXT.
Customers and customer numbers
Customers who are in Opter must also be in Visma Business NXT. If the customer on the invoice is not listed in Visma Business NXT, the customer is automatically created in Visma Business NXT. (However, you can configure the system so that the customer is not created automatically; see Step 2 below.)
The integration also checks whether customer information needs to be updated in Visma Business NXT. If it needs updating, this happens automatically. (However, you can configure the system so that customer information is not updated automatically; see Step 2 below.)
Please check that all customers in Opter have a customer number in field Sales ledger number on the General tab in the customer register. When invoices are exported, the customer number is sent to Visma Business NXT. If there is no sales ledger number in Opter, you will receive error message There is no customer number for {0}. during export.
Step 1: Create integration users and assign permissions
To use the integration, you need to create an Opter integration user in your Visma system and assign the appropriate permissions:
-
Username: “isv_Opter_NXT”.
-
Set the read and write permissions for invoice exports and settlement exports exactly as shown in the table below.
"Y" means "Yes" (Yes, that is, you grant the integration user the permission). Invoices and supplier bills are exported as "vouchers". When you export one or more invoices/supplier bills, all of them are added "vouchers" in a "batch".
If you need help, please contact Visma Business NXT support.
 Display the table setting out the rights
Grant the integration user read and write permissions as shown in the table below. If you are only setting up invoice export, you do not need to assign the permissions that apply only to settlement export (e.g. associate (supplierNo) - Read).
| Permission (right) | Type (reading/writing) | Invoice (invoice export) | Supplier bills (settlement export) | Purpose (purpose) |
|---|---|---|---|---|
|
availableCompanies |
Read |
Y |
Y |
This enables the integration to check whether the company ID is valid in Visma Business NXT. This check takes place every time you or a colleague initiates an invoice export or a settlement export. Enter the company ID into Opter in the Office code field in the Invoice export window (in Step 2 below). For settlement exports, the company ID is entered into Opter in field External code in window Supplier bill export; see Settlement export to Visma Business NXT (API). |
|
generalLedgerAccount |
Read |
Y |
Y |
This is so that the integration can check the general ledger and which accounts are available in Visma Business NXT. |
|
companyInformation |
Read |
Y |
Y |
To enable the integration to check which economic units (1–12) are present in Visma Business NXT. |
|
orgUnit1-12 |
Read |
Y |
Y |
To enable the integration to check which departments fall under the various economic units in Visma Business NXT. |
|
currency |
Read |
Y |
Y |
This enables the integration to check whether the currencies on the invoices or supplier bills are present in Visma Business NXT. |
|
batch |
Read |
Y |
Y |
This allows the integration to check whether the batch (containing invoices or supplier bills) has already been exported to Visma Business NXT. |
|
voucher |
Read |
Y |
Y |
In order for the integration to be able to check whether a "voucher" because the invoice or supplier bill has already been exported to Visma Business NXT. If an invoice or supplier bill has already been exported, it should not be exported again. |
|
associate (customerNo) |
Read |
Y |
- |
This allows the integration to check whether the customer named on the invoice is listed in Visma Business NXT. Applies only to invoice exports. |
|
associate (supplierNo) |
Read |
- |
Y |
This enables the integration to check whether the supplier or subcontractor listed on the supplier bill is in Visma Business NXT. Applies only to settlement exports. |
|
batch_create |
Write |
Y |
Y |
In order for the integration to be able to create a new batch (with "vouchers" (for invoices or supplier bills). |
|
voucher_create |
Write |
Y |
Y |
For the integration to be able to add "vouchers" (for invoices or supplier bills) in an existing batch. |
|
batch_delete |
Write |
Y |
Y |
To enable the integration to delete a batch of invoices or supplier bills, should something go wrong. |
|
orgUnit1-12_create |
Write |
Y |
Y |
To enable the integration to create missing economic units in Visma Business NXT. |
|
voucher_processings -> addNewDocument |
Write |
Y To allow you to choose whether or not to include the Opter invoice in PDF format in the export, use the tick box Include PDF-copy (in Step 2 below). |
Y You can use the tick box Include PDF copy to choose whether or not to include the graphical supplier bill with all the details from Opter in the export. (For more information, see Settlement export to Visma Business NXT (API). |
To enable PDF files to be attached to the export. |
|
associate_create (customer) |
Write |
Y To ensure that missing customers can be created in Visma Business NXT during the invoice export. (If you do not want missing customers to be created automatically, use the Start text field in Step 2 below.) |
- |
To enable the integration to create missing customers in Visma Business NXT. Applies only to invoice exports. |
|
associate_update (customer) |
Write |
Y To ensure that customer information is updated in Visma Business NXT when invoices are exported. (If you do not want the customer information to be updated automatically, use the Start text field in Step 2 below.) |
- |
To enable the integration to update customer information in Visma Business NXT. Applies only to invoice exports. |
|
associate_create (supplier) |
Write |
- |
Y To enable missing suppliers and subcontractors to be created in Visma Business NXT during the export of settlement data. (If you do not want missing suppliers and subcontractors to be created automatically, use the Extra settings field in the Supplier bill export window.) For more information, see Settlement export to Visma Business NXT (API)).) |
In order for the integration to create missing suppliers and subcontractors in Visma Business NXT. Applies only to settlement exports. |
|
associate_update (supplier) |
Write |
- |
Y To ensure that information about suppliers and subcontractors can be updated in Visma Business NXT during the settlement export. (If you do not want the information about suppliers and subcontractors to be updated automatically, use the Extra settings field in the Supplier bill export window.) For more information, see Settlement export to Visma Business NXT (API)). |
To enable the integration to update the information on suppliers and subcontractors in Visma Business NXT. Applies only to settlement exports. |
Step 2: Create an invoice export for Visma Business NXT in Opter
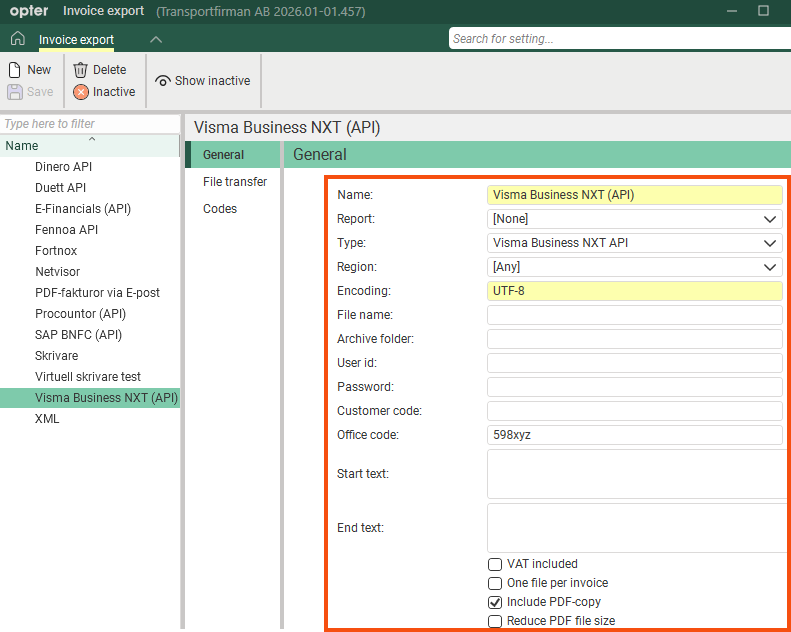
-
Click Economy > Invoices > Invoice export and create a new invoice export by clicking New. The following fields must be filled in on the General tab:
-
Name: For example, “Visma Business NXT (API)” or “Visma Business NXT (API) + transform” (if you’re also using a transform).
-
Report: None.
-
Type: Visma Business NXT API.
-
Region: If the invoice export is to apply to all regions, select [Any].
If you want the invoice export to apply only to a specific region, select the region here.
-
Encoding: Enter “UTF-8” if you do not use a transform.
If you are using a transform, specify the transform’s encoding here.
-
Office code: Your company ID with Visma. Please use the following format:
<Company ID>-<Department ID>, for example “12345” (Company ID only) or “12345-1” (Company ID and Department ID).
-
User id: Leave this field blank.
-
Password: Leave this field blank.
-
Start text (optional): In this field, you can enter additional settings if you wish to customise the export, provided you do not use a transform.
If you do not enter anything in the Start text field, the default settings will apply, namely:
-
If the customer named on the invoice (which is being exported) does not exist in Visma Business NXT, the customer is automatically created in Visma Business NXT.
-
If the details of the customer listed on the invoice (which is being exported) have changed in Opter since the customer was last included in an invoice export, the customer details are automatically updated in Visma Business NXT.
Further information about the field Start text
Use the format "parameter=value" and write one parameter per line, as in the example below.
Parameter
Description
CreateCustomers= <true/false>
Select whether or not the customer should be created automatically in Visma Business NXT:
-
”True” (default): If the customer named on the invoice (which is being exported) does not exist in Visma Business NXT, the customer is automatically created in Visma Business NXT.
-
“False”: If the customer named on the invoice is not in Visma Business NXT, you will receive an error message when you export the invoice. The error message is The customer {0}, with customer number {1}, does not exist in Visma NXT.
The customer is therefore not created automatically in Visma Business NXT, but you can create the customer manually in Visma Business NXT and then export the invoice again.
UpdateCustomers= <true/false>
Select whether or not customer information should be updated automatically in Visma Business NXT:
-
”True” (default): If the details of the customer named on the invoice (which is being exported) have changed in Opter since the customer was last included in an export, the customer details will be updated automatically in Visma Business NXT.
-
“False”: Opter does not update customer information in Visma Business NXT.
If you choose this option, we recommend that you manually keep the customer records in Opter and Visma Business NXT up to date, so that they always contain the same information.
If you are using a transform, the Start text field is not used, as the transform dictates what is sent. (In the transformer, you can disable the export and updating of customer information if you wish).
-
-
Include PDF-copy (optional): Tick the box if you would like the Opter invoice to be attached in PDF format.
Visma Business NXT does not support the inclusion of all the details one might wish to include on a transport invoice, such as distance, weight, consignment note number and so on. The graphical invoice, containing all the details, is therefore created in Opter and sent to Visma Business NXT as a PDF file, provided you have ticked the box Include PDF-copy.
You can also tick the box Reduce PDF file size. (The file size is reduced by removing all text formatting (bold, italics, underlining) and by changing the font to Trebuchet MS, which takes up less storage space.) The extent to which the file size is reduced therefore depends, amongst other things, on how much formatting it contains.)
If you are using a transform:
-
The Opter invoice in PDF format cannot be attached.
-
The setting for tick box Include PDF-copy is ignored.
-
-
-
Click on Save to save all changes.
-
Click on the Codes tab. Select Tax rates from the drop-down list and match the VAT codes in Opter with those in Visma Business NXT.
The Name column shows the VAT codes available in Opter. Enter the name of the corresponding VAT code in Visma Business NXT in the column Code.
-
Click on Save to save all changes.
Step 3: Add the invoice export to an invoice export group
To create a new invoice export setting (i.e. a group of exports) or to check whether there is already an invoice export setting (group) to which you wish to add the invoice export to Visma Business NXT, do the following:
-
Click on Economy > Invoices > Invoice export settings.
-
Check the list on the left to see if there is already an invoice export setting (group) to which you wish to add the export to Visma Business NXT. Click on the invoice export setting and tick the box for ‘Visma Business NXT (API)’ (or the name you gave the invoice export) under Exports.
If there is no invoice export setting (group) where you want to add the export to Visma Business NXT, create a new one. Click on
 and give the invoice export setting a name, for example “Visma Business NXT (API)”. Tick the box for ‘Visma Business NXT (API)’ (or the name you gave the invoice export) under Exports.
 -
Click on Save to save all changes.
-
Choose which invoice export setting should be the default. To select Visma Business NXT (API) as the default, tick “Visma Business NXT (API)” in the list on the left and click
 .
. -
To ensure that all invoices are posted in Visma Business NXT, select the “Visma Business NXT (API)” export option for all export settings (groups).
-
Click on Save to save all changes.
-
To set which invoice export setting (group) applies to a particular customer, click on Register > Customers and search for the customer for which the setting is to be made. Click on the Invoice information tab and select invoice export setting (group) in the Invoice export setting drop-down list. Click on Save to save all changes.
Step 4: Export the invoices to Visma Business NXT
The invoice information can be exported from Opter when closing an invoice period, or subsequently when choosing whether to export entire invoice periods or individual invoices.
Proceed as follows:
-
In Opter, click on Economy > Invoices > Invoices.
-
Select the invoice or invoice period you want to export, right-click and select Export.
-
Click Export and send to export the invoice or invoice period to Visma Business NXT.
The number of invoices to be exported and the number of invoices exported are displayed, as well as a progress bar (at the bottom of the window), are shown in the Invoice export window in Opter. When the invoice export has been completed, the entire progress bar is green.
If the invoice export fails, the progress bar turns grey and there is a statement indicating that the export failed. If the export failed, an error message will be displayed; see Error messages below.
Troubleshooting
If the export failed, an error message will be displayed. The error messages and suggested remedial actions are listed in the table below.
Once you have rectified the problem/error, you can export the invoices again. If an invoice already exists in Visma Business NXT, Opter will not export that invoice to Visma Business NXT (again), but will move on to the next invoice in the export. No duplicates are created in Visma Business NXT.
Error messages
If the export to Visma Business NXT does not work, an error message will be displayed. Error messages only appear if something goes wrong during export. Error messages are displayed in a popup window, and are not saved anywhere.
| Error message |
Description |
|---|---|
|
Error making API call to Visma NXT |
This may be due to one of the following:
Contact the Opter support team. |
|
The user details were not accepted by Visma NXT. |
Please check that the user details you entered in Step 2 above are correct:
If you spot any mistakes, correct them and save. You can then try starting the export again. If you receive the same error message again, check that the user “isv_Opter_NXT" is set up in Visma Business NXT and has the necessary permissions. See Step 1 above. |
|
No access to the company {0} |
Please check that the information in field Office code is correct; see Step 2 above. If you spot any mistakes, correct them and save. You can then try starting the export again. If you receive the same error message again, please contact Visma Business NXT support to obtain the correct company ID (and, if applicable, department ID). |
|
Error loading invoice |
Opter is unable to retrieve the invoice details from the database. Contact the Opter support team. |
|
Could not create voucher for invoice {0}: {1} |
If Opter is unable to create a voucher (a "voucher") for the invoice, the information on the invoice cannot be exported. You can view the invoice in Opter. If you spot any mistakes, correct them and save. You can then try starting the export again. If you need help, please contact Opter Support. |
|
Error when uploading PDF file to Visma NXT: {0} |
This error message is a warning, but it does not prevent the invoice from being created in Visma Business NXT. The PDF file containing the Opter invoice could not be attached to the invoice in Visma Business NXT. This may be due to one of the following:
You can manually add the PDF file (the Opter invoice) to the invoice in Visma Business NXT. If you do not want the Opter invoice to be included in the export, untick the tick box Include PDF-copy; see Step 2 above. |
|
Account does not exist in Visma NXT: {0}. Check which accounts are available in Visma NXT. |
Ensure that the accounting account numbers covered by Opter’s account coding are also available in Visma Business NXT. Troubleshooting tips: A simple accounts receivable report shows the accounts for the period, along with the associated VAT rates/types and cost centres. Proceed as follows: Click Economy > Sales ledger, select Verifications, select the invoice period to be exported, and click Export. Check the result. You can then try exporting the invoice again. |
|
Incorrectly entered account number: {0}. Check the accounts available in Visma NXT. |
Ensure that the accounting account numbers covered by Opter’s account coding are also present in Visma Business NXT. You can then try exporting the invoice again. |
|
The currency {0} does not exist in Visma NXT. |
You can add the currency in Visma Business NXT and then try exporting the invoice again. For more information, see Currencies and exchange rates above. |
|
The customer {0}, with customer number {1}, does not exist in Visma NXT. |
You have set CreateCustomers=false in the Start text field (in Step 2 above). You can do one of the following:
For more information, see Customers and customer numbers above. |
|
Could not create the customer {0} |
The customer is missing from Visma Business NXT. The integration tried to create the customer, but it didn’t work. You can create the customer manually in Visma Business NXT and then try exporting the invoice again. For more information, see Customers and customer numbers above. |
|
Error updating customer {0} with customer number {1}. |
Something went wrong when the integration attempted to update customer information in Visma Business NXT. By default, if the details of the customer named on the invoice (which is being exported) have changed in Opter since the customer was last included in an export, the customer details are automatically updated in Visma Business NXT. You can do one of the following:
For more information, see Customers and customer numbers above. |
|
There is no customer number for {0}. |
When invoices are exported, the customer number is sent to Visma Business NXT. For more information, see Customers and customer numbers above. In Opter, ensure that the customer has a customer number in field Sales ledger number on the General tab in the customer register. You can then try exporting the invoice again. |
|
The organisational unit {0} does not exist in Visma NXT |
The economic units are missing in Visma Business NXT. Ensure that the economic units in Opter are also present in Visma Business NXT. For more information, see Economic units and departments above. You can then try exporting the invoice again. |
|
It was not possible create the value {0} for the organisational unit {1} in Visma NXT: {2} |
It was not possible to create the department for the economic units in Visma Business NXT. Ensure that the economic units and underlying departments that exist in Opter are also present in Visma Business NXT. Please also ensure that the various departments are assigned to the correct economic unit in Opter and Visma Business NXT. For more information, see Economic units and departments above. You can then try exporting the invoice again. |
Please bear the following in mind
-
Visma Business NXT is primarily intended for Sweden and Norway, but Visma is likely to sell it in all markets. The integration (between Opter and Visma Business NXT) has no known limitations by market.

