Invoice export for Tripletex
Last updated: 2 September 2026
In this article
Opter can be connected to the Tripletex accounting system (www.tripletex.no). Customers can be created and updated in Tripletex, and invoice account coding transferred as a basis for bookkeeping and sales ledgers through the Tripletex API.
When you export invoices to Tripletex, Opter sends one invoice line item per combination of account and economic unit. The invoices are imported into Tripletex via its API, and the following then takes place in Tripletex:
-
Accounting entries are created.
-
Customers are created if they do not already exist in Tripletex.
-
Customers listed in Tripletex are updated if the information in Opter is more recent than that in Tripletex.
Conditions
System currency
The Tripletex system currency is the Norwegian krone (NOK). If a system currency other than Norwegian kroner is used in Opter, invoices cannot be exported to Tripletex.
Account number
The account numbers used in Opter must be available in Tripletex.
Step 1: Get the user key from Tripletex
To link the systems together, you will need a user key from Tripletex. Contact Tripletex.
Step 2: Create an invoice export in Opter
Click Economy > Invoices > Invoice export and create a new invoice export by clicking New. The following fields must be filled in on the General tab:
-
Name: for example “Tripletex”.
-
Type: Tripletex API.
-
Encoding: UTF-8.
-
Password: the user key received from Tripletex in step 1.
It is not possible to include a PDF copy of the Opter invoice in the export to Tripletex.
Step 3: Select an export method
Depending on the information you wish to send to Tripletex, you can choose from various export methods by entering it in the field Start text. The various export methods have different limitations.
|
Text in Start text |
Description |
|---|---|
|
exportMethod=voucher |
This is the standard method for exporting invoices. If you do not specify an export method in Start text, “voucher” will be used. the due date and OCR/KID are not transferred from Opter. |
|
exportMethod=invoice preventProjectErrors=true sendToCustomer=false |
This is the most comprehensive method. We recommend using this method, unless there are specific reasons to use one of the other export methods. Using this method, you can send economic units to Tripletex (see Exporting economic units below). The ‘Project’ economic unit can only be submitted if there are one projects per invoice in Opter. If an invoice in Opter contains more than one project, it can still be exported by setting preventProjectErrors=true, but the projects on that invoice will then not be sent to Tripletex. If you use the export method “invoice”, the accounting documentation is sent from Tripletex to the customer in the form of an invoice, including the invoice number, amount and due date. However, the customer receives no information about what they are paying for. The actual invoice should be sent by Opter. We therefore strongly recommend that you set sendToCustomer=false so that the accounting documentation is not sent to the customer by Tripletex. Enter each setting on a separate line, as shown in the example below. These two additional settings apply only to this export method. |
|
exportMethod=GBAT10 |
Use this method if you need to customise the invoice export to suit your requirements using an XSLT transformation (referenced by ). The XSLT transformation is not a separate integration, but merely a supplement to the invoice export. The actual transfer to Tripletex takes place via the API. Due dates are not transferred from Opter. |
|
exportMethod=multiOrderInvoice |
Use this method if you have several projects on the invoice exported from Opter and have economic units named ‘Project’. The invoice item in Tripletex contains several lines, each with a separate project from the Opter invoice. For more information, see Exporting economic units below. Invoice numbers and payment references (OCR/KID) are not transferred from Opter. |
Exporting economic units
You can transfer up to two economic units to Tripletex using either of the export methods ‘invoice’ or ‘multiOrderInvoice’. To identify the economic units to be transferred, they must have the names “Prosjekt” and “Avdeling” in Opter.
Check and, if necessary, update the names of the economic units you wish to export:
-
Click on Settings > Offices and go to the Economy tab.
-
Under Economic unit names, enter the exact “Prosjekt” and “Avdeling” for the economic units to be exported. It doesn’t matter which of the 1–5 economic units you use.
-
Click on Save to save all changes.
-
Restart Opter for the changes to be visible on the Economy > Economic units menu.
Step 4: Translate Opter’s VAT codes (applies only to the ‘voucher’ export method)
If you use any export method other than ‘voucher’, the VAT codes are set automatically.
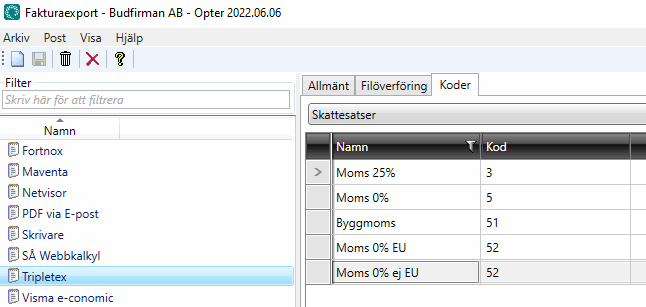
Tripletex has a fixed set of VAT codes that cannot be changed. The VAT codes in Opter must therefore be translated into the VAT codes used in Tripletex.
Go to the Codes tab and select Tax rates from the drop-down list. Then enter the VAT codes from Tripletex in the Code column for each of the VAT rates available in Opter. The Tripletex VAT codes can be found here: Tripletex MVA codes.
Click on Save to save all changes.
Step 5: Add the invoice export in the invoice export settings
Click on Economy > Invoices > Invoice export settings and select “Tripletex” (or the name you gave the invoice export) for the configurations that will generate an export to Tripletex. To make sure that all customer information is always updated, and that all the account coding is transferred, the export for all export configurations should be selected.
Click on Save to save all changes.
Step 6: Export to Tripletex
The invoice information can be exported from Opter when closing an invoice period, or subsequently when choosing whether to export entire invoice periods or individual invoices.
All VAT amounts are rounded to two decimal places in Tripletex.
Ask a deployment consultant for assistance
If you have any questions or need help getting started, contact to make an appointment with an installation expert.

