Last updated: 20.09.2023
Valid from: 2019.12.00 and later
Creating zones
Applies up to and including version 2023.07-01.238. The article is no longer updated.
Zones are sometimes used for pricing in Opter. If a price list is to have a zone-based price collection, the price list needs to have one or more service lists with price zone collections associated with it. Each price zone contains one or more geographical zones.
Whether adding zones or linking zones together, start as follows:
- Click on Economy > Price lists.
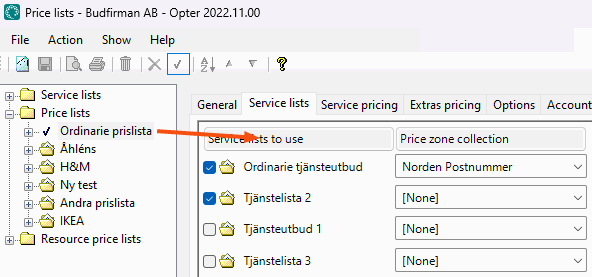
Identify the price list you want to work on and the service list in which the price list is used. This can be seen in the Price lists tab in the price list.

- Click on Economy > Price lists > Price zones.
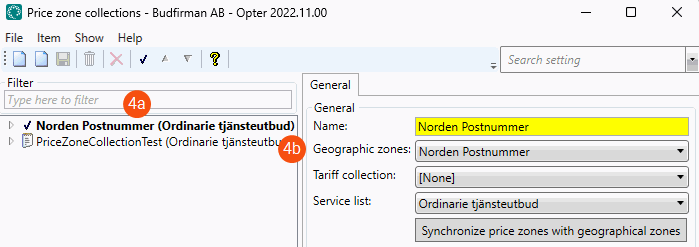
Select the price zone collection you want to work on (4a) and the collection of geographical zones to which it is linked. This can be seen in the Geographic zones drop-down list (4b).

Then continue with one of the following
How to create a geographical zone:
Click on Economy > Price lists > Geo-zones.
The geographical zones are grouped into zone collections. If there is not already a zone collection to which you want to add the new zone, you have to create a new zone collection by clicking on
 (New collection of geographic zones) in the toolbar.
- Select the zone collection in which the new geo-zone will be included.
- Click on
 (New geographic zone) to create a new geographical zone and give it a name. For more information about the settings, see Geographic zone collections (window).
 - Click on
 to save all changes.
 - Go to the Postcodes tab to specify which postcodes are to be included in the geographical zone. For more information, see Geographic zone collections (window).
- Click on
 to save all changes.
It is also possible to export a geographical zone and save it locally on your computer, edit it and then import it into Opter, instead of creating a completely new geographical zone.
How to create a price zone:
- Click on Economy > Price lists > Price zones.
- Click on
 to create a new price zone and enter a name.
 - Click on
 to save all changes.
How to add geographical zones in price zones:
Click on Economy > Price lists > Price zones and expand the collection to work on from the list on the left.
- Select the price zone in which geographical zones are to be added.
Go to the Geographic zones tab and double-click on the columns in the geo-zones in the Excluded list that you want to add. They are then added to the Included list. To remove a geographical zone from the price zone, double-click on it in the Included list to move it to Excluded.
- Click on
 to save all changes.
This is how to create new price zones automatically based on the collection of geographical zones that have been selected:
- Click on Economy > Price lists > Price zones and select the collection to be worked on.
- In the Geographic zones drop-down list, select the collection of geographical zones that is to be used as the basis for the price zones.
Click on Synchronize price zones with geographical zones.
For each geographical zone in the selected collection, Opter creates a price zone in the price zone collection and adds the geographical zone to it. The price zones that are already in the price zone collection and that do not fit any of the geographical zones are disabled.
- Click on
 to save all changes.